

‘Two families made a shared vegetable garden from their front yards. They now share the produce & the maintenance. Would you do this with your neighbour?’
From: Growveg
From: Growveg
 The play landscape in this Norfolk village was created to partly replace, as well as enhance an existing fenced play area with wooden and other equipment, which was set wide apart and surrounded by grass. This adjoins an area of the local recreation ground and a small area of woodland/hedgerow.
I was commissioned to provide design and specification plus project management advice. There was an initial budget of £50,000, funded by the Government Playbuilder programme plus contributions from local organisations.
1. Expanding the play space – using the identified budget and the Design Brief as a starting point, expand and link the existing play space so as to utilise the play opportunities offered by the nearby wood/ hedgerow, allowing for future fundraising and community self-build.
2. Enhancing Play Value – increase the number and range of play opportunities for all abilities and ages, focusing on 8-13 year olds and with some provision for toddlers.
3. Creating an attractive community space – create a welcoming, attractive space for children and adults which is coherent, provides interest through varied height and colour, creates a sense of discovery, uses existing/ donated play equipment (where possible), and landscape features to create play value and enhance the appearance of the space.
The resulting design extends the play area into a larger space (requiring the movement of a football pitch) and integrates this with retained, refurbished play equipment. Old fencing was removed and replaced with shrub planting and trees to indicate boundaries, an existing mound and new grass mounds were created to provide play features and to house a tunnel, wide slide with graded wheelchair access and aerial cableway. There is a wooden climbing feature, plus additional play equipment for toddlers and older children, including a simple wood slice spiral with spring bulbs planted to mark this, a log seating area/ social space, basket swing, spinners, and areas of longer grass. The project was substantially completed by June 2010.


If you’ve enjoyed reading this post and others on this blog, why not comment and join others by signing up for automatic updates via email (see side bar, above right ) or through an RSS feed (see top of page)?
 This is the second post in a series on projects to create playful landscapes, this one located in Mepal, near Ely, in Cambridgeshire.


Other posts of relevance:
Natural Play- ten tips for parents
Playful Landscape- Wensum Way, Fakenham, Norfolk
‘Free range’ children?- seven tips for successful garden play
If you’ve enjoyed reading this post and others on this blog, why not comment and join others by signing up for automatic updates via email (see side bar, above right ) or through an RSS feed (see top of page)?

A metal arbour with a rambling rose
Arbour used to refer to an orchard, garden or lawn, but today its use tends to be limited to a leafy glade or bower shaded by trees, vines, shrubs, etc. – especially when trained about a trellis. More precisely ‘a shady garden alcove with the sides and roof formed by trees or climbing plants trained over a framework’ (Oxford English Dictionary).This alcove may often contain a seat.
Pergola is the term given to a horizontal trellis or framework, supported on posts, that carries climbing plants and may form a covered walk, though sometimes it is also used to describe the same sort of structure as an arbour. Today pergolas are also used to provide an overhanging structure for an entertaining/ dining area such as a patio or terrace.
So why have these structures?
Provide privacy and shade
Divide up areas of the garden or/and provide an interesting route along a pathway or focal point
Provide support for plants
Provide a decorative structure

A flower-covered pergola in the Canary Islands

A painted wooden arbour

A modern metal pergola

Pergola- the Old Vicarage, East Ruston
Further information:
Great Designs for a garden party
Better Homes & Gardens examples of pergolas
58,779 garden pergola Home Design Photos
If you’ve enjoyed reading this post and others on this blog, why not comment and join others by signing up for automatic updates via email (see side bar, above right ) or through an RSS feed (see top of page)?
 In part one of this series of posts I outlined a few tips on getting your School Garden project up and running. If you’ve got the key people on board, identified what the overall aims and objectives of the project are and hopefully secured some start-up funding and promises of help, it’s time to get serious about the design of your Garden. Here are seven ideas to help you…
1. Who will be using your space and what are their needs? It’s important to think about the range of users and why they’ll want to use your garden. Yes, children, but what numbers and ages? During the school day or afterwards? Will parents or the wider community want to get involved? And just what sorts of activities will your garden need to support: growing food, outdoor play, studying nature, formal lessons (in some sort of shelter?) etc.? It’s important to list these and start to see what they suggest in terms of the overall layout of different areas, spaces, structures etc
2. Survey and appraise your site– you may have your area already defined by walls, fences, hedges etc. or perhaps you’re confined to an area of the playgrround. In any event it’s important to accurately measure out the plot. From these measurements you can create a scale drawing (say 1cm = 1 metre) and any key features that are likely to remain – e.g water taps; significant slopes; trees; hedges; types of soil (you can see if it needs improving and what the pH is by using a simple test kit); the way the site lies (in relation to sun, wind, prevailing rainfall etc.) and how the site is accessed. It’s also worth checking on the current maintenance regime and who’s responsible for this (e.g. if you’re thinking of taking over an area of sports field that is regularly mown).

A gathering place like this shelter is probably important
3. Think about basic needs:

Get some child -sized tools
4. Get the children involved (and your wider support group) – you will by now have a good idea about what could be in the garden and you need to share these ideas and discuss others with the children who’ll be using the space and those key adults (teachers, parents etc.) who will also want to feel the project is theirs. You can devise some fun ways of engaging these people, perhaps involving n a loose outline drawing of the plot and your first ideas in pictorial form (e.g photos cut out from magazines), from where children can be asked to draw/write/otherwise think about and convey their ideas and wants for their garden (I can guarantee someone will want a swimming pool!). This will generate interest and ownership of the project.

Raised beds, narrow enough to allow access to the centre without walking on the soil
5. Options for planting – depending on what you want to grow and the space you have available I guess you’ll either be planting in containers (pots, planters and all sorts of quirky planters too), open beds (which have their edges cut into the surrounding ground, often grass) or raised beds– these are edged with boards or other timber and so help to define the growing areas (especially for food crops). If the sides are about 20cms high they can be used to contain additions of manure/compost from year to year as you build up the soil’s goodness and structure. Raised beds can be to varying heights to cater for different ages of children, but ideally they need to be narrow enough to be tilled from the surrounding pathways so that feet don’t trample and compress the growing areas. Rectangular beds are probably the most efficient shape. These beds can be constructed using pressure – treated timber or alternatively there are several places where ‘ready to assemble’ kits can be purchased. If you want to avoid too much digging of the soil (this can be detrimental to its structure) you can just lay a covering of organic material over the beds each year (taking note of the requirements of different groups of plant if growing food) and lightly fork this top-dressing in as you begin the growing season.

How about a plastic bottle greenhouse?
6. Go beyond basic needs– it’s important to focus on basic needs in developing your designs, but if we just stick to the functional requirements, we will miss an important opportunity to make the School Garden exciting, fun and an experience for all the senses! So, think about growing herbs and other plants which have differing fragrances, leaf textures, colours and are in other ways interesting – tall grasses that catch the sunlight and bend in the wind for example, or Stachys (‘Lambs’ Ears’), which has wonderful velvety leaves, Lavender for that midsummer heady smell! Likewise Sunflowers are a wonderful example of the power of nature as they shoot up to enormous heights and beauty starting from little seeds that the children can sow themselves. Similarly, children can get involved in producing signs for different parts of the garden, another way to make them feel that this is their garden and make it look funky too!

A simple scale model helps to convey your design
7. Consult on an outline plan – once you’ve taken all of the above into account you can firm up your plans on paper and maybe even produce a simple 3D cardboard/ scrap model of how your garden could look! Models are especially useful for getting children (and adults) to imagine just what features there are and what the layout will look like. This could go on display at the School for a week or two and you can invite people to put their views on sticky notes nearby so that everyone can see who’s saying what. Gather these up and then with your committee/support team work out those which should be incorporated into the scheme.
Sources & Further information:
‘How to grow a School Garden’ – Arden Bucklin-Spooner and Rachel Kathleen Pringle, Timber Press Books
Budding Gardeners- lots of advice and info
Food & Agriculture Organisation School Garden Planner
California School Garden Network Guide to School Gardening
If you’ve enjoyed reading this post and others on this blog, why not comment and join others by signing up for automatic updates via email (see side bar, above right ) or through an RSS feed (see top of page)?
Where trees for climbing aren’t readily available these wooden climbing structures provide a great alternative
“I prefer climbing trees than climbing frames because they are quite different and there are many ways to climb. I can climb up quite high. My mum is worried but I’m not. I’m quite good at it. I’ve never fallen off a tree because I climb in the quite safe places of trees. It’s quite thrilling being up there. My clothes get messy though.” Christina (aged 11)
So, where did you play and what were your favourite sorts of play places? I bet that some of you (most perhaps) will mention bits of wasteland, parks, on riverbanks, in other people’s derelict gardens and up trees…
It’s likely that most outdoor play happens in ‘natural’ places, but that’s not to say that this is any better than playing on play equipment or in conventional, designed playgrounds. These defined ‘children’s spaces’ make children feel they have permission to be themselves, have fun and are valued – however, they are usually adult- created places. Equally we don’t need to think that every aspect of the playground needs to be ‘manufactured’ or protected; sand or bark are as effective as rubber safety surfacing. And perhaps we don’t need to fence everything in – though this probably gives a sense of security to parents of the youngest children.

A ‘Nectar bar’ of insect- attracting plants
There is now a wealth of evidence to suggest that children benefit from being outdoors and in ‘natural’ places – especially if we want them to grow up with an understanding of the natural environment and take a responsible attitude towards it. In 2006, Playday focused on Play in the Natural Environment. Key findings were:
A ‘Giant’s Causeway’ provides a challenging ascent
So, can designed play spaces be in any way ‘natural’? There is scope for bringing together the best of ‘off the shelf’ play equipment and those which use natural materials, objects and environments – or perhaps are an artful interpretation of these.
The best play spaces are unique and valued by their community. A design -led approach which combines play features custom-built for their location, with ‘off the shelf’ play items like slides, climbing frames, swings and zip wires is a key interest of mine. I’ve included a few pictures of some of my own work in creating these ‘play landscapes’.
1. Making the most of natural features– fallen trees to climb, clumps of tough plants for building dens, slopes to roll down, small things like piles of grass clippings and places that encourage insects and other critters (e.g. the ‘nectar bar’ shown in one of the photos).

Earth sculpting
2. Land sculpting – do you live in a pretty flat landscape? Introducing some variation in the play area by sculpting the land into ditches and hills provides endless fun for children of all ages.
3. Boulders – these are becoming a feature of many play areas, but often lack the size and careful placing to make them a good play feature (as stepping-stones, or for clambering up for example). Ideally they need to be of a smooth granite for ease of climbing and to avoid dangerous sharp edges.
4. Sand – there is an ‘urban myth’ that sand pits attract cats and other animals who use it as a toilet. Though there are examples of this as an issue (and possibly also from vandals leaving cans, bottles and other rubbish in them)- the benefits of sand as a play medium usually far outweigh the possible risks, especially if they are inspected daily to remove any offending items. Sand can be used as a safety surface also though not where rubber or other matting is more practical or where children playing in the sand risk being knocked over by those using some equipment (e.g in the area at the end of a slide). And why not go one stage further and create/designate a muddy/digging area?

A notched pole climber with sand under
5. Trees– either naturally fallen or imported, dead trunks provide great climbing, sitting and ‘hang out’ areas. Some larger living trees are suitable for climbing or having rope swings attached.Planting groups of new trees is also a good idea, but these should be out-of-the-way of key play features, in areas where the temptation to uproot them is minimised! Where you can’t have natural trees, it’s possible to create tree-like structures to climb (see pics).

Long grass and hedges create places to hide
6. Hedges– mixed native species hedges are, once established, a wonderful habitat for many different insects, birds etc. and can include blackberries etc. as a fun source of food in the autumn! Don’t worry about thorns and prickles – once ‘bitten’ children, like adults, will be careful what they touch…

A woodland pond and climbing tower
7. Water– surely a no go for children’s play? Well, once more it’s easy to over react and miss what can be a wonderful play opportunity. Rather than ban any water we should think about how it can be safely included in a play landscape – from a hand pump combined with sand play/mud perhaps (see pic), or in a shallow canal or stream….
8. Grass– introduce areas where the grass is not cut as frequently so as to vary the play landscape. Children love long grass – it seems more ‘jungly’ as one youngster commented to me!

A sand and water play feature aimed at younger children
Further information: Play again film
If you’ve enjoyed reading this post and others on this blog, why not comment and also join some other people and sign up for automatic updates via email (see side bar, above right ) or through an RSS feed (see top of page)?
 An old Workhouse Yard has been turned into a showcase cottage garden of the 1930’s at Gressenhall Farm and Workhouse Museum, Norfolk.
 ‘The words ‘cottage garden’ conjure up an idyllic image involving roses round the door of a picturesque thatch cottage with towering hollyhocks and delphiniums (or something similar) either side of a brick path that leads to a picket gate. It’s all very romantic, always spring or summer – and always sunny.’ (The Enduring Gardener)
Historically, cottage gardens date from medieval times and were where labourers living in tied cottages grew a lot of their own food to bolster their poor wages. Vegetables were grown – not only to feed the family but also to perhaps to feed a household pig and a few chickens. Fruit was grown – apples and pears for example – with wild strawberries being gathered from the hedgerows. Flowering plants would have been collected from the wild and it is possible that flowers like violets, primroses, cowslips, dog rose and wild honey suckle featured in some cottage gardens.
Monasteries grew herbs for medicinal purposes and vegetables for the monks’ food. Their knowledge was much sought after and this filtered through to the poorer classes.
The 18th and 19th centuries brought many changes – the Enclosure Acts meant that wealthy landowners could remove the peasants’ right to graze animals on common land. This forced many to grow food in their gardens to feed themselves. Gradually living conditions for the poor improved – they were able to use their gardens not just to grow vegetables for food but flowers too. Gardeners exchanged ideas and plants and soon flowers and shrubs that were only ever seen in ‘the big house’ appeared in cottage gardens. The Victorian period also saw many new varieties of bright colourful annuals used as bedding plants.In the late 19th and early 20th centuries Gertrude Jekyll developed the cottage garden style on a grand scale.
The First and Second World Wars brought food shortages and so vegetables and fruit took priority over ornamental planting in every available garden space. Once food rationing finished after the 2nd WW, people could look to their gardens to provide visual interest and not just food, so flowers and shrubs were planted once more.
Today the cottage garden retains its popularity. One approach is the traditional, smaller scale artisan style – creating the garden as you go along, often dividing, collecting seed and gratefully receiving gifts of cuttings or plants from neighbours or friends. Others prefer the more designed approach, with carefully planned borders and precisely laid paths, perhaps in a larger scale setting.
The Museum’s records show that Cherry Tree Cottage and its adjacent open space were created in the 1850’s, probably to house elderly couples (‘no longer of child-bearing age’) from the main Workhouse. It seems that it may have actually housed three couples with a shared kitchen/dining room. The open space was probably just a yard used for sitting or exercise and there is no evidence of it being planted with flowers or vegetables. In 1932, the cottage housed Workhouse staff and it is during this period that possibly a garden was introduced.
The current garden was created in the 1980’s by a team of volunteer gardeners, some of whom are still volunteering today! Mary Manning created the original design to demonstrate a typical cottage garden of the 1900’s, and this was based on extensive research, including the local Women’s Institute. Their members’ memories were used in the garden to reflect the Cottage, which had been set out to resemble a 1912 interior. Later changes in the cottage were also reflected in the garden and today it aims to show how a typical 1930’s rural cottage garden would have looked and been gardened. It includes:
Flower borders – traditional cottage garden plants such as lupins, asters, rambling roses and Buddleja. The snowdrops (Galanthus plicatus) derive from bulbs brought back from the Crimean War in the 1850’s by a Captain Aldington who was from near Swaffham. His mother gave some to a friend in Warham where it is said the local rector, Charles Digby, grew them in the Church yard – they became known as the Warham Snowdrop. This variety is still available today. More recently some heritage daffodils from the 1800’s have been planted in the garden.

Cherry Tree Cottage and some of the vegetable growing area (left)
Vegetable Crops – the early vegetable plots grew a wide range of crops and some old seed varieties of pea (‘Simpsons Special’) and broad beans (‘Big Penny’) ‘were acquired from celebrity gardener Percy Thrower and a local retired gardener respectively. The museum ha some old seed catalogues from two local seed merchants – Daniels and Taylors – and these have been used to research the varieties that might have been grown in the 1930’s. Many of the varieties of fruit and vegetables that were grown in the 1930’s can be seen in the garden today. Garden Organic and The Heritage Seed Library have donated many of the seeds.
Herbs – a range of well known herbs are grown in the garden today. Herbs were used both for flavouring food and medicinal uses – for example a paste made from Comfrey leaves would be used to aid the healing of broken bones hence its common name of ‘Country Knit Joint’!
The garden also houses a chicken run, as it was common for many cottagers to keep chickens , which gave them a good supply of eggs. The chicken manure was also used as a fertiliser on the vegetable plot.
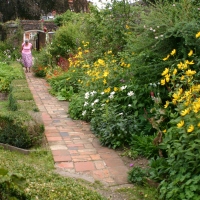
The garden paths were originally grass edged with flint. These were gradually replaced with bricks, local tiles (‘pamments’) and cinder; traditional methods used in cottage gardens. Todays paths are a mix of brick, pamments and gravel – the latter is easier to maintain and is more accessible for wheelchair users.

The Potato Clamp and Scarecrow at Cherry Tree Cottage Garden
Whilst the gardening volunteers are trying to follow gardening practices typical of the 1930’s, sometimes these have to be avoided (e.g avoiding the use of dangerous pesticides). But some interesting examples of old techniques have been demonstrated – for example the creation of a ‘Potato clamp’ which was a method for storing potatoes during the winter months before indoor storage space became more readily available.
Plantax 3: Sweet Peas- cottage garden favourite
Unique heritage gardens at Norfolk museum
Old Workhouse Garden a wildlife oasis at Norfolk Museum
answers to the two in previous post Transfer Window- 7 tips for successful seedlings –
Here are a couple of gardening ditties….
Snowdrops keep falling on my head
Theme tune from The Lone Hydrangea
(with thanks to Les Palmer)
If you’ve enjoyed reading this post and others on this blog, why not comment and also join some other people and sign up for automatic updates via email (see side bar, above right ) or through an RSS feed (see top of page)?
Nigel Boldero aka 'Old School Gardener'
| Nigel Boldero on Fighting to Reduce Climate Cha… | |
| Anonymous on Fighting to Reduce Climate Cha… | |
| Anonymous on PicPost: Carrot, my foot! | |
| 18 Surprising Hydran… on Plantax 16: Hydrangea the wate… | |
| Nigel Boldero on Poppyland: A Victorian romance… | |
| Anonymous on Poppyland: A Victorian romance… | |
| Anonymous on Plants to die for… | |
| Isabella Childress on PicPost: Forest, but not as we… | |
| Happiness Factor on Is child-friendly planning a l… | |
| zidane on Top Tip: On a Pedestal- make m… |


Nature Connectedness Research Blog by Prof. Miles Richardson
Connecting People with Nature
A daily selection of the best content published on WordPress, collected for you by humans who love to read.
Celebrating gardens, photography and a creative life
Writing, photography and more by Daniel Greenwood
Lydia Rae Bush Poetry
Australian Pub Project, Established 2013
The Journey from Finnish Rintamamiestalo to Arboretum & Gardens
Because even in chaos, there’s always gin and a good story …
RANDOM BITS & MORE TIDBITS
.....and nurturing my soul
Cultural Heritage and the Digital Economy
Sense of place, purpose, rejuvenation and joy
Notes from the Gardeners...
Connecting People to Nature, Empowering People to Live Sustainably
A girl and her garden :)


