First Lady and ‘3 sisters’ – Michelle Obama showing American children how to plant
The final post in the series ‘Growing Children’ sets out a few tips on techniques for planting and nurturing your School Garden and making the most of harvesting and cooking what you’ve produced.
Planting and nurturing
- Grow easy crops such as Broccoli, Chard, lettuce, Carrots, potatoes, Garlic, leeks, peas, beans, cucumber, tomato and herbs. Aim to grow a good amount of each crop to take account of children’s inexperience and if you have lots of plants these can be sold or grown on and the produce sold or given away.
- Aim to grow different types of crop in different areas and ‘rotate’ these each year to avoid building up pests and diseases and to ensure the soil doesn’t get drained of its nutrients.
- Save time and hassle by growing some plants from bought/donated seedlings rather than directly sowing in the garden. You could grow your own seedlings if you have a greenhouse or indoor space to develop these from newly germinated seeds. However, it might be worth buying in some seedlings from the local nursery and planting these out, once conditions are right. Plants such as Broccoli, Chard, Leeks, onions and tomatoes might be best grown from seedlings.
- For both seed sowing or planting divide your class into smaller groups and one group can sow seed while the other does something else, and then swap over. This makes it easier to explain and demonstrate the sowing process.

- When sowing directly into the ground pay attention to the seed packet directions as to time of year and temperature of the soil etc. Larger seeds such as peas, beans and squash can be sown directly by the children. Smaller seeds are more fiddly and need constant moisture to germinate (so avoid dry spells or be prepared to water). Broadcasting seeds (randomly spreading across the ground) is useful for tiny seeds though you could add some fine sand into the seed mix and use this to sow more easily in rows. Get the children to help prepare the seed bed, rule out the area for sowing/ mark a row and evenly distribute the seed. You’ll probably need to thin out the growth from broadcast seeds – children’s small hands and fingers are great for this! Look at the seed packet for guidance on final spacing of the thinned crop.
- When planting seedlings show children how to remove the plant from its pot (by gently tapping the bottom and squeezing the sides, not by pulling the stem!). Look at the roots – untangle them gently if they are bound together and place the plant gently in a prepared hole that’s larger than the plant’s roots. Gently pull soil over the roots and up to the stem, firming the soil gently around it. Check all the children’s planting to make sure they are all firmed in and water them in.
- Potatoes should be grown from disease free tubers purchased from the local nursery, and possibly ‘chitted’ on a light windowsill if they are early varieties. They can be planted in trenches (ideally dug and filled with organic matter a few weeks ahead of planting – this is usually around Easter time in the UK). Once placed in the trenches the soil is pulled over the top into a long mound (if planted in rows) – look at the information on planting depths and distances etc. that usually comes with the tubers.
Here’s a link to a video report compiled by students of Reepham High School and College, Norfolk which includes a piece about the School Garden at Cawston Primary School, focussing on their ‘plastic bottle greenhouse’- a great idea to promote recycling as well as a relatively cheap greenhouse! I’ve been supporting both Schools in their School gardening activities.

Sowing seed – especially the smallest kinds – can seem a bit fiddly even for little fingers!
Harvesting and cooking
- Harvesting crops needs careful planning. You will need to explain the different methods required for each crop (cut, dig or pick) and also talk about the importance of hygiene, as the crops are now turning into food for the plate. Think about weighing and recording the yields of different crops and so provide some records which can be used for comparison in the future.
- Some crops can be left for the children to harvest at will and possibly also eat on the spot – tomatoes, broad beans and young peas being good examples.

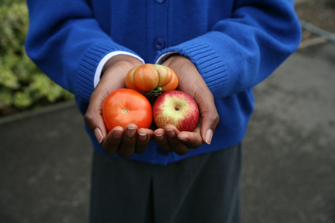
Harvesting what they’ve grown is a great thrill for children
- When cutting greens give each child a set number of leaves to cut – that way you avoid over cutting which si wasteful if you only want enough for meal and you will also avoid cutting too much and damaging the plants capacity to produce new growth.
- For root crops and potatoes the digging up is great fun – like finding buried treasure! Potatoes can be dug once the flowers or leaves have faded – a hand fork could be useful to aid the process. Demonstrate the way to carefully search for the tubers and have a bowl nearby ready for them. They (and carrots etc.) should be scrubbed clean in a bucket of water before taking away for cooking.

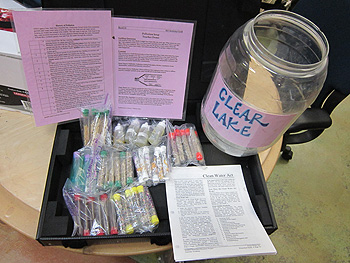
Weighing in- check on crop yields and record these for the future
- Eating straight from the garden is a powerful and memorable activity and you should if at all possible build this into your schedule.
- Always have a bowl of warm soapy water ready for the children to wash their hands, and have a couple of other buckets of clean water on hand for washing the vegetables, one for an inital scrub, the next for rinsing off. A few scrubbing brushes will be needed. and don’t forget to properly wash plates, cutlery etc. afer use.
- Educate the children on where their food left overs should be put – ideally into your compost bin along with any paper plates and cups, shredded for good measure.

- Think about simple cooking for what you harvest; either eat raw; use for salad or saute/stir fry a mixture of vegetables. Potatoes can be put into the school microwave or oven to enjoy in their jackets. use simple recipes that the children can cook themselves. perhaps after washing thinly cut some raw vegetables and have them with some home-made add ons like light oil and vinegar dressing or yoghurt-based dressing for dipping. think about creating a fire pit around which you can gather to cook and eat.
- Encourage the children to serve each other and have sufficient seating available for everyone.
- Enjoy the experience and listen to what the children say – and note it down for use later!
Here’s a video of a high profile harvesting and planting event– the White House Kitchen Garden and Michelle Obama planting the ‘Three Sisters’ with native American children
I hope that you’ve enjoyed reading this series on School Gardening and that it’s been of some use. I’d be very interested to hear of your experiences, ideas and tips, so please use the comment box or email me directly (see ‘About me’ for details).
I’ll regularly report on my own School Gardening activity in this blog, so keep an eye out for special posts or my regular ‘Dear Walter’ letters which capture my gardening year at different times.
Other posts in the series:
Growing Children 6: Top tips for managing and maintaining your School Garden
Growing Children 5: Top tips for School Garden activities
Growing Children 4: AAA rated School Garden in Seven Steps
Growing Children 3: Seven tips for creating your dream School Garden
Growing Children 2: Seven Design tips for your School Garden
Growing Children 1: School Garden start up in Seven Steps
School Gardening – reconnecting children and Nature
Source & Further information:
‘How to grow a School Garden’ – Arden Bucklin-Spooner and Rachel Kathleen Pringle, Timber Press Books
Budding Gardeners- lots of advice and info
Food & Agriculture Organisation School Garden Planner
California School Garden Network Guide to School Gardening
Garden Organic support for schools
Old School Gardener
If you’ve enjoyed reading this post and others on this blog, why not comment and join others by signing up for automatic updates via email (see side bar, above right ) or through an RSS feed (see top of page)?