Vertical gardening and planting seems to be taking off. If it isn’t home-made planters for herbs and the like then its mega green walls in public places. Here are a few of the latest examples I’ve come across.
Edible wall at Atlanta Botanical Garden
Second highest green wall- Colombia
Steel and greenery
Mixed verti gardening
A green screen to help with temperature control
All walls can be green
You can even compost vertically- here’s a design for a wormery!
I’m a bit under the weather at present. A heavy cold was preceded earlier in the week with an infection in the nerves of one of my teeth- very painful, but thankfully the antibiotics are now dealing with it. However, I can ‘look forward’ to some root canal work and a crown in a few week’s time!
The illnesses have rather put back my gardening activities this week, but I’ve still managed to make some progress. You probably saw my articles about the new alpine planter in the Courtyard; I’m really pleased with how that’s turned out and look forward to a new horticultural experience with alpines, which I haven’t grown before. Another project I’m hoping to start today is to turn an old wooden bike rack into a ‘pot plant theatre’ – this should be a fairly simple challenge and will hopefully add another nice feature to the courtyard garden- more on this next week!
The rest of the garden is really starting to kick in too- bulbs appearing in all sorts of places (including some I’d forgotten about), and the early flowering shrubs and trees- Viburnum, Forsythia, Chaenomeles, Cherry, Clematis (armandii and balearica), Currants and magnolias are all looking great. The pink magnolia in the front garden is just about coming into flower- we need a few days of the warmth of a week or two ago. And the Amelanchier is just about to give us its spring shower of white blossom- I can’t wait.
Star Magnolia underplanted with red Wallflowers- just starting to emerge
This Magnolia just needs a couple of warm days to pop
Clematis armandii
Chaenomeles
I’ve begun weeding and tidying the various borders but had hoped to be further on by now (I always seem to be saying that). Still, a few days next week should see the bulk of this done. I’ve also spent a good couple of days pressure washing the terrace, paths and copurtyard floors- this seems to get harder each year, or maybe it’s because we’ve had the warm, wet conditions over the winter that help algae to grow! A weather presenter last week reported that one frosty night (when temperatures fell to about -5 degrees C) had been not only the coldest of the spring, but also of the entire winter too!
Early Tulips in the front of house border
Primula and a box cone
The main mixed borders are really starting to fill out
Pots of early Tulips, Anenomess, Bellis, backed by dwarf Narcissus and Euphorbia myrsinites
I’ve been sowing seeds- veg and flowers- and most of these have so far been successful, though a couple of packets of perennials I bought have been disappointing, yielding only one plant each from packets of 10 or so seeds- maybe I didn’t get the conditions quite right for these. I’m now getting to the stage when I need to clear the greenhouse of the remaining tender, over-wintered plants to create space for further racking for more seed trays.
That reminds me, last week there was a minor disaster in the greenhouse, which is already jam-packed with trays and modules. Our cat decided to ‘explore’ – he jumped up onto the staging and managed to tip three trays of seeds onto the floor! I think I’ve managed to salvage many of the seedlings in two of these, but the third one hadn’t yet germinated, so I may not see anything from that given the way the compost (and seed) was turned upside down!
I’ve finished turning over the soil in the kitchen garden and started to mulch the fruit with manure. The rhubarb is looking good and we had our first crop of ‘forced’ stems last week- very sweet too. The first crops of broad beans, carrots, red cabbage, spinach, onions and garlic are all in (some sown last autumn and over wintered), so we should be getting some tender new veg in a few months. I gave the lawn its first cut a week or two back and it looks like it now needs another, so that’s a further job for the next few days- and edging this will also take some time, especially as I want to straighten out one section that isn’t quite parallel with its opposite edge.
Greenhouse starting to fill..
i’m trying out some new grasses from seed this year
Further afield I’ve continued with my support to two schools (one primary, the other a secondary). Yesterday – despite some heavy rain (or maybe because of it), the younger primary school children had great fun making ‘mud creatures’ in the grounds- a creative use of the many mole hills in what’s called the ‘Eco Park’. We also set up a greenhouse (which was bought with some of the money raised st the opening of Old School Garden last year) and pallet planting spaces (using the vertical planters I made with some of the children last year, but this time using them horizontally). The two younger classes will use these to get growing close to their classrooms – they had great fun filling these with compost yesterday, a natural follow on from getting their hands muddy making ‘mud creatures’!
Potatoes planted in the main School Garden at Cawston
Onions and Garlic coming on and weed-free!
Broad beans starting to bush up nicely
This area will focus on container growing and provide the children with an introduction to growing which they can then use to progress into the main school garden area. This is starting to look very neat and tidy and has a range of crops already underway. Yesterday the class whose responsibility is the potatoes, planted three varieties of ‘earlies’ out in the raised bed we’ve earmarked for this (covered with sheets of polycarbonate). We’ve told them about rotation too – this plot had peas and beans in it last year. Oh, and I’m pleased to say that the School has now been confirmed as achieving the highest award for ‘Learning Outside the Classroom’ -Gold, which will sit nicely alongside its top marks in the RHS Campaign for School Gardening (where it has achieved Level 5, again the highest possible).
The new growing area for younger children- new greenhouse and pallet planters
Having fun filling the planters with compost- and learnign about the stages of compost -making.
Mud land art -a great use for large mole hills!
This one looks ‘thatched’!
At the secondary school, we’ve just about managed to get the three plots (of 12m x 6m each) ready for planting- last week saw a local chap come in with his rotivator to finish off tilling the soil- though we have had to limit this in one plot as we’ve discovered what looks like an old lead water pipe! Still, I hope next week to get temporary landscape fabric paths laid and potatoes planted with each year group. The process of weeding/taking off grass has been a real challenge, not least for children with short attention spans! Still, we’re nearly there and so we can start to plan out next term’s activities to bring in a bit more variety to what they do.
It’s sad that the Master Gardener programme has been wound up in most of Norfolk, as the original funding has come to an end, but it is progressing in one or two community gardening projects and in the whole of the Breckland area, where the Council has kindly agreed to continue funding it. I’m going off to the induction day for the new Breckland Master Gardener volunteers on Sunday, hopefully to inspire rather than de-motivate!
A beauty from inside the house- Clivia
Well that’s about it for this month’s update, Walter. I was pleased to hear that you’ve taken on an allotment with Ferdy but sympathise with you on the tiring preparatory work, similar to what I’ve experienced at the secondary school! Still, it sounds like you’re nearly ready to sow and plant like us, so all the best for that. I’m sure you’ll really enjoy ‘growing your own’ alongside tending your fabulous ornamental garden at home.
Tomorrow, our young German guest, Lisa, is returning home. This will be a sad day as she’s been a delightful addition to our rather depleted household over the last few months. One can fall into stereotyping today’s youngsters as rather shallow, lacking interest in anyone but themselves and focused on ‘having fun’. Lisa has rebalanced my perspective, and we wish her every success in her university studies and chosen career in teaching.
The finished ‘WoodblocX’ planter- soon to be home to an alpine collection
You may recall that two wooden planters in the courtyard here at Old School Garden, recently ‘bit the dust’. Not using pressure treated timber when I made these a few years ago was certainly a mistake. I was wondering what to do to replace them and a few weeks ago was approached by a Scottish company called WoodblocX to do a trial of their products- they make a range of raised planters, beds and ground support systems using an interlinking set of wooden bricks (or ‘blocX’).
Having looked at their comprehensive website, I decided to go for a raised planter (1350mm long by 450mm wide and 450mm high), and I’m hoping to use this both to replace the old planters and create a new feature – an alpine bed. This should be at the right height to be viewed from the nearby metal table and chairs in the courtyard and if suitably finished off will tie in nicely to the predominantly black and terracotta colouring of the many other planters and pots in this sheltered, sun trap setting.
Well, the planter was successfully delivered within a few days of ordering. Last week (having given the courtyard surfacing its yearly clean), I set about constructing it.
In with the new- my new ‘Woodblockx’ planter awaiting construction
There was a pack of various leaflets and other material supplied with the pallet-load of parts and having checked these off against the list supplied, I wound myself through this material. Though comprehensive, the fact that there were bits of advice and information spread across more than one document initially threw me and I didn’t find any instructions specifically about how my planter should be built or look.
So I spent a few minutes working back from the diagram on the company website to see how each layer of the planter should be built up. I also began knocking in the various plastic dowels and wedges (which join each layer of ‘blocX’ together) to what I hoped was the correct configuration. Then I discovered that these didn’t match up to the next layer’s holes, as the next layer of blocX has to be laid like a brick course with no joints overlapping each other, so not all of the holes correlate. Still no problem, as I guessed that a couple of spare blocX had been sent and, as I discovered later, it is easy to just saw off the tops af any dowels that are in the wrong place! (there was also a good supply of plastic dowels sent so I could afford to waste a couple).
Two layers in place, the planter starts to take shape
On the way- the first two layers completed
I decided to take another look at the literature I’d been sent and then – to my embarrassment – discovered a set of instruction diagrams for my planter showing which sized blocX should go where and which holes should have the dowels in! Though I hadn’t worked out the layout to exactly match that shown in these diagrams, I thought mine would work too, so I pressed on with the second and subsequent layers. Hammering in the dowels and then pushing home the next layer of blocX on top was very satisfying and I proceeded layer upon layer, to see my planter taking solid form before my eyes!
Using a rubber mallet, and green plastic tubing to hammer home the black plastic dowels was a doddle
After the fourth and final layer of blocX then came the simple, but attractive capping, which really finished of the planter very tidily. This is knocked onto another set of dowels as well as four metal corner brackets which help the planter to hold its shape. The whole construction time- allowing for my careless beginning– took around an hour, was simple and good fun, giving ‘instant results’.
These planters can be used in open ground (they come with two long metal spikes which help anchor it into the ground), but in my situation, sat on clay paviours, the weight of the planter (especially once full of earth) will be sufficient to hold it in place. As advised by the Company I could have also fixed it in place with some angle brackets. I will add an inner lining of landscaping fabric to help protect the wood (though it is all pressure treated) and to avoid soil seeping out from underneath.
Though the rough-planed finish of the WoodblocX is attractive enough from a distance, I think I may sand it down a little and apply either some black wood stain or similar treatment to tie it into the rest of the courtyard planters. I’ll do a further article to show the finished item, planted up.
This slideshow requires JavaScript.
So, what do I think of WoodblocX?
The planter is very solid and I think will last a long time- especially with the extra treatment I’m planning to give it. The solid construction does not look out of place in the ornamental setting of my courtyard and would also look smart in a more ‘kitchen garden’ context too. I should imagine that the construction system using the plastic dowels would be very effective in a ground retaining role too. The modular nature of the system opens up all sorts of design possibilities if you’re considering a multi/split level garden.
As someone who’s a bit of a DIYer (especially using reclaimed timber), I guess that I could have created a similar sort of planter for a fraction of the cost (the planter that I have would cost just under £200, including delivery). I doubt whether it would look as attractive or be as solid and long lasting though. So, if you’re after a smart look and solid construction, your time is limited or your skill level relatively low, WoodblocX offers an ideal ‘self assembly’ solution to your planter/walling needs. I have a friend who’s considering the system for edging a patio that’s surrounded by sloping ground, and I can imagine him setting this up relatively easily and so avoiding the need to engage a tradesman to install a (probably) more expensive brick or similar retaining wall. The company also offers telephone advice and support during your ‘build’ in case of queries (I didn’t take advantage of this).
So, all in all, I’m pleased with the result and enjoyed the construction process, though perhaps a ‘less is more’ approach to the literature the Company sends out would make the construction a little less daunting at the start. If you’d like to find out more, click on the link on the right hand side to go to the WoodblocX website.
I had a great day’s gardening with various groups of children at Cawston Primary School, Norfolk, last week. They made great progress with digging over the various borders, watering and transplanting- as well as each sowing runner bean seeds in aid of Dr. Barnardo’s. But in addition to these rather more mundane activities it was also possible do some ‘instant gardening’.
An old willow tree stump, removed from the side of the former pond to make way for the new one a couple of years ago, lies near the entrance to the garden and was, to be honest, a bit of an eyesore. Mrs. Brett, the ‘learning outside the classroom’, co-ordinator had a great idea to make this a feature by planting it up, so I bought various bulbs, primulas, anenomes and ferns, using some of the money raised from opening up Old School Garden to the public last year.
Ann, one of the parents, and I helped the children turn this into an attractive feature. We cleared around the old stump and used other old branches to create ‘planting pockets’ in addition to those created by the roots of the stump and filled these with old soil from a nearby spoil heap. The plants were well watered in and there’s now a colourful, rather beautiful ‘floral sculpture’ to welcome us as we enter the garden!
‘Every Monday Morning, he must walk about the whole place to observe what needs doing, what is amisse, before he does any other work….Make regular checks on beehives, seed and root boxes; clean, sharpen and repair tools in wett weather and put away every night.
Stir heaps of dung and mould; clip hedges, mow lawns, prune fruit and murral trees and vines when stated.
Ask every night what rootes, salading, garnishing wil be needed next day, and bring it to Cook in the morning and informe her from time to time what garden provision and fruite is ripe and in season to be spent….
Gather and bring in all fruit… He may not dispose of any fruit or sell any vegetables, flowers or plants without first asking leave of master or mistress. He must show broken and worn out tools to the master before buying new ones.’
John Evelyn- Directions to his gardener at Saye’s Court, 1687
Vertical gardens or ‘green walls’ seem to be increasingly popular, from the humble vertical planters made out of recycled materials like pallets, to the enormous ‘frescoes’ seen on new buildings around the world.
This is a testament to their value in both a domestic setting- where they are one way of adding height and so ‘structure’ to a garden as well as providing either a splash of colour or a source of food – and to their role in helping to ‘green’ our cities and other built up areas, managing air temperatures and providing an attractive texture to what might otherwise be a boring facade.
I’ve gathered together a few pictures here of some examples that might inspire you!
Zantedeschia is a genus of about 8 tuberous or rhizomatous perennials, found in swamps or moist soils at the margins of lakes in southern and eastern Africa. The name of the genus was given as a tribute to Italian botanist Giovanni Zantedeschi (1773–1846) by the German botanist Kurt Sprengel (1766–1833).
Zantedeschia fall into two main types:
hardier outdoor forms (Z. aethiopica and Z. pentlandii ), often called arum lilies, with striking white flowers (these are in fact ‘spathes’ – a coloured bract or leaf- wrapped round a thin, creamy yellow column, or spadice); and
the more tender hybrid forms, typically with white-spotted leaves and pretty yellow, orange, pink or dark purple spathes (Z. elliottiana and Z. rehmannii hybrids), which are borne in spring or summer. Z. elliottiana have broadly, heart shaped leaves, most with a covering of translucent white dots and usually yellow spathes, whereas Z. rehmannii have mid to dark green, lance – shaped leaves, rarely spotted, with white to pink or dark purple spathes. These are often called calla lilies.
However, Zantedeschia is neither a true lily (Liliaceae) nor an Arum or a Calla!
It has often been used in paintings, and is visible in many of Diego Rivera’s works of art (see The Flower Vendor, amongst others). It was a favourite subject of the painter Georgia O’Keefe.
Zantedeschia aethiopica
Z. aethiopica is the most common form in British gardens, grown as a marginal aquatic plant. This is a wonderful architectural plant for pond margins in areas that do not suffer from very hard frosts. The leaves alone are an attraction. They are large, 40cm (16in) long, and arrow-shaped, and a bright, glossy green with distinct veins. However, arum lilies are mainly popular for their serene, white flowers.They make superb, classy cut flowers.
Grow the arum lily as a water plant, planting it into a special aquatic basket, in water up to 30cm (12in) deep. Or you can plant it into moist soil around the pond, protecting it with a deep mulch over winter. The Royal Horticultural Society have given it their prestigious Award of Garden Merit.
In frost – prone areas they should be covered with a deep winter mulch. Where temperatures fall below 10 celsius more tender arums can be grown in a warm greenhouse or as houseplants, or can be planted out in summer in a sunny site. Zantedeschia can be propagated by seed or division (divide in spring).
Zantedeschia elliottiana
Z. elliottiana close up
For early flowering plants at Easter, plant the rhizomes in December. Keep in a light, cool place at a temperature of 16°C (61°F) by night and 18°C (65°F) during the day. Feed fortnightly with a high-nitrogen fertiliser when in active growth but withhold feed during flowering. A high potassium feed such as a tomato fertiliser can be given once a week after flowering.
Both types of Zantedeschia can be grown in containers. When planting, use a loam-based compost such as John Innes No. 2 and plant the rhizomes (underground stems) just showing at the surface of a container with the eyes of the rhizome uppermost.
Z. albomaculata by Forest and Kim Starr
Z. ‘Neon Amour’ by Stan Shrebs
Water freely through the summer and feed with a balanced liquid fertiliser every two weeks until the flowers have faded. Zantedeschia are generally pest and disease free, but can suffer from winter cold unless protected.
Zantedeschia species are poisonous due to the presence of calcium oxalate. All parts of the plant are poisonous, typically producing local irritation or a burning sensation in the mouth and occasionally vomiting and diarrhoea. However leaves are sometimes cooked and eaten.
This concludes my series ‘A-Z of Perennials’, started last year. I hope you’ve enjoyed it and will also like my new series- ‘A-Z of Garden Trees’, coming soon!
Now’s the time to set about creating new borders in your garden and I’m grateful to Hyde N. Seik from Plymouth who asks:
‘I’ve seen some wonderful borders at a National Trust property near me. I enquired about these and was told that they are ‘herbaceous borders’. Can you tell me what this means and how to go about creating one, please?’
Hyde, there’s perhaps nothing as quintessentially English as an Herbaceous border (it became especially popular in the late 19th and early 20th century garden), and many of those associated with our great historic houses are some of the best examples around. This is usually a rectangular border (or twin borders with a lawn or other path running between them), traditionally at least 3 metres wide and about 12 metres long, usually backed by an evergreen hedge. The lengths and widths do vary, but the usual dimensions maintain a ratio of 4:1 (length to depth). The border is planted entirely with herbaceous perennials (plants that grow for more than one year and die back above ground after flowering). The border is designed to be of interest when viewed from the front or along its length and looks its best from late spring to late summer.
These days the amount of work needed to maintain such borders – staking of taller plants to provide support, pruning back dead stems and foliage, feeding and dividing the plants every few years- might be too much for many gardeners and so herbaceous borders can be rather smaller and more irregular in shape, or alternatively have a mixture of planting (including evergreen shrubs, grasses, and annuals) to reduce the workload and provide more structural interest during the winter.
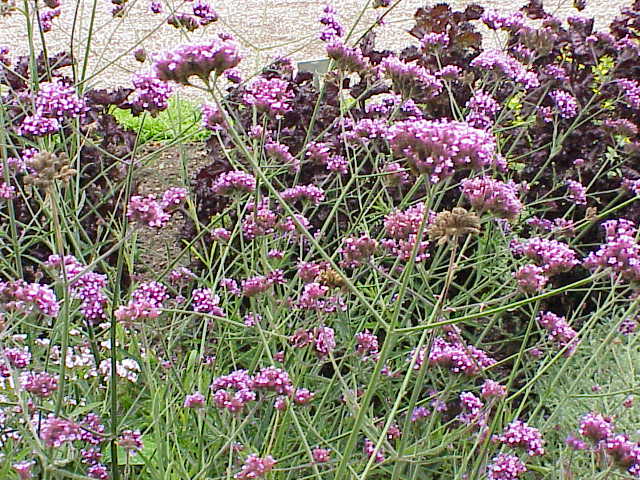
Herbaceous borders are usually planted with clusters of each type of plant, in odd numbered groups of 3, 5 or 7 plants- the tallest are usually at the back of the border and the shortest at the front. However, in recent times this approach has been challenged as borders can look more interesting if some taller plants are placed nearer the front of the border; especially if they add height but are not too dominant, such as Verbena bonariensis and many grasses.
The airy stems of Verbena bonariensis
As your plants are likely to be in the same place for some time, it pays to prepare the soil thoroughly. Remove all weeds, especially the perennial types with deep roots, by digging, hoeing (or you could use a suitable weedkiller such as Glyphosate in the growing season). Then fork the soil to a depth of at least 150mm adding organic matter such as compost or manure, rotted bark, or other manures such as those from hops or mushroom growing. Lime might also be needed if the soil is very acid (peaty) or in generally very poor condition.
This should be applied in autumn or spring, one month before planting or adding organic material, and at least 2-3 months before adding manure (lime and manure should never be applied at the same time). Incidentally, nearly all herbaceous perennials grow well in most soil types, provided they are neither very acidic or alkaline- by manuring and liming regularly, the soil can be kept at a fairly neutral pH, and regular mulching with organic matter will keep the soil nutrient levels up, avoiding the need for artificial fertilisers or feeds.
If possible, leave the freshly dug soil for a couple of months to allow it to settle, then rake over the surface to produce a reasonably fine, crumbly surface.
Whilst you’re waiting for the soil to be readied it’s worth planning the border planting in some detail. Using a sheet of graph paper, draw on it (to scale) the shape of the border (you could of course have begun with an outline plan on paper for this and then scaled this up to create the new border). Then select your plants from a catalogue, book or online information resource which not only describes the plants but gives their height and ultimate spread/width. Think about the different flower shapes, leaf textures as well as colours in composing your border planting plan and also when the plants flower or have other interest (e.g. leaf colour, berries or other fruit) – to ensure a balanced spread of flowering or other interest throughout the seasons.
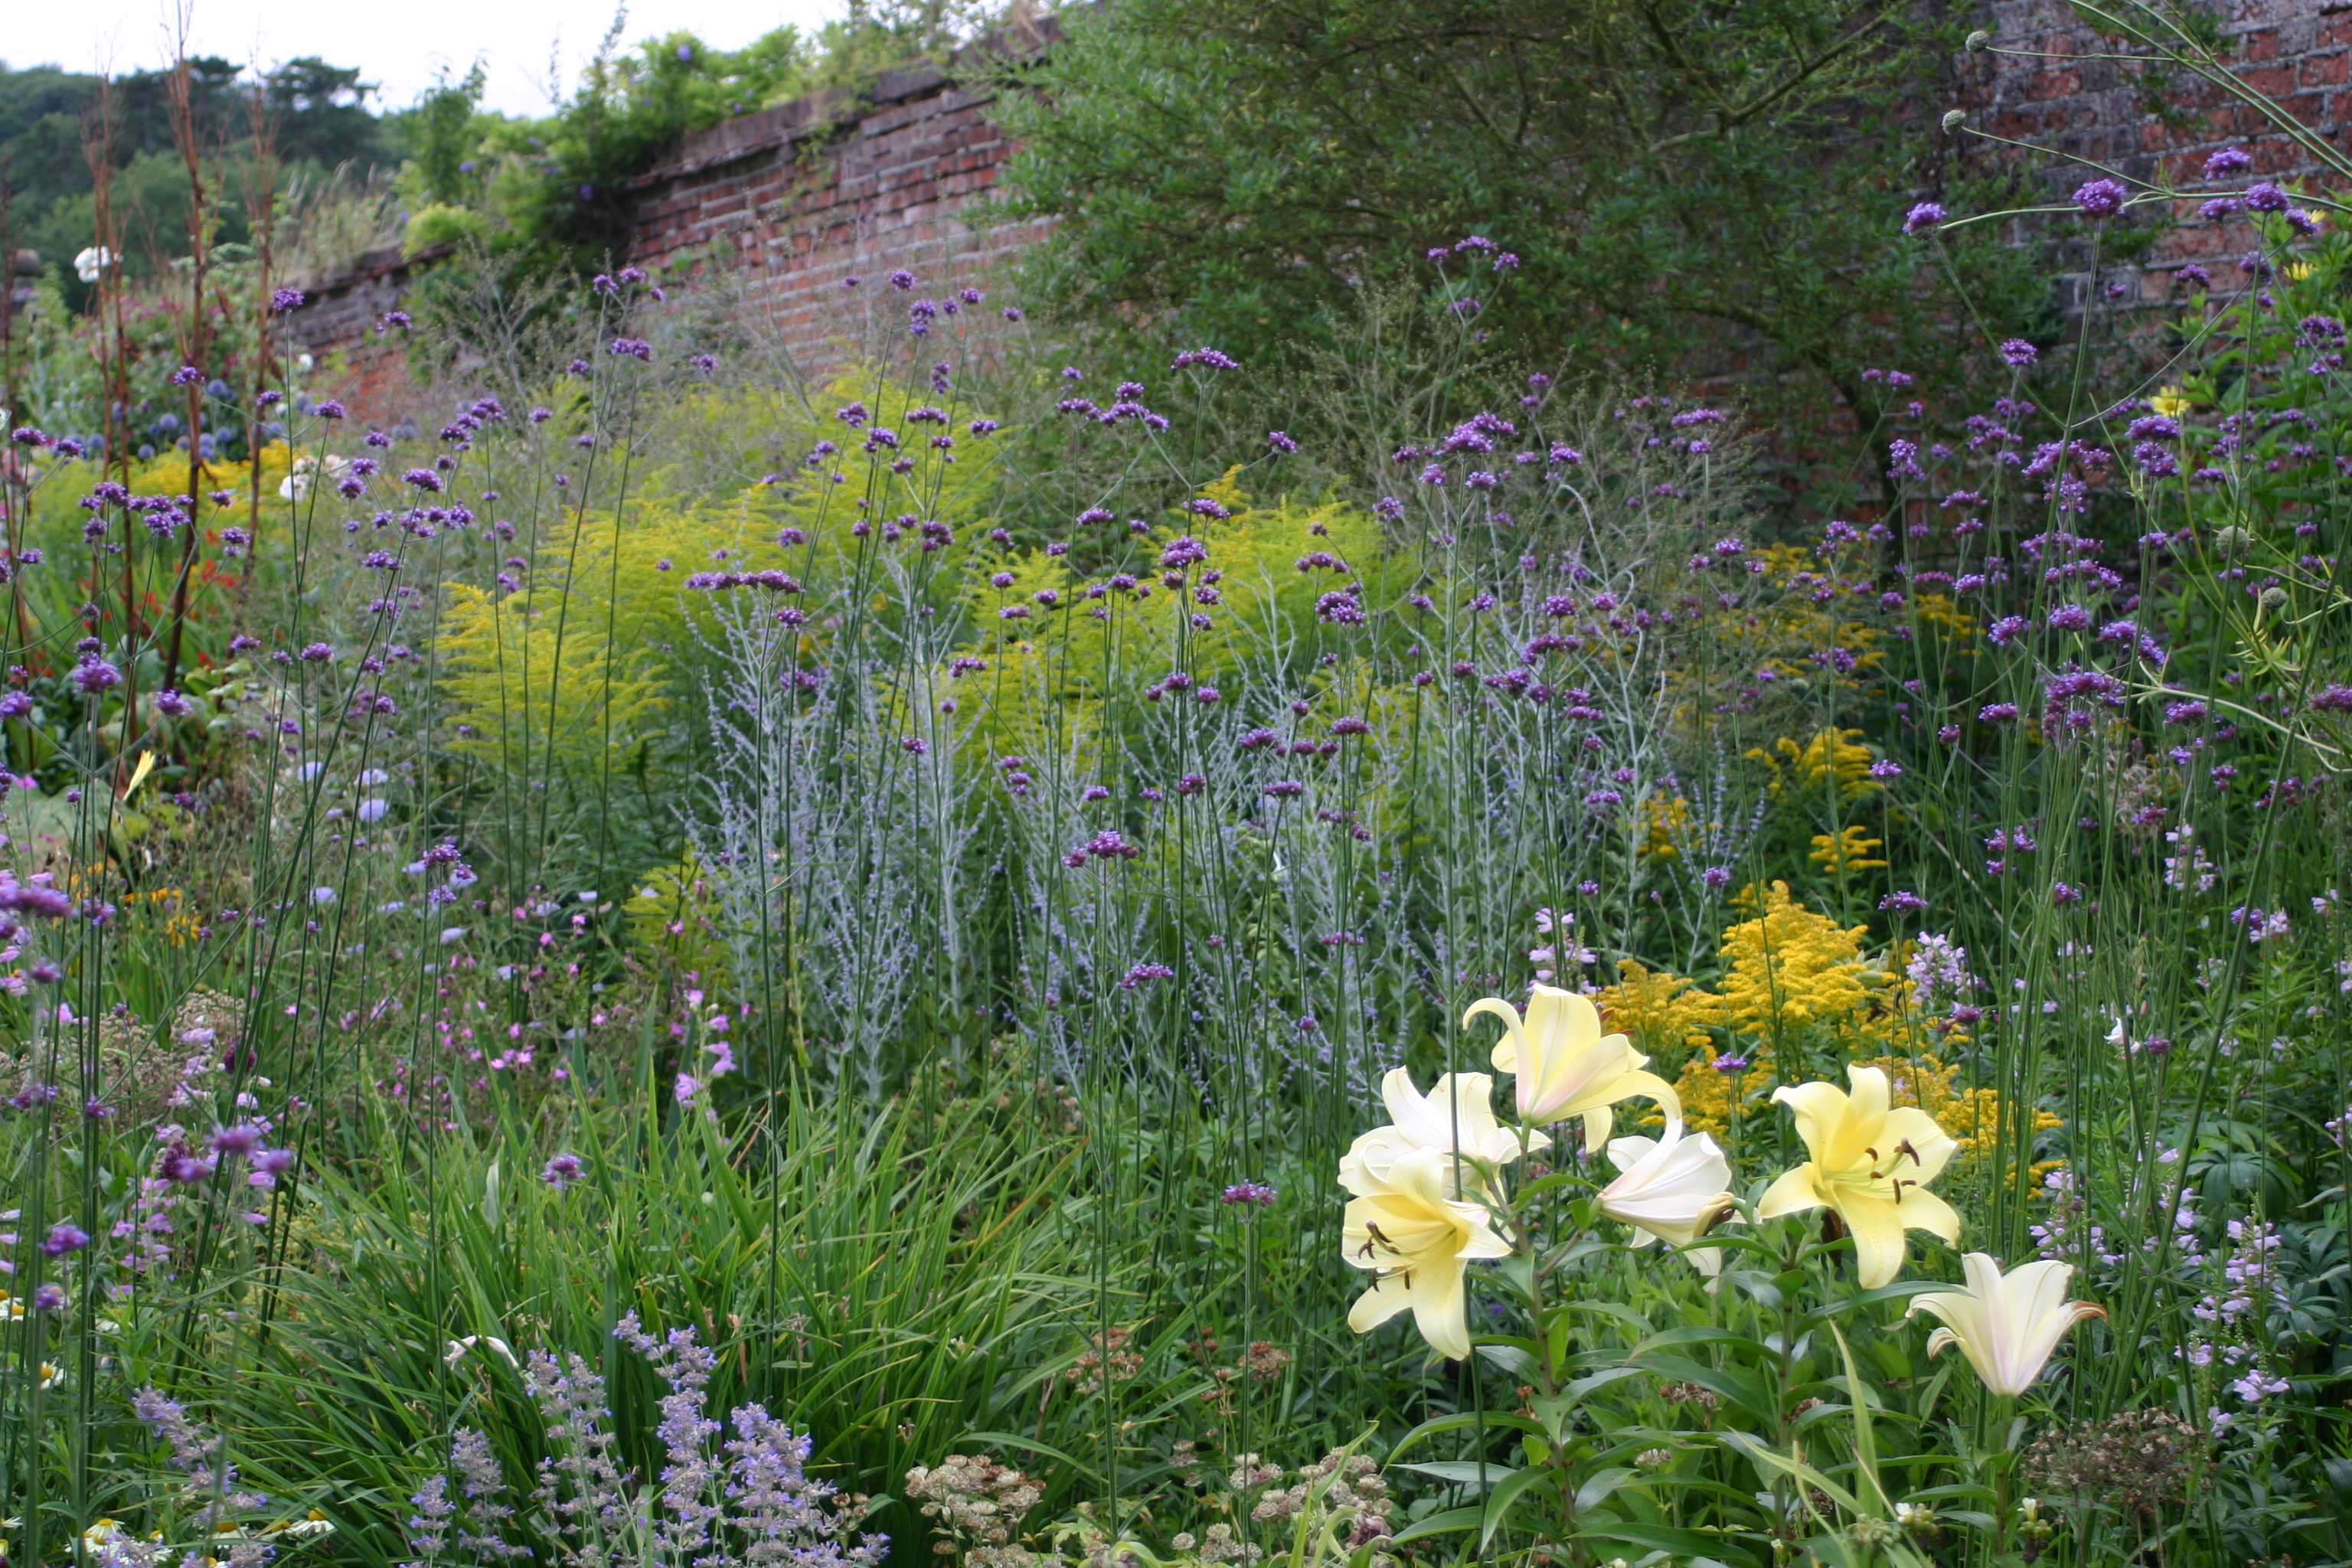
Mixed borders at Old School Garden- looser feel with evergreen shrubs, grasses and mixed hedges as a backdrop
Allow for the plants to be grouped in clumps of 3’s or 5’s (odd numbers tend to create informal looking groups whereas even numbers tend to lead to a more formal, regimented layout). These groups can be drawn on your plan with a circle guide or compasses and then a line enclosing the group drawn around them. If you use a set of colour pencils or crayons to draw these groups according to their flower/leaf colour it will help give you an idea of the colour scheme you are creating. Other information – height, flowering time etc.- can be written on your plan and help to check the overall design and ensure that there is no period in the year without interest of some sort (this can extend to winter interest created from strong shapes such as evergreens and grasses as well as some herbaceous plants that hold on to their dead flower heads or foliage).
The best time to plant your herbaceous border is in the autumn or spring, although plants grown in containers can be planted at any time, provided they are kept well watered and the ground is not frozen or flooded. If you buy by mail order, the nursery will send you plants at the right time for planting, although the roots will probably have little or no soil on them (‘bare rooted’). If you can’t get them planted on arrival, store them in a cool place in damp, sandy soil or put them in a trench in the garden (so called ‘heeling in’). However, do try to plant them out as quickly as possible provided the ground is workable.
If the plants seem dry on arrival, soak the roots in water for 24 hours; if any are damaged in transit, let the nursery know as soon as possible, so that they can be replaced.
Herbaceous border at Copped Hall, Essex
Planting is best done with a trowel. Set the plants out in the planting positions on the soil surface and then move them around to make sure they are in line with your plan which should suit their final growing widths. Dig holes under each plants big enough to accommodate the roots of the plant without cramping them. Work from the back of the border (or centre if it is an island bed). Always plant to the same depth as the soil mark on the stems of the plants.
Hoe carefully to remove footmarks, and water in the plants with a thorough but gentle sprinkling. Don’t forget to label each group of plants, as once they die down you may forget where they were – though your reference plan should help with this. Most herbaceous perennials will spread outwards, gradually dying off from the original centre, so every few years these plants will need dividing, repositioning and mulching. And some of the taller ones will need staking to support them, at least in the early years before those around them provide some mutual support.