
Category: Design
 You may remember my recent visit to Canterbury and the wealth of architectural detailing I found ‘over my head’. Well, visiting Chester at the weekend gave another opportunity to crane my neck and seek out some wonderful ornamentation and other building features in this largely late Victorian/ Edwardian ‘Mock Tudor’ set piece City Centre. Here are a few pictures to capture the spirit of the place. I’ll do a separate post with those I took in and around the cathedral.
You don’t generally look to Richmond upon Thames for political radicalism and pioneering social reform. But look again – at a street of modest Victorian terraced housing: Manor Grove in North Sheen. This was the first council housing in London. It was built through the efforts of Richmond’s very own ‘People’s Champion’, William Thompson.
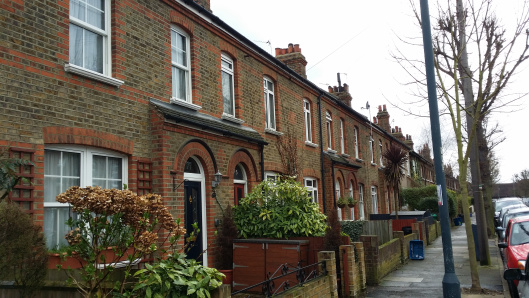
Of course back then Richmond was in Surrey and it had been created a municipal borough only in 1890. That, it turned out, was an auspicious year: a young Liberal schoolmaster, William Thompson, was elected to the local council and, nationally, the Housing of the Working Classes Act was passed which allowed local councils not only to clear areas of slum housing but to build new, municipal, housing where necessary.
Then, as now, Richmond was a relatively affluent area but it too had areas of poverty and slum housing. Existing housing supply was, in Thompson’s words…
View original post 1,561 more words
A great way to introduce children (and playful adults) to imaginative design, growing and caring…..mini gardens.

Old containers like this metal bath are great for putting some limits on the space and provide a focal point in the garden too…..

…and plastic trays can replicate ‘real garden’ shapes…

or maybe you have some old cracked pots?

…let the imagination run wild and create a whole ‘fairy world’…

..or why not let them loose in your big garden?..

..and maybe even add a miniature (recycled) greenhouse..
Old School Gardener

-
The finished ‘WoodblocX’ planter- soon to be home to an alpine collection
You may recall that two wooden planters in the courtyard here at Old School Garden, recently ‘bit the dust’. Not using pressure treated timber when I made these a few years ago was certainly a mistake. I was wondering what to do to replace them and a few weeks ago was approached by a Scottish company called WoodblocX to do a trial of their products- they make a range of raised planters, beds and ground support systems using an interlinking set of wooden bricks (or ‘blocX’).
Having looked at their comprehensive website, I decided to go for a raised planter (1350mm long by 450mm wide and 450mm high), and I’m hoping to use this both to replace the old planters and create a new feature – an alpine bed. This should be at the right height to be viewed from the nearby metal table and chairs in the courtyard and if suitably finished off will tie in nicely to the predominantly black and terracotta colouring of the many other planters and pots in this sheltered, sun trap setting.
Well, the planter was successfully delivered within a few days of ordering. Last week (having given the courtyard surfacing its yearly clean), I set about constructing it.

- In with the new- my new ‘Woodblockx’ planter awaiting construction
There was a pack of various leaflets and other material supplied with the pallet-load of parts and having checked these off against the list supplied, I wound myself through this material. Though comprehensive, the fact that there were bits of advice and information spread across more than one document initially threw me and I didn’t find any instructions specifically about how my planter should be built or look.
So I spent a few minutes working back from the diagram on the company website to see how each layer of the planter should be built up. I also began knocking in the various plastic dowels and wedges (which join each layer of ‘blocX’ together) to what I hoped was the correct configuration. Then I discovered that these didn’t match up to the next layer’s holes, as the next layer of blocX has to be laid like a brick course with no joints overlapping each other, so not all of the holes correlate. Still no problem, as I guessed that a couple of spare blocX had been sent and, as I discovered later, it is easy to just saw off the tops af any dowels that are in the wrong place! (there was also a good supply of plastic dowels sent so I could afford to waste a couple).
 Two layers in place, the planter starts to take shape
  On the way- the first two layers completed
Two layers in place, the planter starts to take shape
On the way- the first two layers completed
I decided to take another look at the literature I’d been sent and then – to my embarrassment – discovered a set of instruction diagrams for my planter showing which sized blocX should go where and which holes should have the dowels in! Though I hadn’t worked out the layout to exactly match that shown in these diagrams, I thought mine would work too, so I pressed on with the second and subsequent layers. Hammering in the dowels and then pushing home the next layer of blocX on top was very satisfying and I proceeded layer upon layer, to see my planter taking solid form before my eyes!

- Using a rubber mallet, and green plastic tubing to hammer home the black plastic dowels was a doddle
After the fourth and final layer of blocX then came the simple, but attractive capping, which really finished of the planter very tidily. This is knocked onto another set of dowels as well as four metal corner brackets which help the planter to hold its shape. The whole construction time- allowing for my careless beginning– took around an hour, was simple and good fun, giving ‘instant results’.
These planters can be used in open ground (they come with two long metal spikes which help anchor it into the ground), but in my situation, sat on clay paviours, the weight of the planter (especially once full of earth) will be sufficient to hold it in place. As advised by the Company I could have also fixed it in place with some angle brackets. I will add an inner lining of landscaping fabric to help protect the wood (though it is all pressure treated) and to avoid soil seeping out from underneath.
Though the rough-planed finish of the WoodblocX is attractive enough from a distance, I think I may sand it down a little and apply either some black wood stain or similar treatment to tie it into the rest of the courtyard planters. I’ll do a further article to show the finished item, planted up.
So, what do I think of WoodblocX?
The planter is very solid and I think will last a long time- especially with the extra treatment I’m planning to give it. The solid construction does not look out of place in the ornamental setting of my courtyard and would also look smart in a more ‘kitchen garden’ context too. I should imagine that the construction system using the plastic dowels would be very effective in a ground retaining role too. The modular nature of the system opens up all sorts of design possibilities if you’re considering a multi/split level garden.
As someone who’s a bit of a DIYer (especially using reclaimed timber), I guess that I could have created a similar sort of planter for a fraction of the cost (the planter that I have would cost just under £200, including delivery). I doubt whether it would look as attractive or be as solid and long lasting though. So, if you’re after a smart look and solid construction, your time is limited or your skill level relatively low, WoodblocX offers an ideal ‘self assembly’ solution to your planter/walling needs. I have a friend who’s considering the system for edging a patio that’s surrounded by sloping ground, and I can imagine him setting this up relatively easily and so avoiding the need to engage a tradesman to install a (probably) more expensive brick or similar retaining wall. The company also offers telephone advice and support during your ‘build’ in case of queries (I didn’t take advantage of this).
So, all in all, I’m pleased with the result and enjoyed the construction process, though perhaps a ‘less is more’ approach to the literature the Company sends out would make the construction a little less daunting at the start. If you’d like to find out more, click on the link on the right hand side to go to the WoodblocX website.
Old School Gardener
Old School Gardener
In the last two months our family has spent time in six different countries, visiting parks in every location. I have a growing theory that the casual observer can learn something about the culture from paying attention to the types of equipment in a playground and watching the ways that equipment is used by the children and the adults they are with.
My sampling of playgrounds from the countries in the title of this post (plus, the post I wrote a few weeks ago about parks in Japan) is very small, and I’m sure does not provide a clear overview of playgrounds across that country. Still, I enjoy reflecting on our experiences in these parks and wondering what conclusions I can draw given my very limited experience.
View original post 414 more words
By 1944, 1 million British homes had been damaged or destroyed by German bombing. Lewisham alone had lost over 1600 dwellings in the first wave of the Blitz in 1940 and would suffer heavily again as the V1s and V2s rained over London in June 1944. There are those in the Excalibur Estate in the borough who feel they are the victims of enemy action once more.
Back in 1944, Churchill gave his ‘word that the soldiers, when they return from the war and those who have been bombed out …shall be restored to homes of their own at the earliest possible moment.’
 Hector Murdoch’s homecoming, 1946
To fulfil this pledge, the 1944 Housing (Temporary Accommodation) Act was passed, earmarking £150m for an emergency programme of temporary housing. Aircraft factories which, in these closing days of the European war, might move to peacetime production were tasked with the construction of…
View original post 1,916 more words
I had a great day’s gardening with various groups of children at Cawston Primary School, Norfolk, last week. They made great progress with digging over the various borders, watering and transplanting- as well as each sowing runner bean seeds in aid of Dr. Barnardo’s. But in addition to these rather more mundane activities it was also possible do some ‘instant gardening’.
An old willow tree stump, removed from the side of the former pond to make way for the new one a couple of years ago, lies near the entrance to the garden and was, to be honest, a bit of an eyesore. Mrs. Brett, the ‘learning outside the classroom’, co-ordinator had a great idea to make this a feature by planting it up, so I bought various bulbs, primulas, anenomes and ferns, using some of the money raised from opening up Old School Garden to the public last year.
Ann, one of the parents, and I helped the children turn this into an attractive feature. We cleared around the old stump and used other old branches to create ‘planting pockets’ in addition to those created by the roots of the stump and filled these with old soil from a nearby spoil heap. The plants were well watered in and there’s now a colourful, rather beautiful ‘floral sculpture’ to welcome us as we enter the garden!


Old School Gardener
Two pictures to illustrate how I try to take inspiration from the natural world in creating ‘playful landscape’ features. The playful landscape was created in Fakenham, Norfolk. The ‘Giant’s Causeway’ here uses different lengths and thicknesses of smooth-planed, pressure-treated timber, inserted into a concrete foundation within a formed, grass covered mound, and with gravel to fill in around each ‘step’.

- The Giant’s Causeway in Northern Ireland, by Joe Cornish

A ‘Giant’s Causeway’ at Fakenham, Norfolk
Old School Gardener


