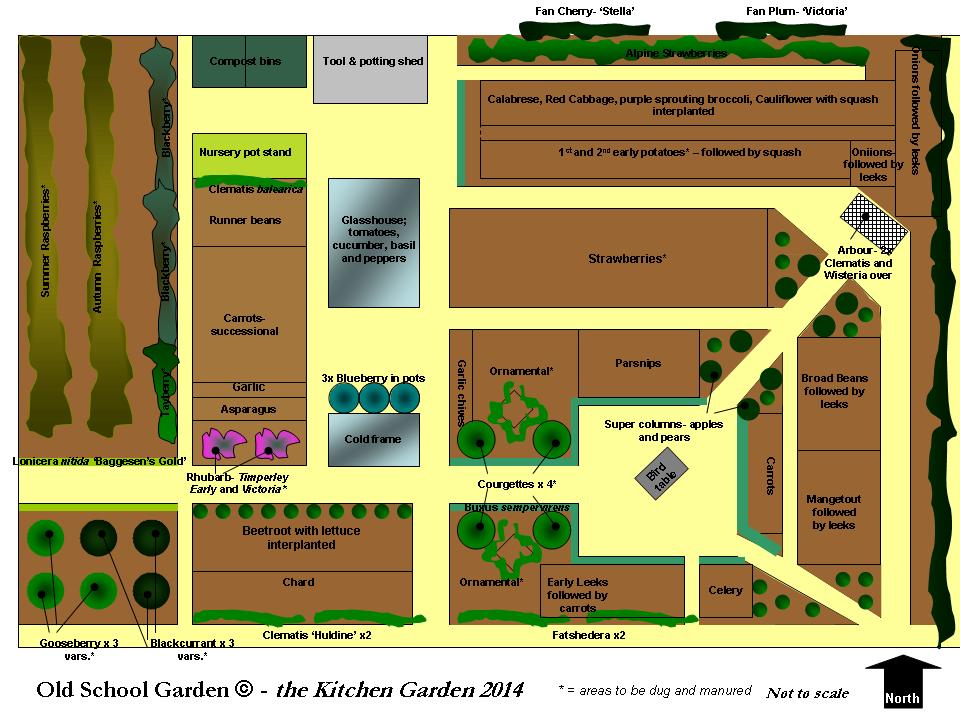
Tag Archive: grow your own
I’m also going for some ‘heritage’ varieties- squash, cauliflower, leek, pea, runner beans and beetroot.
An inspiring movie about how to create food growing areas using recycled bottles, buckets and other containers.
Old School Gardener

A community growing area in Geneva, Switzerland, where individual plot holders trade food crops….
Old School Gardener

Get planning your veggy plot for 2014!
Here’s a handy guide to the numbers of food plants to grow per square foot. This is a useful technique for small food gardens or containers but can also be used in larger plots to ensure a mixture of veg in smaller quantities, so avoiding gluts.
Old School Gardener
Here’s the final article by one of the participants in a ‘Grow Your Own Food’ course I ran recently in Foulsham, Norfolk. I’m planning to run another course starting in February (Tuesday mornings for 6 weeks) as well as another one focused on helping participants use design to reshape their own gardens (Monday evenings at Reepham, Norfolk). More details can be found at www.reephamlearningcommunity.co.uk
Cherry Trees
Guest article by Ann Blezard
Choose a sunny spot for your tree (approx. 6 hours direct sunlight a day). Acid cherries will tolerate some shade. Cherries grow particularly well in southern and central England.
Cherries will grow well in almost any kind of soil, but avoid soil that stays soggy for extended periods. Spreading a layer of mulch over the soil around your tree will help it grow better.
Some cherry trees cannot pollinate themselves and will need pollination partners. Others are self- fertile.
It is preferable to grow cherries from a rootstock as it can take 10 years or more to obtain the first fruits from a cherry grown from seed.
Cherries are now available as a dwarf rootstock, growing to approx. 10ft, instead of the usual 40ft, allowing you to cover the tree with bird netting to protect your crop.
Cherry trees should be planted between November and March. Mulch in late February with well-rotted organic matter. Keep trees well watered during the early stages of fruit development. Apply potash if fruiting is poor.
Cherry trees flower early in the year, the flowers will need protecting from frost. Cover with horticultural fleece if frost is predicted, however remove during the day to allow access to pollinating insects.
Sweet cherries will fruit on one-year old and older wood. Formative pruning takes place in spring as the buds begin to open. Established trees are pruned from late July to the end of August.
Cherries are not totally disease free. Sweet cherries are susceptible to a disease called brown rot. This can be prevented by pruning in between branches to allow good air flow, be scrupulous about cleaning up blossoms, fruit and leaves that might have been affected. Sulfur is an organic method for brown rot. Spray when the flower buds are pink, when the flowers are open, when the petals fall and once again about 14 days later.
Cherries can also be affected by Silver Leaf, a fungal disease of the wood and leaves, causing a silvering of the leaves and death of the branch. The fungus produces most of its infectious spores in autumn and winter. Prune susceptible plants in summer when not only are there fewer spores, but pruning wounds, the main point of entry for the spores, heal more quickly.
Cherry blackfly is an aphid that sucks sap from the foliage of fruiting cherries during spring and early summer. Attract natural predators like blue tits or use soap based sprays before the leaves curl. Cherry blackfly will not affect fruiting, but looks unsightly
Cherries will shed fruit that they do not have the resources to bear, known as cherry fruit drop or cherry run off. Pruning trees to give an open canopy, maximising light to the leaves and increasing the photosynthetic rate is likely to minimise the fruit drop. Thinning the cherries is also an option, creating a balance between the supporting leaf and the fruit, thus increasing fruit retention.

- The Evans Cherry variety showing ripening fruit
Examples of cherry varieties are:-
Sweet Cherry- ‘Stella’ : Black, large , rich, high quality fruits, regular heavy crops; self-fertile. Late season; harvest in July.
Acid Cherry- ‘Morello’: Self-fertile , dark red fruits, excellent for preserves and tarts. Attractive blossom, heavy crops, late season; harvest July and early August.
SWEET CHERRY COBBLER
(Serves 8)
Ingredients
350g Caster Sugar
45g Butter, melted
125g Plain Flour
¼ tsp Salt
1 tsp Baking Powder
120ml Milk
1 tbsp Cornflour
225ml Boiling Water
500g Fresh Cherries, stones removed (frozen cherries may be used)
Method
Preheat oven 180 deg C/Gas 4
1) Mix 150g sugar, butter, flour, salt, baking powder and milk together. Place cherries in bottom of 23cm square tin. Spread topping over cherries.
2) In small bowl combine 200g sugar and cornflour, stir in boiling water, pour mixture over topping.
3) Bake for 45 minutes, serve warm with vanilla ice cream.

-
Bing cherries- the most widely grown variety of sweet cherry in the U.S.A.
Here’s another profile of a food plant produced by one of the participants in the ‘Grow your Own’ course I ran at Foulsham, Norfolk.
Grape (Vitis vinifera)
Guest article by Kay Elvin
Black Hamburg is a popular, outside, late grape that can be used for desserts or wine making.
Planting- Dig a large hole, adding plenty of farmyard manure and water well. Plant bareroot vines in winter, but containerised specimens can be planted at any season.
Location- Vines like to grow on a sunny, south or west wall. Support the vines with horizontal wires held in place by vine eyes, about 12”- 16” apart.
Growing – Allow about three stems to grow vertically during the first year. Pinch out shoots that grow from the side to one leaf. The next year in spring aim to have a shoot every 6”. When fruits appear thin out to one bunch every 12”. Remove some of the foliage to improve air flow.
Feed with high potash. Vines can be affected by scale insects, vine weevil, downy mildew and mould. When harvesting avoid touching the fruits, cut each bunch with a ‘handle’ (2” of stem).
Beware – Do not park your car under a grape arbour- they damage the paintwork! Grapes are also poisonous to dogs.
Recipe- Grape Jam
Ingredients:
4lb ripe grapes
1 box powdered fruit pectin
3.25 lbs sugar
Method:
Slip skins from grapes and set aside
Add 1 cup of water to pulp, bring to boil cover and simmer for 5 mins.
Press through a sieve to remove seeds.
Chop or grind skins, add to pulp.
Measure 6 cups into a very large saucepan.
Then make jam, add powdered pectin to the fruit in pan and mix well.
Bring to hard boil over high heat, stirring constantly. At once stir in the sugar.
Bring to a full rolling boil and boil for 1 minute, stirring all the time.
Remove from heat and skim off foam with a metal spoon, then alternately stir and skim for 5 mins..
Cool slightly, ladle into jars, cover jam at once.
Makes 6 half pound jars.
For spicier jam add 1 teaspoon each of cinnamon, ginger and allspice to the grapes before simmering.
Old School Gardener
A greenhouse to extend the growing season for King’s Lynn’s Lianne. The second project to be funded from the Old School Garden opening last July.
Lianne sowed her first seeds early this summer when she registered with one of Norfolk’s Master Gardeners, Lally Lee. She started with a garden overgrown with brambles and weeds and now is enjoying harvests of onions, salads, beans and various herbs. She’s simply hooked on growing.
Lianne is on a very low income and being able to grow her own is helping to supplement her diet with fresh, organic vegetables and herbs. Her mentor, Lally wanted to provide Lianne with the tools to continue to grow something throughout the winter and get an early start next year with protected seed sowing.
Lally was awarded funds to purchase a mini-greenhouse and some seeds to get Lianne off to a flying start when the growing season takes off again in early Spring. Lianne was delighted:
“A greenhouse is something that I have always wanted to use. To be presented with one makes me happy and proud. I am very grateful for the support, help and kindness of the Garden Organic charity. My sister, Linzi, and I are really looking forward to getting a head start on our vegetables and flowers next spring. I would like to express my gratitude to Master Gardener, Nigel Boldero, for sharing the proceeds of his open garden day this summer, which has enabled this donation“.
Old School Gardener- with thanks to Lally
Community Food Growing in a Garden City – New project

‘Letchworth Garden City Heritage Foundation and the RHS are joining forces in an innovative community-focused programme to create three new sustainable green spaces in the heart of the town.
It is hoped that the project will ultimately be used as a model for how communities, especially those in low-income areas, can best utilise their public green space for food production and to create affordable and attractive areas, which are a benefit to local wildlife as well as the community…..’
Click on link above for more info.
Old School Gardener
Note: This is the first of a series of articles on how to grow and use different food plants. It’s one of a number produced recently by particpants in a ‘Grow Your Own’ course I’ve been running in the village of Foulsham, Norfolk. I thought the work deserved a wider audience and hope that you find it useful. I’ll post other articles in coming weeks.
Guest blog by Jacqui Carr
Coriander (Coriandrum sativum), is an annual herb in the family Apiaceae. It is native to regions spanning from southern Europe and North Africa to southwestern Asia. It is a soft plant growing to 50 cm (20 in) tall. The leaves are variable in shape, broadly lobed at the base of the plant, and slender and feathery higher on the flowering stems. The flowers are borne in small umbels, white or very pale pink, asymmetrical, with the petals pointing away from the centre of the umbel longer (5–6 mm) than those pointing toward it (only 1–3 mm long). The seeds are often used as a spice or an added ingredient in other foods.
How to Grow Coriander
Coriander enjoys a sunny position but appreciates a little shade during the hottest part of the day. Coriander has a tendency to run to seed if stressed. This is fine if the plant is grown for its seeds, but not if it is grown for its leaves.
Coriander is best grown from seed directly into the soil. This is because it is quite a sensitive plant; transplanting young plants can shock them and cause them to bolt (run to seed). Prepare the soil thoroughly by digging it over, removing any weeds and incorporating organic matter, such as well-rotted manure or compost. Rake the soil so it’s level and sow seeds 4cm apart in drills 1cm deep.
Germination of coriander takes up to 3 weeks. Young plants should be thinned to 20cm apart to allow them to grow to their full size. The soil should never dry out. If flowers develop they should be removed immediately to ensure the plants focus their energy on growing new leaves. Coriander should be re-sown every three weeks to ensure a continual supply during the summer. It is not normally necessary to feed coriander if the soil is well nourished. However, if the plants appear to be suffering they can be given a liquid organic feed to perk them up.
Coriander does well in containers and can be grown on a sunny windowsill or balcony. The container must be quite deep as coriander has a long taproot. Scatter seeds on the surface of the compost and cover with soil, watering well. They may need more frequent watering as pots dry quickly.

-
Coriandrum sativum from the Medizinal Pflanzen
Harvesting Coriander
Harvest the leaves when the plant is big and robust enough to cope. Pluck or cut each leaf off the stem or snip whole stems if necessary. Both the leaves and the stalks can be used.
If grown for its seeds, wait until the flowers have died off before harvesting. Cut the stems and place the heads of the coriander in a paper bag, with the stems slicking out. Tie the stems and the bag together in a bunch and hang upside down in a cool, dry place. Wait for three weeks and then shake the bag. The dry seeds will fall out from the flowers and be ready in the bottom of the bag. Keep them in a dry place and re-sow the following spring.
Coriander pests and diseases
Coriander can suffer from root rot. Coriander doesn’t like its roots to be too wet so make sure the soil is well draining and don’t over water the plants. Water during the day and avoid watering in the evening. Coriander is a very aromatic plant, and as such it is usually free from pests, although slugs may have a chomp at the seedlings. In the UK, there are no serious diseases affecting coriander.
Storing
The best way of storing coriander leaves is to freeze them. Freeze the tender stalks as well as the leaves. Try not to wash the coriander before freezing. . If you do wash it, then dry it as much as possible before freezing. Freeze only healthy green leaves – remove any that are yellow. Put the leaves and stalks in a plastic bag, seal it and put it in the freezer. When you want to use it, just take out as much as you need, and chop whilst still frozen. Then add it to your cooking. A slightly more labour-intensive method is to freeze the coriander in ice cube trays. Chop the coriander, and pack it into ice cube trays. Add a little water to just cover the coriander, and then freeze. Once it’s frozen, remove from the trays and seal in a plastic bag. Use the cubes straight from frozen.
Cooking with Coriander
Coriander is a delicious and versatile herb, used in a variety of dishes including Indian and Thai dishes and salsas and salads. Both the leaves and the seeds are commonly used and have distinct flavours and uses. The leaves are best eaten fresh and the seeds are best eaten dried, toasted and ground into a fine powder to use as a spice.
Recipe: Tomato, Cucumber and Coriander Salad
Ingredients:
· 6 ripe vine tomatoes, deseeded and chopped
· 1 small cucumber, diced
· 1 red onion, very finely chopped
· 6 tbsp fresh coriander, chopped
Method: mix together the tomatoes, cucumber, red onion, and chopped coriander, but don’t season until just before serving.

-
Coriander Seeds
Summary
Sow seed every 2-3 weeks to have a constant supply of leaves
Do not transplant the seedlings – coriander doesn’t like to be moved
Keep the soil moist, but do not over water
Don’t water in the evening – coriander doesn’t like to “go to bed with wet feet”
Pick leaves regularly once they are 10cm (4in) high
Use the stems as well as the leaves, and allow some plants to flower so you can collect the seed
Freeze any excess coriander in a plastic bag, and use from frozen
Don’t grow in a confined space indoors as the plant has an unpleasant smell
Avoid planting near fennel, as they just don’t like one another!

Flower and Hay Bale Garden by Carol Leigh Thomas


