Tag Archive: grow your own


teaching gardeningMy previous posts in this series have covered the process of getting a School gardening project going, designing and constructing your plot and developing it into a valuable part of the school and wider community. The final three posts provides a few tips as the ‘icing on the cake’, the sort of things you can consider once your project has well and truly established itself as a key local resource. Today some tips on activities, an area that is likely to grow in importance if, as is proposed, gardening is to be added to the UK National Curriculum for schools in 2014.

Organising school gardening activities

  • Carve out a place in the School where you can keep all the folders, binders, books and other supporting information you need to plan and run your garden. This could be in a classroom, the library, the office or ideally in the Garden shed where they will be easily accessible.
  • Develop and keep up to date a weekly schedule of how the garden will be used. Once time slots are set for particular classes or groups, encourage parents to come in to help with their child’s session. Keep parents up to date with the schedule so that they know when their children will need to bring in appropriate clothing and footwear.
  • Invest in a Garden Organiser book –  a notebook for lesson planning, reflecting on the way a particular session went,notes etc. You can start to sketch out lesson plans after discussions with teachers and begin thinking about the organisation of the sessions in the garden, what resources and people you’ll need etc. Ideally get a robust, week by week format to help you plan ahead.

    How to sow seeds is a basic gardening skill that all children need to learn

    How to sow seeds is a basic gardening skill that all children need to learn

  • Make sure all the children are trained in basic gardening skills – digging, sowing, planting, weeding, watering, harvesting and, if you’re extending activities into using the food you produce, cooking! These basic skills can be programmed over the different terms of the year/phases of the growing season. So, digging over the soil and preparing it can be done in the Autumn/ Winter/ Spring, sowing seed in Spring, planting out late Spring/early Summer, weeding in the Spring and Summer, harvesting in the Summer/Autumn etc. Make sure you include a session on tools – what is used for what task, how to use and carry them safely and keeping them clean and well maintained.
  • Recording children’s comments –  listen to what they say to each other and you/ teachers and record these as insights into their understanding and learning. They can also be useful in fund-raising campaigns, evaluation reports – and they are often hilarious!

    Create a 'digging pit' for filling gaps and honing skills

    Training children in basic tasks – like soil preparation – can be hard work, if the boy on the right’s expression is anything to go by! So try to introduce an element of fun through competitions.

  • Make garden maintenance tasks into competitions and they can be both a lesson and fun for the children. For example, ‘Who can collect the most slugs and nails?’, ‘Who can collect the longest weed?’
  • Create an outdoor kitchen and cooking kit – if you’re looking to cook your produce on site you can collect together a supply of plates, cutlery, cooking utensils, gas burner etc. in a waterproof storage bin in the garden for when you need them at harvest time.
  • Be a model for recycling – the garden is a great place to teach the importance of reuse and recycling and to avoid sending more waste to landfill. For example, avoid using plastic pots and trays if possible, but if you, look after them so that they have the maximum useful lifetime. Collect old newspaper to add to your compost or worm bin. Re use old plastic lunch containers for collecting bugs/ pests. Use broken ceramic cups and plates to create a mosaic on a wall or as a cemented path surfacing. If you have to buy in compost, make sure that it’s peat free.
Cooking in the garden can be as simple as shredding/cutting food to eat raw or with a tasty dressing

Cooking in the garden can be as simple as shredding/cutting food to eat raw or with a tasty dressing

Ideas for activities

(details can be found in How to grow a School Garden‘ – Arden Bucklin-Spooner and Rachel Kathleen Pringle, Timber Press Books)

Autumn

  • Seed saving – using tomatoes, sunflowers or other plants to harvest seed and save it for next year
  • Look lively–  helping children to observe how animals and plants interact and understand what humans, pants and animals need for survival and record their ideas
  • Stem, root, leaf or fruit?– identify and classify the different parts of different plants that we eat
Saving sunflower seeds is easy

Saving sunflower seeds is easy

Winter

  • Post code seeds – children select a variety of seeds to order based on the climate, food crop and taste preferences
  • Habitat riddles – developing an understanding of how physical conditions affect plant and animal life within a habitat
  • Introduction to worm composting – learning about worm anatomy, the abilities of worms to aerate soil and assist decomposition, and how to care for worms.

Spring

  • Land scarcity – illustrating the scarcity of land to grow food and clothing by using an apple to represent the earth and cutting away portions that can’t be used for different reasons.
  • Graphing plant growth – creating a graph that records bean growth throughout the season
  • Interviewing local farmers –  gaining a sense of local farming activity, where food comes from and the sort of work that farmers do.

The whole year

  • Garden scavenger hunt – observing and exploring the garden by asking children to find different things, eg an aquatic habitat
  • Pollution soup – understanding how human activities cause runoff pollution from roads and other hard surfaces, affect river water quality – by using a large jar of clean water and adding different types of pollutant to it.

    'Pollution Soup' - kits are available

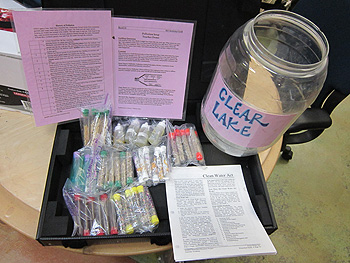
    ‘Pollution Soup’ – kits are available

There are plenty of other ideas for activities available on some of the websites mentioned below. Here’s a link for activities for younger children. In my penultimate post I’ll be looking at top tips for managing and maintaining the School Garden.

Other posts in the series:

Growing Children 4: AAA rated School Garden in Seven Steps

Growing Children 3: Seven tips for creating your dream School Garden

Growing Children 2: Seven Design tips for your School Garden

Growing Children 1: School Garden start up in Seven Steps

School Gardening – reconnecting children and Nature

Source & Further information:

How to grow a School Garden’ – Arden Bucklin-Spooner and Rachel Kathleen Pringle, Timber Press Books

School Gardening Club- ideas

Budding Gardeners- lots of advice and info

Garden planner tool

Planning your school garden

Food & Agriculture Organisation School Garden Planner

California School Garden Network Guide to School Gardening

School Gardening Wizard

School garden fundraising

Garden Organic support for schools

Devon Country Gardener magazine articles on School Gardening

September activity planning in a Canadian School

Old School Gardener

If you’ve enjoyed reading this post and others on this blog, why not comment and join others by signing up for automatic updates via email (see side bar, above right ) or through an RSS feed (see top of page)?

PicPost: Manic Street Feature

Time to prune your blueberries: early March is ideal, as it is usually easier to see the fruit buds. Start by taking out your 3 Ds (dead, diseased and dying). Then remove the ends of the branches which fruited last year, taking them back to a strong bud or branch. Finally, remove a third of the oldest stems from the base, to open up the bush and encourage new growth. If it’s newly planted just do your 3 Ds!

More info here: http://apps.rhs.org.uk/advicesearch/Profile.aspx?pid=85

– Becky, RHS Members Advisory (who is now craving blueberries!!)

PicPost: City Centre

Nature Study helps to extend the use of your garden and encourages children to explore habitats beyond the School

Nature Study helps to extend the use of your garden and encourages children to explore habitats beyond the School

Previous posts on school gardening have looked at laying the foundations of a School Garden project, designing your garden and getting the project off the ground. This post looks at how to develop your garden so that it becomes a key resource for the School and wider community.

1. Get into the curriculum

Don’t relegate your garden to just an ‘extra curricular’ activity or club – though these are useful as ways of enhancing the core purpose of your garden: to support children’s learning as part of the school’s curriculum (see 3 below). It might be wise to focus initial garden activity on one or two year groups/classes, so you get the most interested teachers involved (and maybe on your steering group). You can experiment and understand what is working and what isn’t. Once they’ve seen the garden in operation others, including less enthusiastic teachers, will want to get in on the action! Some countries (especially the USA, where School Gardening seems to be well established) have comprehensive curriculum guides for school gardening which link into the wider curriculum of the School.

The recently released draft National Curriculum for UK Schools features children growing plants in the primary years, so this may well give a boost to school gardening and curriculum plans and ideas may follow.There are also some useful guides which enable some basic skills and knowledge to be covered in your gardening activities from some of the national campaigns, especially the Royal Horticultural Society’s ‘Campaign for School Gardening’  and Garden Organic’s work for the ‘Food for Life’ Partnership.

The school could focus on a theme or topic for a number of weeks (say a half term) and weave the School Garden into this work, which could build on work started off in the classroom. As an example my own local school is focusing on ‘Fairy tales’ this half term and so children are getting involved in sowing turnips and beans with links to specific stories. This approach can also work well for specific science topics like ‘insects and animals’, ‘seeds and germination’ or ‘planting and the seasons’.

Don’t forget the importance of basic gardening skills too – I ‘ve been delivering some sessions on tool safety, use and cleanliness linked into preparing the soil and sowing etc.

It’s also a good idea to keep a lesson plan book to record what has been taught and the results in terms of what did and didn’t work, to aid future planning – it’s important to keep making adjustments and small changes to sessions to keep them interesting, new and relevant.

Basic gardening skills, like how to carry tools safely, are an essential part of the curriculum

Basic gardening skills, like how to carry tools safely, are an essential part of the curriculum

2. Leadership

As the use of the Garden grows, so will the need for a dedicated person to coordinate and manage it – the ‘Garden Coordinator’ or equivalent. This role is a bit like the School Librarian in that they link with all classes as they come into and out of the garden, helping them to make the most of this important resource (and also making some tasty withdrawals at harvest time!). The role is also important in contributing to discussions about the curriculum and ways in which the garden can be used as a key resource for the school’s programme of learning. The Garden Coordinator may well start off as a volunteer, but in due course it may be necessary to make this a paid position. As suggested in a previous post, the ongoing funding required to support this could come from the School Budget, but more likely it will be found (at least in part) from the Parents’/Friends’ Association and possibly supplemented through regular fundraising activities. Another important job for the Garden Coordinator is to facilitate annual evaluations of the garden. Devise a simple but systematic evaluation questionnaire for staff,volunteers and others to complete so that you can reflect and use the information to plan ahead.

3. Go beyond the formal curriculum

The garden should first and foremost be used as part of the school curriculum, but don’t ignore opportunities to deepen its contribution to learning. For example it can be a great place to begin to understand about the local ecosystem and specific habitats – ‘Nature Study’. It’s important to use unexpected opportunities to deepen and enrich the learning going on – e.g. the arrival of a particular insect or animal in the garden or children pulling flowers apart looking for developing seeds. A good way of getting children to strengthen their writing and observational skills is for them to fill out a ‘Garden Diary’ after each visit ro record what they’ve done and seen and any wider lessons learned. These records (probably best to invest in some robust folders that can withstand outside use) can provide a wonderful presentation of achievement over the year and serve to underline the important role the garden plays in school life.

4. Manage your Garden

The Garden Coordinator is the focus for how the garden functions, guiding the different classes in the tasks needed at different times of the year to keep the garden looking good and working well. With their Steering Group/ Committee, they can also organise a few days when more intensive effort is needed and the wider community (especially parents and staff) can get involved. These ‘Garden Gang’ days or their equivalent are the opportunity to get big jobs done – e.g laying paths, constructing glasshouses and sheds, digging over beds, clearing ponds and so on. The Garden Coordinator will also need to produce a weekly schedule of which classes are using the garden and what they will be doing, plus the staff and other support that will be available. Initially children’s excitement at being in the garden will make for a bit of a roller coaster as they are easily distracted by any novel or unusual thing they see, or touch, or smell (I recently had some ‘interesting’ if not unexpected reactions to handling manure for example!). Whilst it is important to try and use these opportunities creatively, the Garden Coordinator and supporting staff should strive towards getting classes into a quiet, focused way of working so that they eventually arrive in the garden, prepare and get on with what they need to do in increasingly ‘self-directed’ mode (especially older children). Some ideas for helping to bring this about include:

  • Dividing the class into manageable groups (say of 6 or 7 for primary years) – this will enable two or more different activities to be rotated around the groups either within a session or from week to week.

  • ‘Digging pit’ – it might be an idea to have a separate space/bed where nothing is grown but where ‘idle hands’ can be directed to dig over the ground –  good for digging practice if nothing else!

  • Recruit parent volunteers  – as well as teachers and learning support assistants it could be useful to get some additional help from willing parents. Make the most of their skills and expertise (as they will probably be interested and knowledgeable gardeners) and if warranted organise a rota so that they come in and work regularly with particular classes or groups. The Garden Coordinator can reach out to parents of reception class children who may be new to the school and are keen to make a positive contribution to their child’s learning. This additional help will make it easier to conduct garden sessions and make for a richer experience for the children (and adults too!).

Children love to dig- set aside an area for digging, to use those idle moments and hone skills!

Children love to dig- set aside an area for digging, to use those idle moments and hone skills!

5. Promote your Garden

So you’ve got the garden underway and you might be feeling pleased with what you’ve achieved. But don’t ‘rest on your laurels’ as the garden will need continuous promotion if you are to retain and increase interest and involvement by the school and wider community. The children are your best advocates – if they’ve enjoyed a session in the garden they’ll mention it at home and so inform and possibly engage parents. Other ideas to try:

  • write a monthly newsletter/ blog or/and contribute to regular School newsletters

  • publish recipes using garden vegetables growing in the garden

  • send home notes abotu what’s been happening in the School Garden and possibly advice for home gardening in a weekly folder

  • arrange an interview with a local newspaper, radio or TV station

  • take over (after asking of course!) a centrally located notice board and pin up student work and photos

  • have a garden party!

Hold a Garden Party to celebrate and promote your plot

Hold a Garden Party to celebrate and promote your plot

6. Broaden the base

Once the basic programmes are in place you can think about how the garden can contribute to the school more generally and also the wider community:

  • A School Gardening Club in which parents are encouraged to join in?

  • Linking with other schools and having visits to/from your garden with activities to encourage students getting to know each other?

  • Several schools sharing an allotment so helping to spread out the workload and resulting in a wider range of food being grown?

  • Use the garden to inspire and present art projects?

  • Poetry competitions based on the garden?

  • A garden reading session where children take out library books and read these in the garden?

  • A science fair focused on the garden?

And think about ways to get students and teachers to broaden their horizons – perhaps explore the ecosystem in the wider area and different types of habitat like riverside, woodland, coastal marshes etc. Teachers can also be encouraged to take part in environmental education training programmes  and so on, including those provided by Garden Organic.

Get your own composting project going

Get your own composting project going

7. Healthy practices

Finally it’s important to develop a set of healthy practices in the garden which will not only benefit it but also lead to important lessons that students and others can take into the future. For example:

  • Wildlife – welcome insects and other ‘critters’ into the garden and use organic or physical means to control them if they get out hand. Good methods include home-made anti-fungal sprays (using garlic and mineral oil), insecticidal soap made from liquid soap (not detergent) and water in a spray bottle,  ‘beer traps’ and ‘wildlife friendly’ pellets or other controls to reduce slugs and snails. And be prepared to tolerate some untidiness and ‘less than perfect’ veg!

  • Soil – use organic principles to develop a healthy soil; never dig it if it’s wet or frosted; find a good source of organic matter to add to the soil a couple of times a year (make your own compost, get donations of horse or farmyard manure); nurture the organisms in the soil by ensuring that it is never too dry – a mulch will help; once a good soil has been built up try not to dig it or turn it over (unless it’s very heavy of course)- just layering compost/manure and adding mulch (‘no till’ or ‘lasagna gardening’) is less work and is kinder to the insects and other animals working your soil; use cover crops to keep the soil protected over winter and possibly add fertiliser (‘green manure’); set up and actively manage a compost project in the garden ( in the UK possibly seek help from a ‘Master Composter to get you going) – or alternatively set up a worm (or vermi) composting project which is less intensive than traditional compost – making.

  • Plants – use organic plant foods such as ‘Fish, blood and bone’ or make your own ‘compost tea’ in bag of used compost mixed with water or using plants such as Comfrey or nettles steeped in water for a few weeks.

What's your favourite tipple? Beer traps are effective at controlling slugs and snails

What’s your favourite tipple? Beer traps are effective at controlling slugs and snails

Hopefully, these tips will help to set your School Garden on a fun, effective and healthy course.  In my final post I’ll try to point up some good ideas to enrich and expand your School Gardening programme further – a sort of ‘Master Class’ for school gardening.

Other posts in the series:

Growing Children 3: Seven tips for creating your dream School Garden

Growing Children 2: Seven Design tips for your School Garden

Growing Children 1: School Garden start up in Seven Steps

School Gardening – reconnecting children and Nature

Source & Further information:

How to grow a School Garden’ – Arden Bucklin-Spooner and Rachel Kathleen Pringle, Timber Press Books

School Gardening Club- ideas

Budding Gardeners- lots of advice and info

Garden planner tool

Planning your school garden

Food & Agriculture Organisation School Garden Planner

California School Garden Network Guide to School Gardening

School Gardening Wizard

School garden fundraising

Garden Organic support for schools

Old School Gardener

If you’ve enjoyed reading this post and others on this blog, why not comment and join others by signing up for automatic updates via email (see side bar, above right ) or through an RSS feed (see top of page)?


PicPost: Hanging Gardens

PicPost: Well hung

The Farmhouse Garden at Gressenhall Farm and Workhouse Museum

The Farmhouse Garden at Gressenhall Farm and Workhouse Museum

A variety of gardens awaits the visitor to Union Farm, part of the Gressenhall Farm and Workhouse Museum, Norfolk.

The main Farmhouse Garden sits alongside the Victorian farmhouse and was designed and developed around 10 years ago. It was intended to be a ‘sensory garden’ with aromatic, tactile and other plants including a ‘herb wheel’. It was also intended to demonstrate how planting could be used to control pests. This original purpose has been diluted over the years and the garden now provides a pleasant green foil to the farmhouse building. The garden is domestic in scale with a large area of grass and an irregular series of planted island borders, including raised beds edged with split poles. There are a number of shrubs, including climbing roses on the farmhouse wall, bench seats and a wooden shed in the north-eastern corner which contains garden tools.

The kitchen garden at Union Farm

On another side of the Farmhouse a vegetable growing patch has been developed which is used to demonstrate grow your own techniques and different types of vegetables. To the front of the farmhouse sit two other gardens, one with a range of perennial herbs that would have been used in the farmhouse kitchen and another which houses a wide range of plants that were used in the traditional dyeing of cloth. This garden was slightly rearranged last year with new edges to the borders and with a length of low willow fencing to provide both a sense of enclosure and to discourage visitors from trampling in the beds.  The plants are regualrly used here in demonstrations of traditional dyeing.

One side of the Dyers' Garden

One side of the Dyers’ Garden

Developed in recent years by the volunteer dyers, some of the plants grown here include:

Alcea rosea varieties Helianthus annuus varieties
Alkanna tinctoria Hemerocallis varieties
Amaranthus caudatus Isatis tinctoria
Anthemis tinctoria Lythrum salicaria
Berberis vulgaris Mahonia aquifolium
Buddleja davidii Origanum majorana
Calendula officinalis cultivars Perilla frutescens
Carthamus tinctorius Phytolacca americana
Consolida ajacis Pyracantha angustifolia
Convallaria majalis Reseda luteola
Coreopsis tinctoria Rheum x hybridum
Dahlia varieties Rhus typhina
Datisca cannabina Rosa –climbing varieties
Foeniculum vulgare Rubia tinctorum
Forsythia Rudbeckia triloba
Galium verum Solidago
Genista tinctoria Tagetes patula cultivars

Other posts in this series:

From Grand entrance to Grand Central at Norfolk Museum

Gypsies, tramps and thieves: garden where poor once trod at Norfolk Museum

Cottage Garden recreates 1930’s at Norfolk Museum

Old Workhouse Garden a wildlife oasis at Norfolk Museum

Unique Heritage Gardens at Norfolk Museum

Old School Gardener

If you’ve enjoyed reading this post and others on this blog, why not comment and join others by signing up for automatic updates via email (see side bar, above right ) or through an RSS feed (see top of page)?

school gdn headerIn part one of this series of posts I outlined a few tips on getting your School Garden project up and running. If you’ve got the key people on board, identified what the overall aims and objectives of the project are and hopefully secured some start-up funding and promises of help, it’s time to get serious about the design of your Garden. Here are seven ideas to help you…

1. Who will be using your space and what are their needs? It’s important to think about the range of users and why they’ll want to use your garden. Yes, children, but what numbers and ages? During the school day or afterwards? Will parents or the wider community want to get involved? And just what sorts of activities will your garden need to support: growing food, outdoor play, studying nature, formal lessons (in some sort of shelter?) etc.? It’s important to list these and start to see what they suggest in terms of the overall layout of different areas, spaces, structures etc

2. Survey and appraise your site– you may have your area already defined by walls, fences, hedges etc. or perhaps you’re confined to an area of the playgrround. In any event it’s important to accurately measure out the plot. From these measurements you can create a scale drawing (say 1cm = 1 metre) and any key features that are likely to remain – e.g water taps; significant slopes; trees; hedges; types of soil (you can see if it needs improving and what the pH is by using a simple test kit); the way the site lies (in relation to sun, wind, prevailing rainfall etc.) and how the site is accessed. It’s also worth checking on the current maintenance regime and who’s responsible for this (e.g. if you’re thinking of taking over an area of sports field that is regularly mown).

A gathering place like this shelter is probably important

A gathering place like this shelter is probably important

3. Think about basic needs:

  • Sunlight- ideally you’ll have a space which is open to sun at most times of the day, but use your survey information to identify the sunniest and shadiest spots and start to think about what to place in these
  • Shelter – from strong, cold winds and midday sun – look at boundaries and think about growing hedges , using fences (ideally with gaps to allow slowed wind to pass through) or putting in wind breaks of mesh material. Do you need some trees or an awning to provide a sun shade?
  • Water – either from a tap or through adequate outdoor harvesting of rainwater from sheds, glasshouses, or possibly school buildings
  • Pathways –  to get around the various areas. These need to be wide enough and of a surface and gradient that a wheelchair – user can negotiate without too much effort
  • Good soil – if you’re removing asphalt, the soil underneath is likely to need radical improvement or possibly overlain with imported topsoil. In most situations you’ll need to get organic matter – compost, manure, leafmould– to improve it over time
  • Fencing or another suitable boundary – to keep younger children in and intruders out . You could grow a hedge and whilst this gets established, on one side try a chain link or similar fence which in due course can be removed leaving you the wonderful sight and wildlife value of the hedge
  • Plants– what are you intending to grow? Each type will have different needs – are you envisaging growing under glass/polythene, if so space for a glasshouse/polytunnel will be needed. Do you envisage some sort of wildlife pond, if so this will need a suitable range of plants and may need a secure boundary
  • A gathering area – where groups/classes can be instructed or shown a task. This can be outside and informal (e.g. getting an annual supply of straw bales is a good cheap way of providing seating)  or enclosed within a shelter
  • Storage– a good tool shed, which if large enough can possibly double up for seed sowing/potting up, or alternatively a separate shelter/structure for this if that’s something you envisage doing in your garden
  • Tools and equipment – these will vary according to what you are growing and the size of your plot (and your children), but here’s a guide. Tools:  gloves– enough for everyone who’s gardening at any one time; trowels and hand forks or hand cultivators (enough for half a full class – say 15) ; a mix of adult and child – sized spades, digging/border forks, rakes, hoes (3 or 4 of each); wheelbarrows (probably at least 3); Secateurs, loppers, pruning saws, brooms (1 or 2 of each); watering cans – a couple should do, you can make home made ‘plant showers’ out of plastic tubs with holes in the bottom. Equipment: clipboards (one each for a full class); stationery supplies – paper, pencils, crayons, markers, glue, string, tape, scissors and a First Aid Kit! Also, if you plan to sow and grow your own plants you’ll need a range of other equipment like seed trays etc.
Get some child -sized tools

Get some child -sized tools

4. Get the children involved (and your wider support group) – you will by now have a good idea about what could be in the garden and you need to share these ideas and discuss others with the children who’ll be using the space and those key adults (teachers, parents etc.) who will also want to feel the project is theirs. You can devise some fun ways of engaging these people, perhaps involving n a loose outline drawing of the plot and your first ideas in pictorial form (e.g photos cut out from magazines), from where children can be asked to draw/write/otherwise think about and convey their ideas and wants for their garden (I can guarantee someone will want a swimming pool!). This will generate interest and ownership of the project.

Raised beds, narrow enough to allow access to the centre without walking on the soil

Raised beds, narrow enough to allow access to the centre without walking on the soil


5. Options for planting –  depending on what you want to grow and the space you have available I guess you’ll either be planting in containers (pots, planters and all sorts of quirky planters too), open beds (which have their edges cut into the surrounding ground, often grass) or raised beds– these are edged with boards or other timber and so help to define the growing areas (especially for food crops). If the sides are about 20cms high they can be used to contain additions of manure/compost from year to year as you build up the soil’s goodness and structure. Raised beds can be to varying heights to cater for different ages of children, but ideally they need to be narrow enough to be tilled from the surrounding pathways so that feet don’t trample and compress the growing areas.  Rectangular beds are probably the most efficient shape. These beds can be constructed using pressure – treated timber or alternatively there are several places where ‘ready to assemble’ kits can be purchased. If you want to avoid too much digging of the soil (this can be detrimental to its structure) you can just lay a covering of organic material over the beds each year (taking note of the requirements of different groups of plant if growing food) and lightly fork this top-dressing in as you begin the growing season.

How about a plastic bottle greenhouse?

How about a plastic bottle greenhouse?

6. Go beyond basic needs– it’s important to focus on basic needs in developing your designs, but if we just stick to the functional requirements, we will miss an important opportunity to make the School Garden exciting, fun and an experience for all the senses!  So, think about growing herbs and other plants which have differing fragrances, leaf textures, colours and are in other ways interesting – tall grasses that catch the sunlight and bend in the wind for example, or Stachys (‘Lambs’ Ears’), which has wonderful velvety leaves, Lavender for that midsummer heady smell! Likewise Sunflowers are a wonderful example of the power of nature as they shoot up to enormous heights and beauty starting from little seeds that the children can sow themselves. Similarly, children can get involved in producing signs for different parts of the garden, another way to make them feel that this is their garden and make it look funky too!

A simple scale model heps to convey your design

A simple scale model helps to convey your design

7. Consult on an outline plan – once you’ve taken all of the above into account you can firm up your plans on paper and maybe even produce a simple 3D cardboard/ scrap model of how your garden could look! Models are especially useful for getting children (and adults) to imagine just what features there are and what the layout will look like.  This could go on display at the School for a week or two and you can invite people to put their views on sticky notes nearby so that everyone can see who’s saying what. Gather these up and then  with your committee/support team work out those which should be incorporated into the scheme.

By the end of this process you should have a clear, accurate design plan on paper that everyone is signed up to and which is ready to rock!

In Part 3 of this series I’ll share some thoughts on constructing your School Garden and especially the day you ‘ground break’.

Sources & Further information:

How to grow a School Garden’ – Arden Bucklin-Spooner and Rachel Kathleen Pringle, Timber Press Books

School Gardening Club- ideas

Budding Gardeners- lots of advice and info

Garden planner tool

Planning your school garden

Food & Agriculture Organisation School Garden Planner

California School Garden Network Guide to School Gardening

School Gardening Wizard

Old School Gardener

If you’ve enjoyed reading this post and others on this blog, why not comment and join others by signing up for automatic updates via email (see side bar, above right ) or through an RSS feed (see top of page)?

herry Tree Cottage flower borderAn old Workhouse Yard has been turned into a showcase cottage garden of the 1930’s at Gressenhall Farm and Workhouse Museum, Norfolk.

What is a cottage garden?

The words ‘cottage garden’ conjure up an idyllic image involving roses round the door of a picturesque thatch cottage with towering hollyhocks and delphiniums (or something similar) either side of a brick path that leads to a picket gate. It’s all very romantic, always spring or summer – and always sunny.’ (The Enduring Gardener)

Historically, cottage gardens date from medieval times and were where labourers living in tied cottages grew a lot of their own food to bolster their poor wages. Vegetables were grown – not only to feed the family but also to perhaps to feed a household pig and a few chickens. Fruit was grown – apples and pears for example – with wild strawberries being gathered from the hedgerows. Flowering plants would have been collected from the wild and it is possible that flowers like violets, primroses, cowslips, dog rose and wild honey suckle featured in some cottage gardens.

Monasteries grew herbs for medicinal purposes and vegetables for the monks’ food. Their knowledge was much sought after and this filtered through to the poorer classes.

The 18th and 19th centuries brought many changes – the Enclosure Acts meant that wealthy landowners could remove the peasants’ right to graze animals on common land. This forced many to grow food in their gardens to feed themselves. Gradually living conditions for the poor improved – they were able to use their gardens not just to grow vegetables for food but flowers too. Gardeners exchanged ideas and plants and soon flowers and shrubs that were only ever seen in ‘the big house’ appeared in cottage gardens. The Victorian period also saw many new varieties of bright colourful annuals used as bedding plants.In the late 19th and early 20th centuries  Gertrude Jekyll developed the cottage garden style on a grand scale.

The First and Second World Wars brought food shortages and so vegetables and fruit took priority over ornamental planting in every available garden space. Once food rationing finished after the 2nd WW, people could look to their gardens to provide visual interest and not just food, so flowers and shrubs were planted once more.

Today the cottage garden retains its popularity. One approach is the traditional, smaller scale artisan style – creating the garden as you go along, often dividing, collecting seed and gratefully receiving gifts of cuttings or plants from neighbours or friends. Others prefer the more designed approach, with carefully planned borders and precisely laid paths, perhaps in a larger scale setting.

Cherry Tree Cottage Garden

The Museum’s records show that Cherry Tree Cottage and its adjacent open space were created in the 1850’s, probably to house elderly couples (‘no longer of child-bearing age’) from the main Workhouse. It seems that it may have actually housed three couples with a shared kitchen/dining room. The open space was probably just a yard used for sitting or exercise and there is no evidence of it being planted with flowers or vegetables.  In 1932, the cottage housed Workhouse staff and it is during this period that possibly a garden was introduced.

The current garden was created in the 1980’s by a team of volunteer gardeners, some of whom are still volunteering today!  Mary Manning created the original design to demonstrate a typical cottage garden of the 1900’s, and this was based on extensive research, including the local Women’s Institute. Their members’ memories were used in the garden to reflect  the Cottage, which had been set out to resemble a 1912 interior. Later changes in the cottage were also reflected in the garden and today it aims to show how a typical 1930’s rural cottage garden would have looked and been gardened. It includes:

Flower borders – traditional cottage garden plants such as lupins, asters, rambling roses and Buddleja. The snowdrops (Galanthus plicatus) derive from bulbs brought back from the Crimean War in the 1850’s by a Captain Aldington who was from near Swaffham. His mother gave some to a friend in Warham where it is said the local rector, Charles Digby, grew them in the Church yard – they became known as the Warham Snowdrop. This variety is still available today. More recently some heritage daffodils from the 1800’s have been planted in the garden.

Cherry Tree Cottage and some of the vegetable growing area (left)

Vegetable Crops – the  early vegetable plots grew a wide range of crops and some old seed varieties of pea (‘Simpsons Special’) and broad beans (‘Big Penny’) ‘were acquired from celebrity gardener Percy Thrower and a local retired gardener respectively. The museum ha some old seed catalogues from two local seed merchants – Daniels and Taylors –  and these have been used to research the varieties that might have been grown in the 1930’s. Many of the varieties of fruit and vegetables that were grown in the 1930’s can be seen in the garden today. Garden Organic and The Heritage Seed Library have donated many of the seeds.

Herbs – a range of well known herbs are grown in the garden today. Herbs were used both for flavouring food and medicinal uses – for example a paste made from Comfrey leaves would be used to aid the healing of broken bones hence its common name of ‘Country Knit Joint’!

The garden also houses a chicken run, as it was common for many cottagers to keep chickens , which gave them a good supply of eggs. The chicken manure was also used as a fertiliser on the vegetable plot.

The garden paths were originally grass edged with flint. These were gradually replaced with bricks, local tiles (‘pamments’) and cinder;  traditional methods used in cottage gardens. Todays paths are a mix of brick, pamments and gravel – the latter is easier to maintain and is more accessible for wheelchair users.

The Potato Clamp and Scarecrow at Cherry Tree Cottage Garden

The Potato Clamp and Scarecrow at Cherry Tree Cottage Garden

Whilst the gardening volunteers are trying to follow gardening practices typical of the 1930’s, sometimes these have to be avoided (e.g avoiding the use of dangerous pesticides).  But some interesting examples of old techniques have been demonstrated – for example the creation of a ‘Potato clamp’ which was a method for storing potatoes during the winter months before indoor storage space became more readily available.

Acknowledgement: I am grateful to Kay Davis, Heritage Gardening Trainee 2011-12, for permission to use her article on Cherry Tree Cottage for most of the material used in this post.

Sources and further information:

Plantax 3: Sweet Peas- cottage garden favourite

Unique heritage gardens at Norfolk museum

Old Workhouse Garden a wildlife oasis at Norfolk Museum

The Cottage Garden Society

Quizzicals:

answers to the two in previous post  Transfer Window- 7 tips for successful seedlings

  • Set fire to Ms Allen – Torch lily
  • Mythical creature that enjoys a game of cards – Snapdragon

Here are a couple of gardening ditties….

Snowdrops keep falling on my head

Theme tune from The Lone Hydrangea

(with thanks to Les Palmer)

Old School Gardener

If you’ve enjoyed reading this post and others on this blog, why not comment and also join some other people and sign up for automatic updates via email (see side bar, above right ) or through an RSS feed (see top of page)?

Finding Nature

Nature Connectedness Research Blog by Prof. Miles Richardson

Norfolk Green Care Network

Connecting People with Nature

Discover WordPress

A daily selection of the best content published on WordPress, collected for you by humans who love to read.

Susan Rushton

Celebrating gardens, photography and a creative life

Unlocking Landscapes

Writing, photography and more by Daniel Greenwood

Alphabet Ravine

Lydia Rae Bush Poetry

TIME GENTS

Australian Pub Project, Established 2013

Vanha Talo Suomi

The Journey from Finnish Rintamamiestalo to Arboretum & Gardens

Marigolds and Gin

Because even in chaos, there’s always gin and a good story …

Bits & Tidbits

RANDOM BITS & MORE TIDBITS

Rambling in the Garden

.....and nurturing my soul

The Interpretation Game

Cultural Heritage and the Digital Economy

pbmGarden

Sense of place, purpose, rejuvenation and joy

SISSINGHURST GARDEN

Notes from the Gardeners...

Deep Green Permaculture

Connecting People to Nature, Empowering People to Live Sustainably

BloominBootiful

A girl and her garden :)