- Zantedeschia aethiopica
Zantedeschia is a genus of about 8 tuberous or rhizomatous perennials, found in swamps or moist soils at the margins of lakes in southern and eastern Africa. The name of the genus was given as a tribute to Italian botanist Giovanni Zantedeschi (1773–1846) by the German botanist Kurt Sprengel (1766–1833).
Zantedeschia fall into two main types:
-
hardier outdoor forms (Z. aethiopica and Z. pentlandii ), often called arum lilies, with striking white flowers (these are in fact ‘spathes’ – a coloured bract or leaf- wrapped round a thin, creamy yellow column, or spadice); and
-
the more tender hybrid forms, typically with white-spotted leaves and pretty yellow, orange, pink or dark purple spathes (Z. elliottiana and Z. rehmannii hybrids), which are borne in spring or summer. Z. elliottiana have broadly, heart shaped leaves, most with a covering of translucent white dots and usually yellow spathes, whereas Z. rehmannii have mid to dark green, lance – shaped leaves, rarely spotted, with white to pink or dark purple spathes. These are often called calla lilies.
However, Zantedeschia is neither a true lily (Liliaceae) nor an Arum or a Calla!
It has often been used in paintings, and is visible in many of Diego Rivera’s works of art (see The Flower Vendor, amongst others). It was a favourite subject of the painter Georgia O’Keefe.

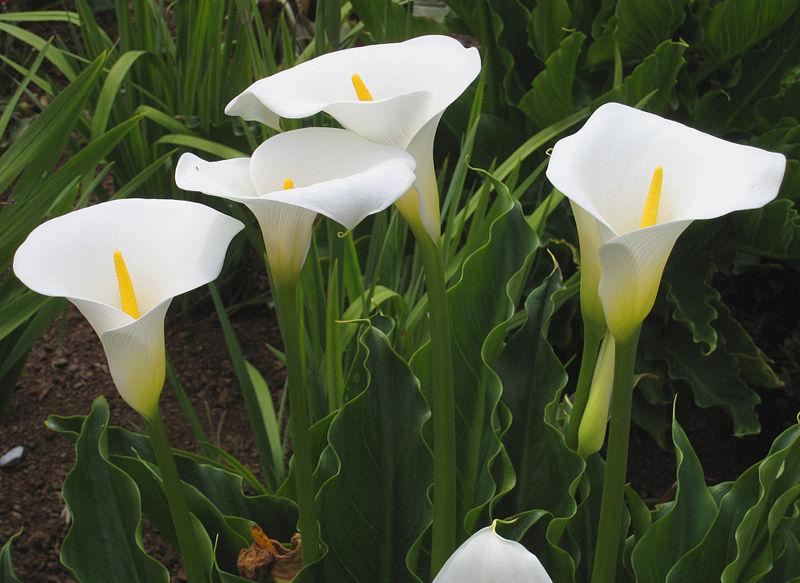
- Zantedeschia aethiopica
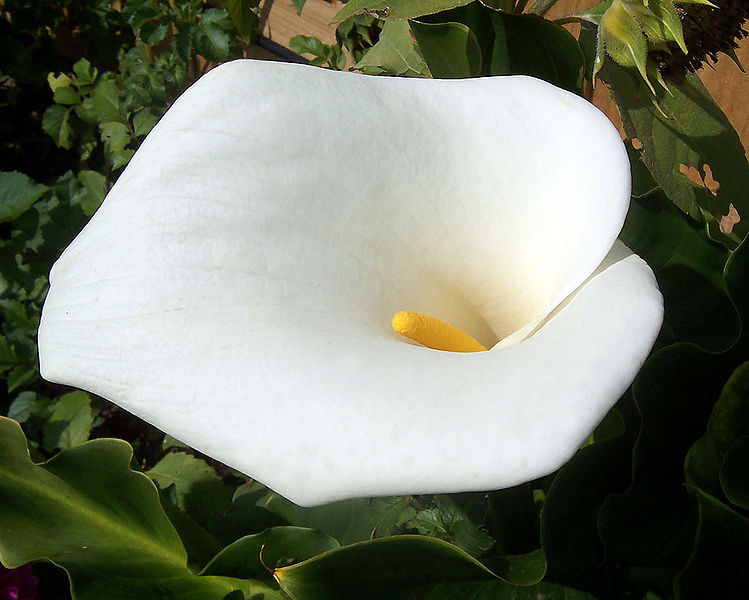
Z. aethiopica is the most common form in British gardens, grown as a marginal aquatic plant. This is a wonderful architectural plant for pond margins in areas that do not suffer from very hard frosts. The leaves alone are an attraction. They are large, 40cm (16in) long, and arrow-shaped, and a bright, glossy green with distinct veins. However, arum lilies are mainly popular for their serene, white flowers.They make superb, classy cut flowers.
Grow the arum lily as a water plant, planting it into a special aquatic basket, in water up to 30cm (12in) deep. Or you can plant it into moist soil around the pond, protecting it with a deep mulch over winter. The Royal Horticultural Society have given it their prestigious Award of Garden Merit.
In frost – prone areas they should be covered with a deep winter mulch. Where temperatures fall below 10 celsius more tender arums can be grown in a warm greenhouse or as houseplants, or can be planted out in summer in a sunny site. Zantedeschia can be propagated by seed or division (divide in spring).
 Zantedeschia elliottiana
  Z. elliottiana close up
Zantedeschia elliottiana
Z. elliottiana close up
For early flowering plants at Easter, plant the rhizomes in December. Keep in a light, cool place at a temperature of 16°C (61°F) by night and 18°C (65°F) during the day. Feed fortnightly with a high-nitrogen fertiliser when in active growth but withhold feed during flowering. A high potassium feed such as a tomato fertiliser can be given once a week after flowering.
Both types of Zantedeschia can be grown in containers. When planting, use a loam-based compost such as John Innes No. 2 and plant the rhizomes (underground stems) just showing at the surface of a container with the eyes of the rhizome uppermost.
 Z. albomaculata by Forest and Kim Starr
  Z. ‘Neon Amour’ by Stan Shrebs
Z. albomaculata by Forest and Kim Starr
Z. ‘Neon Amour’ by Stan Shrebs
Water freely through the summer and feed with a balanced liquid fertiliser every two weeks until the flowers have faded. Zantedeschia are generally pest and disease free, but can suffer from winter cold unless protected.
Zantedeschia species are poisonous due to the presence of calcium oxalate. All parts of the plant are poisonous, typically producing local irritation or a burning sensation in the mouth and occasionally vomiting and diarrhoea. However leaves are sometimes cooked and eaten.