
Category: Gardening techniques
 Before starting to lay foundations for a paved area, decide on the position of plants around a terrace or patio and in planting pockets within the space and leave the areas free of foundation material and paving (wooden shuttering can be used for larger areas). Once the works are over, replace the topsoil of the planting areas with John Innes number 3 compost (and grit if you’re putting in things like Thymes). This will ensure a weed free growing medium with the right nutrients so plants establish quickly.
 Horticultural fleece laid over plants can bring earlier crops and other benefits.
Fleece is a finely woven material that protects crops from wind and cold, and raises soil and air temperatures slightly, all helping plants to advance faster than unprotected crops. If it is anchored in the soil properly it also protects against flying pests, such as carrot root fly.
Because fleece allows water and air to penetrate, it reduces watering requirements and increases airflow around the plants. This encourages hardier growth and discourages disease build – up. If used carefully, fleece can last for many seasons.
Being porous, fleece does not warm the soil as well as plastic cloches or black plastic sheeting. It can also lay flat in wet conditions, making germination difficult, and it can easily tear on windy sites.

Fleece comes in all shapes and sizes, like this zip up jacket protector for tender shrubs by Harrod Horticultural
Other uses of fleece:
-
to extend the growing season, making maximum use of the garden
to improve the performance of half hardy crops, such as peppers
to produce softer, more palatable growth in vegetables that become tough with winter exposure, such as spinach and chicory.
In recent years another material called ‘Enviromesh’ has come on to the market. This fine-weaved plastic netting is strong and lasts for ages. It is fine enough to keep off small insects such as butterflies, carrot fly, flea beetles and leaf miners, and yet durable enough to keep pigeons off. It is also good frost and wind protection. I use it here in Old School Garden, both early in the season to protect young crops and also later as a useful cover for raspberries and other bush fruit which is otherwise unprotected against birds. The downside is that it is more expensive than fleece, so shop around!

Enviromesh tunnel using pegs to hold it down- picture Enviromesh Ltd.
Alternatives which can do pretty much the same job are old net curtains (you can get off white ones relatively cheaply from charity shops) or builder’s netting used around scaffolding or to protect against falling debris.
Sources and further information:
Gardeners’ Advice- RHS Wisley Experts, Dorling Kindersley 2004
Alys Fowler- Netting
Old School Gardener
 More and more garden plants are available from garden centres in flower. If bought in bud, potted bulbs, such as dwarf daffodils, crocuses, hyacinths and tulips, allow you to instantly transform an otherwise dull border into a colourful, early spring centrepiece. This is particularly useful for adding colour to prominent beds near to the house.
Source: ‘Short Cuts to Great Gardens’- Reader’s Digest 1999
Old School Gardener
Old School Garden – 31st December 2015
Dear Walter,
It was great seeing you and Lise over Christmas and we hope you had a wonderful time with your nearest and dearest. As you know, my time in the garden has been limited this month as I tried to finish off the major redecorating in one end of the Old School. I’m pleased to say that’s done and I’m now developing detailed plans to fit out a couple of rooms with some built in furniture. Alas, my plans for the outside are moving slowly, though there’s been a bit of progress I can report.

Dogwoods starting to put on their winter colours
We had a few hours cutting up the fire wood we’d saved from the major tree surgery on our Black Poplar a couple of years ago, and this is all now stacked in the woodshed. At the same time I reorganised the outside storage area (with pallets and angle irons), in anticipation of getting some new logs from our neighbours (who have some Ash trees that have fallen foul of Ash die back).

Awaiting logs (left) and a new leaf mould bay (right)
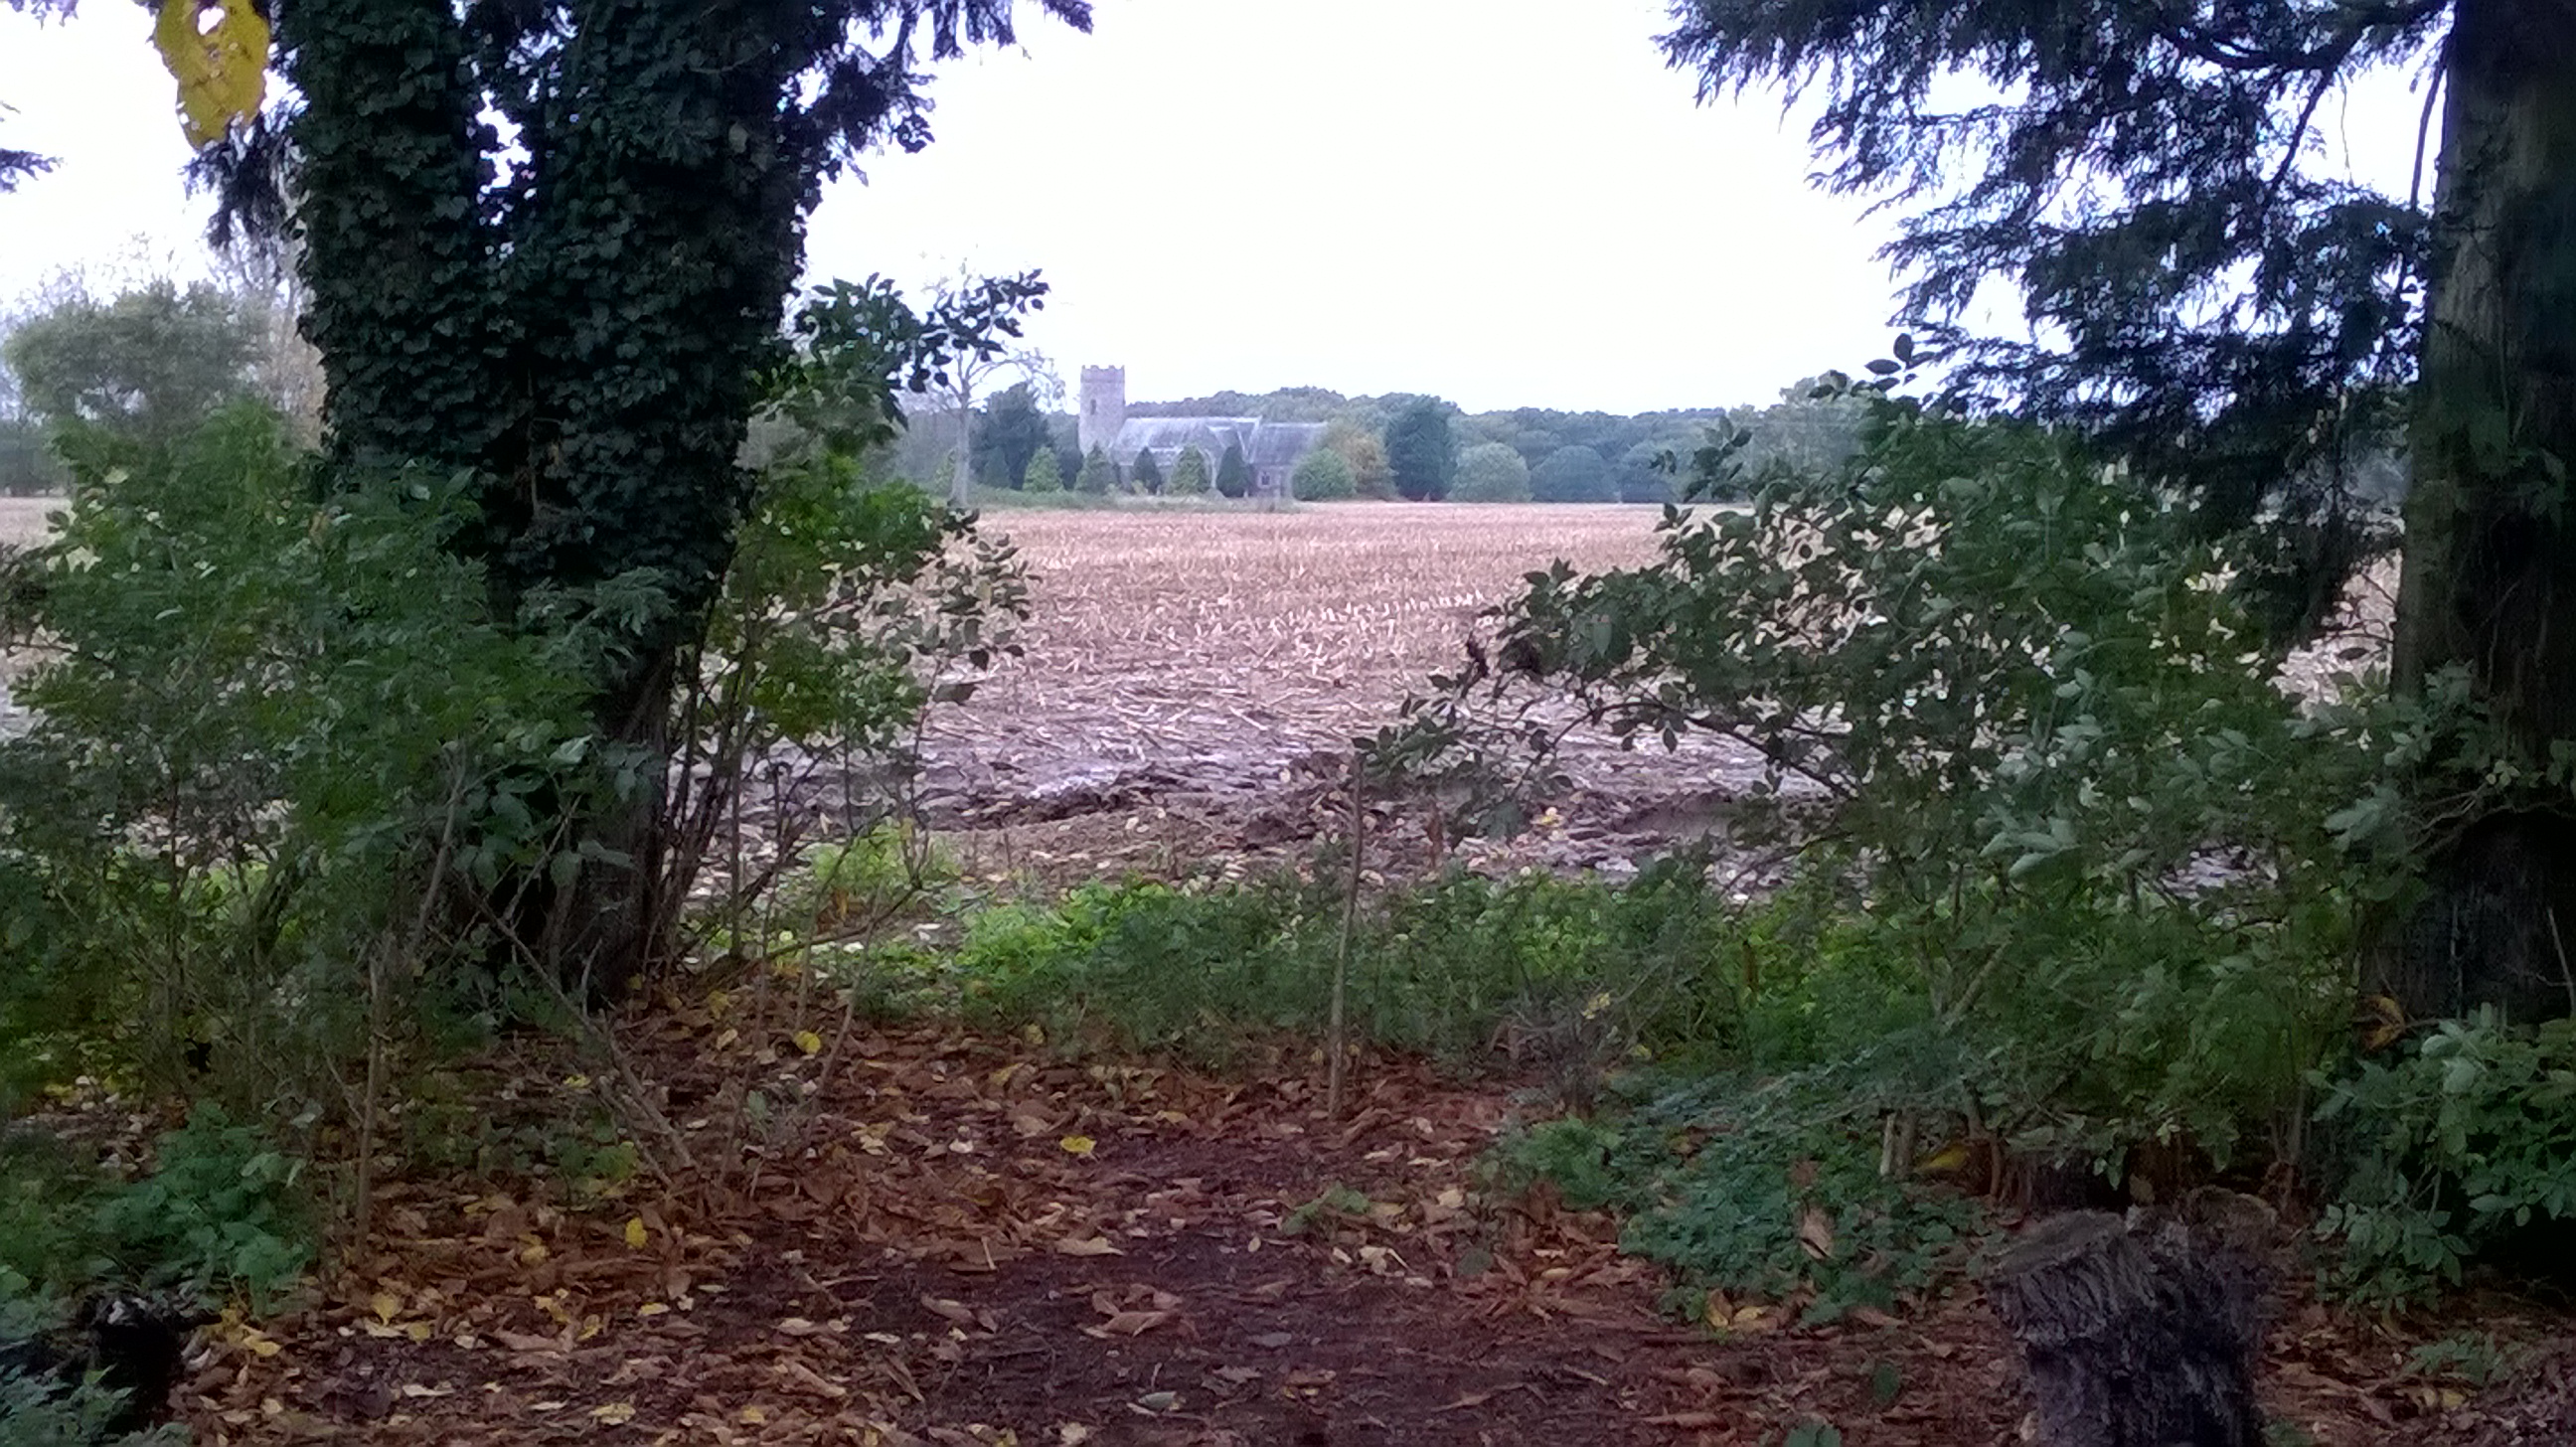
I’ve built alongside (using more pallets of course!) a leaf mould bay, which in the summer will also serve as a good spot for the grass clippings. As you know, in the past I’ve deliberately mixed these two materials together and had some good organic material to add to the soil. Gathering up the final loads of leaves from around the garden has been the other major task this month, though there are a few stubborn oak leaves still to fall. This minor reorganisation in the rear garden area has started to tidy it up, and so I can get to grips with further spring planting in the area with a nice view to the church (where I plan to put another bench).

A work in progress- rubble from one of the shed floors used to begin sculpting a basin for the pond garden…

New possibilities- the view across fields to the church is crying out for a bit of organisation, including a new bench.
I’ve also potted up the cannas (but not yet the dahlias as it’s been so mild here), and planted up the pots they were in with some violas and a range of tulips and other spring bulbs- we should have a great show next spring.
I’ve cleared and planted up the front circular border with the rather ‘whippy’ selection of Wallflowers and Sweet Williams I sowed earlier in the year. I also took the opportunity of swapping over the centre piece shrub here; out came the Star Magnolia and in went another Magnolia (‘Merrill’), which will grow a bit larger than the one it’s replaced and so be a better counterbalance to the large magnolia we have on the other side of the drive. So the Star Magnolia is in a pot for now until I decide it’s final location, somewhere in the pond garden.

Not much to look at right now, but the round border tidied and planted out with a new Magnolia and some spring colour- I hope!

The table top planter- good early growth, but a bit of weeding required too!
The kitchen garden is looking tidier, too, though without much of interest as you might expect. I’m pleased with the progress of the table top planter, though; the unseasonably mild weather has really got the shallots, garlic and broad beans well underway.
You know how in Autumn and early winter you can pick up some plant bargains (the ones that are past their best, but will nonetheless put on new growth if looked after)? Well, I picked up a few trays of violas to fill my ever increasing containers and at the same time got three pots of Pennisetum, reduced to well below their original price- they don’t look much at present, but with a bit of spring care and potting on/ planting out, should do well.

A plant bargain

Violas starting to pick up
I spent a couple of sessions over at Gressenhall focusing on leaf clearing, cutting back and digging over some of the borders, so that will probably be my last time there for now.
One of my jobs in the next couple of weeks will be to finalise the marketing material for my new Garden design course, which hopefully will begin in early February at Blickling. I’ll put details in a page on my blog early in the New Year for anyone interested.
 Well, as we come to the end of another year, I’m grateful that the garden here seems to have survived pretty well, despite less attention than normal; but the ground elder awaits and this and the other weeds will need attention in a couple of months time before the growing season really gets underway!
Very best gardening wishes for 2016,
Old School Gardener
 Start right…
Buy well-branched plants and train immediately after planting to create a framework that is easy to prune and that will flower where you want it. After that here’s what to do in each season…
Autumn/ Winter
Leave the main pruning of repeat flowering climbers to spring, but if you have long, whippy new growth trim this back a little and tie it in temporarily to prevent wind damage. If roses have suffered mildew or black spot, clear leaves to prevent spores overwintering. To rejuvenate rampant ramblers on large structures, cut them back to 1.2 metres from ground level.
Spring
Just before growth begins, prune repeat-flowering climbers by removing dead and exhausted shoots. To get flowers all along the stems, tie in large shoots horizontally in a rough fan shape, once growth starts. Over the growing season, spread out and tie in new shoots.
 Summer
Deadhead ramblers, where possible, and once-flowered climbers by removing old flower heads with 15cm of stem- or 30-45cm if vigourous. To get new growth on old ramblers, cut a few old, spent flowering shoots to ground level.
 Source: ‘Short cuts to Great Gardens’- Reader’s Digest 1999
Further information:
Rose Gardening Made Easy.com
RHS- Pruning Climbing Roses
Old School Gardener

Some of this year’s squash harvest- should keep us going for a few weeks.
Old School Garden – 29th November 2015
Dear Walter,
As we move towards winter, this month has been one of small steps forward, old friend. We had our first frost last week, and I managed to get the tenderest plants under cover in the greenhouse.

Tucked away from the frost…
I’ve noticed that the leaves on the Cannas have started to brown so it won’t be long until they and the Dahlias are also brought in. I won’t be cutting down or removing much else as I like to see the grasses and many herbaceous stems stand over winter- I think this is also good for wildlife.

Cannas on the turn- soon to be dug up and replanted in the greenhouse
The piles of leaves continue to grow, and though many have fallen, there’s still a lot of oak to float down and then be gathered up. I’ve already cut back and placed most of the Pelargoniums into trays for over wintering and once the remaining pots on the terrace are empty, I’ll plant out the four or five packs of tulips I have in the shed.

Tulips ready to go in some of the other terrace containers and borders
In the kitchen garden I’ve pulled the remaining carrots- they are a well-sized and tasty crop. The parsnips and a few leeks are all that remains for winter vegetables, with the promise of Purple Sprouting Broccoli to come in spring. As I reported last month, I’ve used my latest batch of compost to mulch the fruit bushes, strawberries and raspberries and added some manure over the rhubarb and asparagus bed, which hopefully might give us a few spears next year.
I dug up one of the remaining two blackcurrant bushes the other day and took this in to the local Primary School, where I was helped by 7 pupils to divide it and plant it out in their developing fruit garden. It was fun to be back among some familiar (if older) faces and they were very responsive and involved in the hour we spent talking about roots, stems, water and so on.

Awaiitng a Redcurrant, to go alongside White and Black!
So, here we’re left with one large blackcurrant bush (after having three for several years – the freezer is still bulging with the last few year’s crops). I’m now waiting on the arrival of some bare root red currant and raspberry canes at the local nursery, so that I can fill out the summer fruiting raspberries and replace the blackcurrant, which will give us one each of Red, White and Black currants.
Looking ahead, my friend Steve volunteered to order me some seed potatoes, so I’ve gone for some first and second earlies which should be here for ‘chitting’ in January. I also recently ordered some seeds from the RHS scheme for members, which is good value for money. With the seeds I purchased on my visit to Wallington Gardens in September (as well as some harvesting at other gardens we’ve visited), I can see that February will be a busy time (as usual), propagating a new range of interesting flowers for the borders; including one ‘long wanted’ variety, Cephalaria gigantea.

Some heavy flagstones awaiting re-use in the Pond Garden

The Pond Garden design starts to evolve…
My Pond garden project is moving ahead slowly, with the reclamation of some large York stone flags from one of our outside sheds (we’ve had a new concrete floor put in here to replace the stones) and the use of the stony soil from under these to build up the surrounds of the pond area. Before going much further outside on this I want to firm up my design on paper, so the drawing board is out again and I’m sketching out some ideas, including a stepping stone bridge (this is what some of the flagstones will be used for), boggy borders and a ‘beach’. My collection of plants for this area is growing nicely so I’m factoring these into the design too.

Nerine bowdenii

Onions sets starting to go..

Crab apple well laden

Cornus beginning to reveal its colurful stems with Mahonia in flower

Oops! These Red Delicious apples fell before they could be harvested…I’ve not been diligent enough this year!

Table planter starting to fill out with garlic, shallots and Broad Beans
On a broader front, I went over to Gressenhall the other day and began to clear up for winter (including some overdue shearing of the lavender and leaf clearing) and planted out some Catmint I took out of the courtyard planters at Old School Garden. Together with the new plants I purchased recently these will make a good show in a number of half barrel planters we have there.
You’ll have also seen something of my regular visits to Blickling Hall, where the winter clear up and preparation for next season is well underway. Did I tell you that I’m hoping to run a new Garden Design course at Blickling? Based on the one I’ve run in the past at Reepham, it will be slightly extended but will still focus on helping participants to design their own garden or area. I hope for a good level of interest, especially as we shall be able to use the gardens at Blickling as a showcase for many of the ideas and concepts I’ll be covering. If I get the numbers I need this will begin in early February.
Having just replaced the broken glass in our wood burner I think its time to light it and get something to drink!
Very best wishes,
Old School Gardener
 Wood- clean with a pressure washer or stiff brush and water; apply wood preserver to non-treated softwoods, and apply, if desired, teak oil to hardwoods once a year to keep their colour.
 Cast iron- clean with a damp cloth. It rusts slowly when exposed to air. You will need to sand down (or use a wire brush/wire wool) damaged areas and apply a rust converter, followed by an undercoat and topcoat of paint.
Aluminium- wipe down with a damp cloth, and oil all fittings and moving parts.
 Plastic and resin- clean with a damp cloth and detergent, or with a proprietary spray cleaner.
 Stone- clean with a pressure washer or stiff brush and soapy water.
Upholstery- use a proprietary liquid or spray for cleaning.
Source: ‘Short Cuts to Great Gardens’- Reader’s Digest 1999
Old School Gardener

Old School Garden’s Kitchen Garden cropping plan 2016
It’s getting to that time of year when we ‘kitchen gardeners’ like to think about our plans for next year’s food crops. Here are a few thoughts on how to approach this with an eye on maximising what you get for your efforts and minimising costs and waste….
1. Grow only the crops you’ll eat (but also try out something new?)
2. Think ahead and work out how much time you can spend each week before deciding what to grow.

Maximise space by using vertical growing containers like this simple ‘A’ Frame made from pallets
3. Draw up a cropping plan of what you will grow during which season and where in the plot, trying to avoid growing the same things in the same place as last year. And try to maximise the use of your plot by early sowings (e.g. Broad Bean, garlic and onion sets in the autumn) and late sowings (e.g. carrots, lettuce and other winter vegetables). Also, think about planting green manures to provide soil cover and which can be dug in as a soil feed before you sow your first crop of vegetables.
4. Choose pest and disease resistant varieties where available (but have an eye on quality too).
5. Invest in fruit cages and crop covers to protect your produce. Plastic plumbing pipe can provide a relatively cheap frame on which to fix various kinds of protection- including fleece and other material to help warm up your beds as well as keeping pests off.
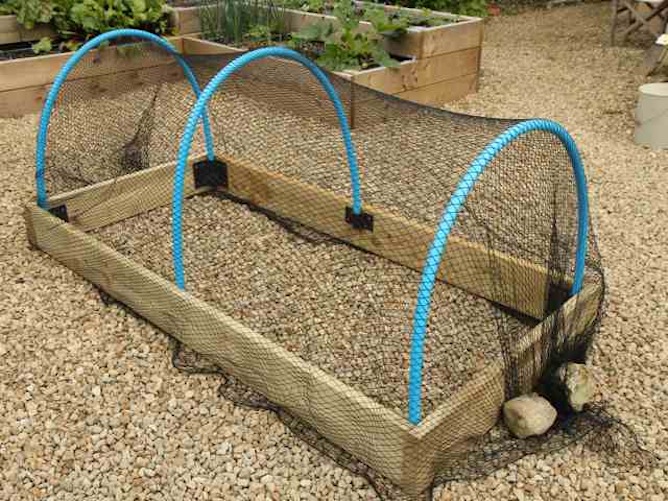
Plastic pipes can provide a good frame for protection
6. Concentrate on growing fewer crops well.
7. Avoid growing too much of one thing or you’ll have waste to throw away (or perhaps pass on to neighbours). Grow small quantities at different times to avoid a glut (‘succession planting’); think about dividing up your plot into smaller parcels (maybe usuing ‘square foot gardening’) and grow varieties that aren’t ‘F1’ hybrids as their plants tend to produce at the same time.

‘Square Foot Gardening’ can help to manage the range, timing and amounts of produce
8. Avoid crops that aren’t worth the effort- either because they’re difficult to grow, unreliable performers or where the cost and quality of what you can buy in the shops makes it sensible to buy rather than grow your own.
Source: ‘Short Cuts to Great Gardens’- Reader’s Digest 1999
Old School Gardener
 Mulch- a layer of natural material spread thickly over the soil cuts down the need for watering, reduces weeding and protects and improves the soil. Mulch matting is also available from most nurseries and garden centres and can be an effective way to conserve moisture and prevent weeds.

Six types of loose mulch
-
Bark chippings- attractive, but expensive (unless you have a supply from your own felled timber or know a friendly tree surgeon who will give you a load for free). Large chunks will last a long time and don’t blow around, though deep wood chips won’t rot quickly. Use chippings that are at least a year old as the early rotting process will ‘rob’ the soil of nitrogen.
-
Cocoa shells- pricey but has more nutrients than most mulches. They bond together when wet so they won’t blow away.
-
Garden compost, manure and leaf mould- free, but soon rots away. Can spread weeds unless well broken down. Compost and well-rotted manure add goodness to the soil as well as improving and protecting it, leaf mould acts as a protective layer and improves soil texture, but is less nutritious.
-
Grass clippings- free, but turns yellow and can introduce weeds. In wet weather, they can become slimy.
-
Composted bark- attractive, but can blow around and may support wind-borne weed seeds. Does not last as long as chipped bark.
-
Gravel- attractive, and long -lasting, but does not add organic matter to the soil. Various grades available.

Bark chippings

grass clippings

Compost
Oh, and straw can also be used around vegetables and of course strawberries (to conserve moisture and protect ground laying fruit), and if you can get hold of it, shredded paper also works!

Shredded paper mulch around dahlias
No-Dig gardening, Sheet Mulching and Hugelkultur
Sheet mulching, No-dig gardens and Hugelkultur have a fair bit in common; basically using organic matter in large quantities to provide a rich growing medium without the need for digging. It depends what school of gardening you’re from as to what your preference is, coupled with your conditions.
No dig gardens rely on adding copious layers of organic material over the soil without digging it, allowing the mulch to break down and form a rich top soil, into which vegetables and fruit can be directly planted. You need lots of organic material.
Sheet mulching
Sheet mulching (or ‘lasgane gardening’) has a similar premise to no-dig. Smother the undesirable plants, mulch heavily, make a ‘lasagne’ of carbon and compost, and plant lots. A good initial burst of energy brings minimal labour further down the line!

Hugelkultur
Hugelkultur (‘hill culture’) are no-dig raised beds with a difference. They hold moisture, build fertility, maximise surface volume and are great spaces for growing fruit, vegetables and herbs.
Effective mulching
Apply at the right time- mulches need to be in place by mid spring when the soil is at its wettest but is no longer cold. There is no point applying a mulch in dry summer conditions because it will stop moisture from getting to the plants and they will require even more watering than usual. Applying compost or well-rotted manure to fruit bushes and trees in the autumn and early spring will give them a boost, and applying leaf mould to bare soil in Autumn can be an effective protective layer to reduce the leaching away of nutrients in the soil during wet winters.
Apply the right thickness- to ensure effective weed control, apply a minimum thickness of loose organic material or gravel of 5cm (ideally 7cm) straight onto the soil surface.
Feed and water plants- add fertiliser before applying a mulch in spring time. Lay a seep hose under mulch matting so that you can supply water easily if needed.
Mulch in rows- when planting vegetables or bedding plants in rows, lays strips of mulch matting along the bed between the plants rather than planting them through the matting.
Problems with Mulches
-
Some mulches can be unsightly or troublesome when scattered by foraging birds
-
All mulches provide refuge for slugs and some types are a refuge for snails
-
If mulches are laid in direct contact with tree stems they can cause it to soften, making it vulnerable to disease
-
A build up of mulch can produce a hard layer, which is difficult for water to penetrate. Avoid this by only replacing mulch when it has rotted away or fork the remaining mulch into the soil
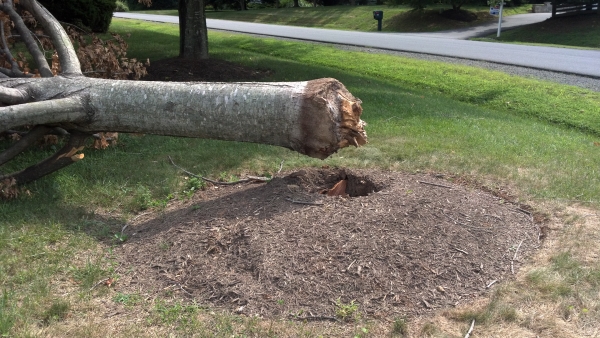
The outcome of piling mulch up around tree stems- ‘volcanoes’
Sources and further information:
‘Short Cuts to Great Gardens’- Reader’s Digest 1999
RHS- Mulches and mulching
RHS- Fruit Trees- feeding and mulching
Milkwood blog– S is for Sheet mulching
Permaculture – Hugelkultur
Proper mulching- no mulch volcanoes
Old School Gardener
 Old School Garden – 30th October 2015

Dear Walter,
Well, this month I can say that I’ve just about caught up with the routine jobs that Old School Garden needs at this time of year, though my bigger projects of pond and shed still await some serious attention.
I’ve spread a large pile of leaf mould in the new woodland garden I’m creating and mixed this with the topsoil and ashes from the old bonfire site I’d deposited there a few months ago. The soil is at least starting to deepen and hold some moisture. Into this mix I’ve planted a lot of ground cover and slightly larger perennials from around the garden as well as many spring bulbs – in waves that should hopefully make a bit of an impact next March and April.

The new woodland garden…promise of things to come.

Rhubarb mulched with manure…

Strawberries, and other fruit, with compost
I’ve also dug over the main kitchen garden beds and added some leaf mould and compost; the latter around the various fruit bushes. It all looks nice and tidy and should help to enrich the soil as well as cover it over the winter. I also finally got around to cleaning up the greenhouse and am about to add its winter insulation before putting in the various tender plants that I try to over winter.

Greenhouse cleaned, ready to insulate and fill..

..with things like these Echeveria.
I also plan to buy some bare root summer fruiting raspberries and a redcurrant bush- I’ve decided to reduce further our stock of blackcurrant bushes to one and donate the other to the local Primary School; how we ever dealt with three bushes I don’t know! (the first one went to Gressenhall Museum last year).
The table planter I created this year has also been stocked with a mix of garlic, shallots and broad beans that should get going and give me a chance of early crops next year. And a mix of white and red onions have also been planted out for the same reason.

Leaves, leaves everywhere
Elsewhere in the garden its been leaf collecting time, and having cleared last year’s leaf mould pile, I’m slightly reorganising the storage areas to accommodate a new supply of firewood (yet to be cut and collected) from our near neighbours. In doing this I’ve opened up a new vista towards the church..maybe a spot for another bench methinks?
New view…one to take advantage of with a new seat?
I had hoped to have shown you some pictures of the beautiful leaves on the Sumachs, but once again a little breeze and they soon disappear! It’s also been a time of hedge cutting and I’m pleased that this big job- with the added task of reshaping the big Laurel hedge in the main garden- has now been completed, as has fence painting. I spent one morning spreading 7.5 tonnes of shingle we had delivered which certainly improves the look of the drive, though in places it’s rather like Sheringham beach!

Autumn colour…Sedums, Cornus…

Malus ‘Red Sentinel’

Cooking apples…

Chinese lanterns
I recently made start on some plant moving, specifically a large white rose bush that was being crowded out by a vibrant Choisya and Viburnum. This helps to plug a gap in one of the mixed borders. I’ve also been mentally logging which other plants need to be shifted, including a Myrtle (which I’ll leave until early spring) and some other shrubs I’ve earmarked for the new pond garden. The plants I now have for this area – including some purchases earlier in the year – are now making a nice little collection and I can’t wait to finalise my design and get on with the pond and its surrounds.

Some of the plants I’ve been collecting for the new pond garden
I also have a big bag of tulips of various kinds as well as some Alliums I want to get into some of the containers we have and some in the borders. A job for next month.
As you’ll read in my other posts I’ve been putting in some sessions at Blickling Hall and also went over to Gressenhall museum last week to plant up some tubs with some drought tolerant perennials; two varieties of Cistus and a compact Buddleja, to be precise, with a few small ivies to add ‘edge interest’.
I gave a talk to a local gardening group the other night on the basics of garden design. This went well and I took the opportunity to plug my new garden design course (‘Your Garden- your Design’) I’m hoping to run at Blickling Hall from February next year.

The switchover has begun…the tender plants formerly in these pots are on their way to the greenhouse..to be replaced by Carex elata aureum (‘Bowles Golden Grass’) and tulips to come..
I do hope you and Lise are in good health as the days shorten and the temperatures drop. No doubt you’re enjoying watching someone else do the autumn tasks now that you’re getting some extra gardening help!
All the best old friend,
Old School Gardener


