Category: Gardening techniques


Hellebores coming to an end...

Hellebores coming to an end…

To Walter Degrasse

Dear Walter,

So, as usual, I’m feeling guilty at all the jobs that are lining up and my failure to make much of an impact on them. Still, I was heartened by Monty Don’s comment in last week’s ‘Gardeners’ World’, when he said: ‘Now’s the time to divide and move herbaceous and other perennials’; phew, at least I’m a little ahead of the game on that score!

However, I do seem to be behind in digging over the borders and getting seedlings going, amongst other things. I got round to planting out some (leggy) ‘cut and come again’ lettuce the other day (under cloches), and yesterday I potted up some other trays of early seedlings. At the same time I started to clear out the greenhouse- of trays of not very successfully overwintered pelargoniums, and the more tender exotics…hopefully a cover of fleece will see them through the remaining cold weather.

Potted up and ready to go- Scabious 'Nana', Geum rivale etc.

Potted up and ready to go- Scabious ‘Nana’, Geum rivale etc.

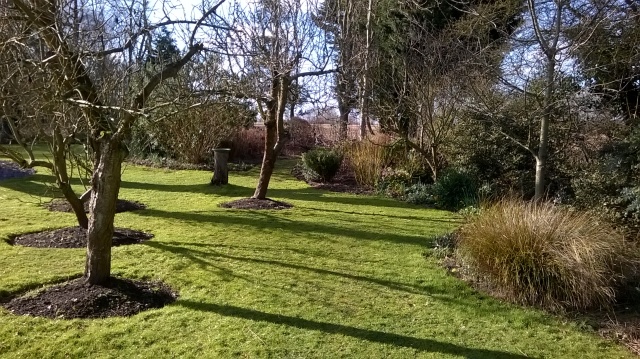
The little bit of digging I have done was very satisfying, having finished cutting back all the dead growth from last year and raked up the remaining fallen leaves from the borders. The daffodils are well into their stride – mine seem to have behaved much as normal as far as flowering time is concerned, unlike other parts of the country, where the abnormally mild winter has brought many species out earlier than ‘usual’. And the tulips are starting to show their colours. I also gave the grass its first real cut of the year at Easter Weekend and that always makes things look a little tidier.

I’ve continued to dig out the new Pond Garden and also- thanks to a gift from Blickling- set up a lowish rustic fence. in front of this I’ve planted a couple of lines of Yew cuttings (which will, I hope reach a reasonable height to form a hedge in a few years time). I’ve also slotted in an evergreen, variegated Jasmine (the variety escapes me), pink Clematis and a Belgian Honeysuckle; these three should nicely clothe this fence and leave some peep holes into the pond garden.

Grass has had its first real cut...

Grass has had its first real cut…

I’ve firmed up my plans for this new area and have decided to follow a ‘Crescent’ theme- you’ll recall that I cut out a crescent (or arc) along the top of the Laurel hedge that bounds this new garden? I plan to repeat this motif in other features; e.g. a crescent-shaped wall of rustic poles to hold up the embankment behind the rustic bench, and a series of rope swags which will form a nice rose and clematis-clad pergola feature over the bench. I’ve also got a rather fine arc of an oak trunk which will look good placed in the garden and have ideas for some ‘rustic arc sculpture’ to also pick up the theme. However, I’ve looked back at my letter to you about this time last year and was horrified to see that the pond excavation was underway then- so a whole year on and not much to show for it!

I’m using the spoil from the pond excavation to create a mound overlooking the fields and church beyond; where another bench can be placed as both a feature and somewhere different to sit- not that I seem to do much of this these days!

Mound under construction with the view across the field to the Church

Mound under construction with the view across the field to the Church

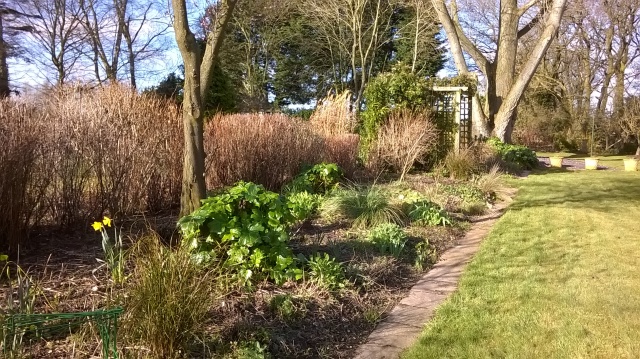
Along side this the woodland garden I set out last year is starting to fill out nicely, with several types of spring bulb beginning to form flowers. In due course I’l extend this to enclose the new bench mound.

The woodland garden starting to fill out..

The woodland garden starting to fill out..

As I write this the remnants of Storm ‘Katie’ have just passed and so I’ve been out with the pressure washer to try to clean up the paved areas of the terrace and around the house. It was hard work and a few hours later it looks better, but retains a lot of algae. I’ll give it a coating of patio cleaner and another go with the pressure washer tomorrow. I also divided up the two main patches of snowdrops the other day, but there is plenty of other plant moving and dividing to do. Along with digging over, mulching, preparing the ground for my ‘first early’ potatoes and so on…

Getting cleaner- the terrace after it's first pressure wash

Getting cleaner- the terrace after it’s first pressure wash

The other big digging job that I’ve just begun involves taking out some cotoneaster shrubs and the roots of the ivy that grew up the front gable wall of the house. I hope that once this is cleared we can get the old paint removed  to reveal the original flint facing and at the same time get the roof flashings repaired to, hopefully, overcome our water penetration problems.

The front border is being dug out to remove ivy roots and a couple of old Cotoneaster plants- these will be relocated to the new pond garden

The front border is beign dug out to remove ivy roots and a couple of old Cotoneaster plants- these will be relocated to the new pond garden

This slideshow requires JavaScript.

I’m pleased to say that more time is now available as the Garden Design course I ran at Blickling has just ended. I think that this went pretty well, though some elements need to be tweaked. The last session involved the participants going into the Walled Garden at Blickling and doing a practical exercise in setting out and preparing the ground for planting etc. Though pressed for time, I think that they found this useful and I’m grateful for Project Manager Mike’s help in this.

Garden Design course participants getting to grips with a setting out exercise in the Walled Garden at Blickling

Garden Design course participants getting to grips with a setting out exercise in the Walled Garden at Blickling

This is the time of year that is full of promise in the garden- stems, flowers and foliage are sprouting, bringing back a welcome splash of fresh colour. My hope is that I manage to get all the preparation done before it’s too late to tread on the ground- and all this this alongside the other big projects in both house and garden!

All the best to you and Lise,

Old School Gardener

There's such a choice of  containers to grow in!

There’s such a choice of containers to grow in!

It’s getting to that time when we plant up containers – with annuals, or perhaps longer lasting plants. Which type of compost should you use?

There are two main types of compost: soil-based (John Innes) and soil-less, which may be based on peat or a peat substitute such as coir or perhaps recycled household waste. In addition, depending on the drainage requirements of the plants you’re placing in containers, you’ll need to add some horticultural grit, Pearlite or similar. And some plants- bulbs for example- like a mix which is less nutrient rich, light and leafy- so add in plenty of leaf mould.

All containers need some means of letting excessive water escape- in most pots there’s a hole in the bottom and permeable liners (or a few holes punched in a piece of plastic) in hanging baskets will achieve the same result. But don’t forget to rest some pieces of broken pot or tile over the drainage hole in the bottom of the pot to avoid the compost washing out.

Plants like this Box ball requires a soil-based compost to thrive long term

Plants like this Box ball requires a soil-based compost to thrive long term

Soil-based composts

These are heavy, retain water well and provide a long-lasting supply of nutrients. They are the best choice for permanent plants in containers and for plants that grow tall and are top heavy. For permanent displays, use john Innes Number 3 because of its high level of nutrients.

Soil- less composts

These are lightweight, clean and easy to handle, but dry out quickly and contain few nutrients. Soil-less composts are best for temporary displays, such as bedding plants and hanging baskets. Peat-based composts are the most consistent in quality, though alternatives are improving all the time (especially some of the recycled organic matter types) and do not deplete the landscape like peat-based types.

Plants like Pelargoniums (these are in the courtyard at Old School Garden), require a very gritty soil-less compost.

Plants like Pelargoniums (these are in the courtyard at Old School Garden), require a very gritty soil-less compost.

Source: ‘Short cuts to Great Gardens’- Reader’s Digest, 1999

Old School Gardener


All-green leaves are starting to poke through the variegated ones ('Reversion')

All-green leaves are starting to poke through the variegated ones (‘Reversion’)

Don’t let Green shoots dominate variegated trees or shrubs

Variegated trees and shrubs – those whose leaves are attractively streaked, striped, edged or splashed with another colour, such as white or yellow-  usually originate as a variegated shoot on a normal green plant. They have to be propagated from cuttings to keep the variegation.

Variegated plants are not always stable, and some shoots can revert to the original green. This often occurs, for instance, with the popular evergreen shrub Euonymus fortunei ‘Emerald ‘n’ Gold’ and with variegated box elders (Acer negundo). the green reverting shoots contain more green colouring (chlorophyll) and produce more food for growth. this makes them more vigourous than variegated ones, so green shoots will eventually overtake variegated growth in size and vigour if they are not removed.

Remove reverting shoots as soon as they arr seen by cutting them back to wood with the variegated foliage. This often means removing entire shoots.

Occasionally shoots will change to entirely cream or yellow leaves, but because of the lack of green colouring they often grow weakly and so are less of a problem.

Source: ‘RHS Wisley Experts Gardeners’ Advice’- Dorling Kindersley 2004

Old School Gardener

A little out of control?!

A little out of control?!

Swift action can prevent ivy from causing structural problems

Self-clinging climbers do not usually cause damage to wall surfaces but ivy supports itself by roots on the stems and where these penetrate cracks or joints they may cause structural damage. Its dense cover can also hide defects in the fabric of the building or hinder maintenance work.

At the Old School we have direct experience of this. The main gable end is of flint and brick construction and when we moved in (some 28 years ago) was painted white. This seemed strange, but we later discovered that we had a damp problem on the inner face of this wall. I took what I thought was the right action at the time and covered the wall with another coat of (this time brown) wall paint and for some years the damp problem seemed to wane. Then ivy got a hold and virtually covered the wall by last year, when we decided to remove this (it was a pain trying to keep it cut below the top of the roof) and try to remove the paint (there are, in fact three layers) and restore the original bare flint surface.

Having removed the ivy we’ve noticed how the roots from the stems have got behind a lot of the paintwork and whilst there’s no obvious major damage, we have seen our damp problems return; maybe a case of the ivy helping to prevent water coming in?! Well, we’re still waiting for quotes to do the paint removal work (and to repair some defective flashing on the adjacent roof which I think partly explains the damp problem), and I’m soon going to get into the border next to the wall to remove the roots of the ivy (I think this might be hard work).

In some situations Ivy up the wall may also provide handy access for intruders and harbour pests like mice. Where brickwork is sound, the main task is to keep growth away from gutters (and certainly from getting in under the roof slope) and paintwork.

Ivy under control, but it can be a pain getting up the ladders and trimming back annual growth...

Ivy under control, but it can be a pain getting up the ladders and trimming back annual growth…

Large climbers can pose a risk to house foundations. This is most likely with older buildings constructed on clay soils that are prone to shrinkage.

In the past, Ivy could be killed by cutting through the stem near ground level and treating the stump with ammonium sulphate, but this chemical is now banned so you have to resort to cutting the main stems and digging out the roots and any seedlings. Top growth may be treated with a brushwood killer or a weedkiller containing glyphosate, but ivy is not easily controlled in this way because the leaves are glossy and the spray simply runs off. Repeat applications may be necessary.

Dead foliage and stems are relatively easy to remove from walls (I used a crowbar to lever off quite large chunks, once these had died off), but aerial roots are persistent and can only be removed using a hard brush, wire brush or paint scraper. Here’s a useful video to summarise the basic approach to removing ivy (including from trees and shrubs).

Source: ‘RHS Wisley Experts- Gardeners’ Advice’ – Dorling Kindersley, 2004

Old School Gardener

WP_20160222_14_13_35_ProOld School Garden – 29th February 2016

Dear Walter,

This month has been one of acquisition. I mentioned my plans for a DIY shed (including shingle roof) at Blickling recently and one of the volunteers, Peter, said he thought his brother might have some shingles he wanted rid of. Well last week I collected  several boxes of cedar shingles and ridge caps from his home in nearby Taverham, and think I might have enough to do most if not all of the roof- for a bargain price of £20.

Shingles...I look forward to fixing these on the roof of my new shed

Shingles…I look forward to fixing these on the roof of my new shed

The shingles are old, but unused and have been stored under cover for several years. You may remember that I’m drawing up plans for this shed based on using the old floorboards taken up when we had some under floor insulation put in? The plans are firming up nicely, and I’m making the shed big enough and tall enough to comfortably store all my unpowered garden tools along with a potting bench and storage for trays, pots and all the other garden paraphernalia like string, plant labels and so on. I’ll need to buy a few extra slabs for the base, as well as the timber for the frame, but the result should be something that will last, be big enough, not cost the earth – and look attractive too (I hope).

The other big project for this year, the wildlife pond, has begun too. Having firmed up my sketch plan I decided to dig out the main boundaries and other features and put in some key shrubs from elsewhere in the garden. While I was at it I thought I’d tidy up and strengthen the planting in the two borders you pass between to get to the pond. These look much better, with one side featuring a relocated Spotted Laurel (which was nestling unseen behind soem holly and whose leaves now pick up the yellow flowers of the Kerria behind), Star Magnolia and  Viburnum along with white Forget – me – Nots, and Verbena bonariensis. The other side features the ornamental Japanese Maple I bought last year along with a Flowering Currant and Anemanthele lessoniana grass, all surrounded with Yellow Loosestrife and purple Geraniums.

I’ve also acquired- again from Peter and his wife Pam, some plants suitable for the pond area and I hope to get some rustic wooden poles and log slices for embanking and an arbour from Blickling when I’m next there – the acquisitions continue!

Elsewhere in the garden I’ve begun the great spring clear up- cutting spent stems and pruning shrubs and trees, raking off leaves from the borders and forking over the soil to remove weeds and aerate. I find this very satisfying work, though I’ve a lot to do. I also cut the grass in a few places a week or two ago (in February would you believe!), as it had grown considerably in the (to date) mild winter.

Borders cleared and ready for weeding and soil tickling...

Borders cleared and ready for weeding and soil tickling…

I’ve also finally got my seed potatoes chitting (‘Rocket’ as first earlies, ‘Charlotte’ as second), and my first seeds have been sown and are starting to germinate; Sweet peas, Scabious, Lettuce, Calabrese, cosmos etc. Some of these are a little spindly, showing the effect of low light levels, but hopefully they can be potted up shortly and placed in the greenhouse to continue their journey.

My garden design course at Blickling proceeds well, I think, with 6 participants keen to find out how best to improve their own plots, which range from small, urban settings to large country gardens. The second session involved a practical measured survey of the Secret Garden at Blickling, which I think they found very instructive, and in tomorrow’s session I plan to cover garden structure which will also involve a visit to the gardens at Blickling to observe the key structural elements of the different gardens there.

Oh, I mustn’t forget my other acquisition this month. Our neighbour Richard and I were chatting over the garden fence one day and he told me of his new mole repeller, and asked if I wanted to get one as he was going to order another. Having used this sort of thing in the past with mixed results I was skeptical, but went along and said I’d give one a try. Well, he duly came round the other day and presented me with this solar-powered device, which emits a regular sound which is supposed to disturb the moles and encourage them to move on. He didn’t want any payment either!

Will it work? My new attempt at mole control,courtesy of neighbour Richard

Will it work? My new attempt at mole control, courtesy of neighbour Richard

So, it is in the lawn where there was last evidence of mole activity (I’ve also come across lots of mole hills in the borders as I’ve been clearing up), so we’ll see what impact it has. I suspect it’s still a little early for mole activity on any scale, so I await the spring with a mixture of trepidation and a small element of hope that this new device might do the trick. Of course with us both having these things we could drive the moles to our third nearby neighbour’s garden! But this shouldn’t be too much of an issue as the chap there, Norman, seems to thrive on his mole catching ability; I think his tally to date is in the twenties!

Well, Walter, I hope this latest letter finds you and Lise in good health and looking forward to the lighter, warmer days of spring that are on the horizon- tomorrow is March after all!

best wishes,

Old School Gardener


brick pedestalThe simplest ornament has more impact if it is raised. Keep your costs down by making your own pedestal; use a length of clay drainpipe, about a third taller than it is wide. Alternatively use some old bricks to make a pedestal. Place a paving slab on a level bed of sand; cement the pipe or place the bricks on top of it. Fix a slightly smaller slab on top with cement and finish off with your ornament; this could be a large sea shell, bird bath or whatever….

You can also use 10- and 18-inch-diameter PVC pipes cut to varying heights to serve as bases for applying a mosaic surface. Overturned terra-cotta saucers turn two of the pipes into pedestals; the third cradles a flowerpot….

mosaic pillarsAnother idea is to make your own concrete pillars, stain them terracotta and put terracotta planters atop them….

stained concrete pillarsChimney pots can also make great planters or pedestals….

chimney pot planterAnd why not some sawn off tree trunks or chicken wire gabions filled with stones…

Or some simple sticks stuck around a piece of wood…

bundle sticks pedestalSources:

‘Good Ideas for your Garden’- Reader’s Digest, 1995

Pinterest

Old School Gardener

P1020823aSeen from indoors, or as you approach a stepped entrance, pots can make a ready-staged display as they mount the stairs. But always make sure that the pots do not obstruct the route and that they cannot fall or be kicked over. You can fix the pots in place with a dab or two of cement, as long as the drainage holes are not blocked, but this means they cannot be moved. The simplest way to secure each pot is to wrap a loop of gardening wire firmly round it and tie the ends of the wire to side railings or other firmly fixed uprights.

Source: ‘Good Ideas for Your Garden’- Reader’s Digest 1995

Old School Gardener

Trees and shrubs stand up well for viewing from a distance through seasons and year after year. Many reward you with flower, foliage, hips and bark interest…here are a few to think about.

Cornus controversa 'Variegata'

Cornus controversa ‘Variegata’

Wedding Cake Tree (Cornus controversa ‘Variegata’)- tiered growth, flat heads of white summer flowers and vivid autumn leaves.


Acer_rubrum_'Scanlon' - autumn leaves

Acer_rubrum_’Scanlon’ – autumn leaves

Red Maple (Acer rubrum ‘Scanlon’) – slow growing tree with dense, conical crown and glowing autumn colour.


Prunus serrula - bark

Prunus serrula – bark

Birchbark Cherry (Prunus serrula) – peeling trunk and branches show gleaming red-brown new bark, which is particularly good in winter.


Rosa moyesii- flowers

Rosa moyesii- flowers

Shrub Rose (Rosa moyesii) – tall shrub with red single flowers all summer and shiny scarlet flask-shaped hips to follow.


Fuchsia magellanica- flower

Fuchsia magellanica- flower

Fuchsia magellanica – bushy shrub with a profuse show of dangling crimson and purple flowers from midsummer to October.


Cotinus coggygria 'Royal Purple'

Cotinus coggygria ‘Royal Purple’

Smoke Bush (Cotinus coggygria ‘Royal Purple’) – feathery plumes of pink flowers in July and deep purple leaves lightening to red in autumn.


Cercis siliquastrum - flowers

Cercis siliquastrum – flowers

Judas Tree (Cercis siliquastrum) – pink spring flowers followed by heart-shaped leaves flushed red at first, then yellow in autumn. I also have Cercis s. ‘Forest Pansy’ here in Old School Garden– the leaves turn lovely shades of crimson and magenta in the autumn.

Source: ‘Good Ideas for your Garden’- Reader’s Digest (1995)

Old School Gardener


WP_20160130_13_10_48_ProI’ve now begun this year’s seed sowing; some early veg and some of the interesting varieties above, courtesy of my visit to Wallington Gardens last year and the RHS seed scheme…Looking at the germination requirements some of these are going to be a challenge!

Old School Gardener

Hellebores one of a few winter flowers currently on show...

Hellebores one of a few winter flowers currently on show…

Old School Garden – 29th January 2016

Dear Walter,

I looked back at the letter I wrote you this time last year, just out of interest. Even though that letter (written from a snowy landscape), painted a picture of relative inactivity, I did at least have potatoes chitting and the first seeds germinated. Alas, even though the weather has been mild (if a bit wet) I seem to be way behind this year.

I do NOT have potatoes chitting (I’m waiting on my friend who’s ordered the seed potatoes this year) and I do NOT have seeds sprouting (I brought the propagators in yesterday along with the seed box for sorting through).

I am looking forward to seed sowing though. Apart from some interesting perennials I bought at a National Trust Garden in the summer, I’m waiting on my selection of seeds from the RHS Seed scheme. These, with early vegetables (I planned out this year’s crops for the Kitchen Garden before Christmas) will give me a lot of seed sowing and seedling potting activity in the coming weeks….

Apart from NOT doing the things I needed to, I HAVE done a few other garden related things. As you know, I’ve been constructing some cupboards in two alcoves in our entrance hall. I’m rather pleased with the result. I bought some solid oak cupboard doors and sourced some oak framing and tops from a local timber merchant (the smell of freshly cut oak in the car on the way home was delightful). These are now finished and being repopulated with photo albums, sewing machines and other stuff… and I’m pleased with the result, and not a little surprised at my own skill level (YouTube ‘How to’ videos are a wonderful invention).

One of two new cupboards I've been building from solid oak...

One of two new cupboards I’ve been building from solid oak…

Well, I was left with a few pieces of spare wood, and had begun making a key cabinet to also go in the entrance hall, but upon putting this together using glued dowels I discovered my skill level wasn’t quite up to that challenge and also concluded that the thickness of the wood looked out of place for such a small item….So, having abandoned that project I had a lightbulb moment and decided to adapt the three sided box I had into a ‘bug hotel’, with a focus on nesting places for solitary bees and the like. Here’s the result…

One Bug Hotel!

One Bug Hotel!

It is rather heavy, but certainly solid. I’ve used a selection of old canes, some willow plant support and an old bamboo window blind, cut to fit and jammed together. I’ll now need to finalise where to put it up. I gather it needs to be in a warm sunny spot at least a metre off the ground. I may try to fix this to the fruit fence in the Kitchen Garden; this is the place where effective pollination is especially important.

Oh, and I nearly forgot that I’ve tied in the summer raspberries – at last! I’ve pruned the apple trees and vine. I’ve also finally dug up the dahlias and apart from a little tuber rot, these seem to be OK, so they are currently drying off in the greenhouse and will be put into slightly damp, second hand compost shortly, to stay under cover until they are ready to plant out later in the season. I also dug up two Osteospermums and put these in pots inside, as I think they might be prone to dying off before the end of the winter if left outside.

I’m pleased to say that my new Garden Design Course, ‘Get More From Your Garden’ looks like it will run as I have achieved the minimum number needed to make it viable, so I’m looking forward to meeting this new group of people and using the wonderful venue at Blickling Hall to explore and develop their own design projects.

Deborah and I have followed your lead and joined our newly established, local U3A (‘University of the Third Age’) group in Aylsham. We went along to a fascinating talk about ‘PAT’ (Pets As Therapy) dogs yesterday, the ones used in schools to help shy children learn to read, as companions for older or disabled people and so on. I’ve also joined a new gardening group and met the dozen or so other people in the group last week for an initial get together to discuss what we want to achieve. It looks like this could include visiting each other’s gardens to discuss problems and ideas, swapping plants, visiting open gardens etc.

An ahhhh moment...

An ahhhh moment…

So, I look back. And whilst I’m behind in some garden-related things, hopefully there’s still time to catch up (especially with the seed sowing). I’m pleased to hear that your new terrace has been laid and look forward to seeing it when we visit you and Lise at Easter. No doubt you’ll be planting up the pockets you left amongst the paving soon?

all the best for now,

Old School Gardener


Finding Nature

Nature Connectedness Research Blog by Prof. Miles Richardson

Norfolk Green Care Network

Connecting People with Nature

Discover WordPress

A daily selection of the best content published on WordPress, collected for you by humans who love to read.

Susan Rushton

Celebrating gardens, photography and a creative life

Unlocking Landscapes

Writing, photography and more by Daniel Greenwood

Alphabet Ravine

Lydia Rae Bush Poetry

TIME GENTS

Australian Pub Project, Established 2013

Vanha Talo Suomi

The Journey from Finnish Rintamamiestalo to Arboretum & Gardens

Marigolds and Gin

Because even in chaos, there’s always gin and a good story …

Bits & Tidbits

RANDOM BITS & MORE TIDBITS

Rambling in the Garden

.....and nurturing my soul

The Interpretation Game

Cultural Heritage and the Digital Economy

pbmGarden

Sense of place, purpose, rejuvenation and joy

SISSINGHURST GARDEN

Notes from the Gardeners...

Deep Green Permaculture

Connecting People to Nature, Empowering People to Live Sustainably

BloominBootiful

A girl and her garden :)