
How to make leafmould

Trench composting is an underused way to improve your soil texture and add fertility to your soil. And it has the added bonus of getting rid of those tough old stems of spent sunflowers, sweetcorn and brassicas. We spent a day trench composting the quarter of our allotment in which we shall be growing our roots next year. Many books tell us not to add manure or humus to the patch where you are planning to grow your root crops but we have found by experience that if the trenching is carried out in early autumn it works just fine. As the depth of soil on our plot is less than a border fork deep we need to keep adding to it in an attempt to build up some depth.
The job gets started as Jude, aka Mrs Greenbench or The Undergardener, takes out a 2 foot wide trench down…
View original post 356 more words

Where’s Wally? 250 Master Gardeners and Composters (including me) line up for the annual group photo

No, not a set from ‘Dr. Who’, just a display of ‘dalek’ and other types of compost bin!

One of two Cakes specially made to celebrate the conference-a masterly effort from a Norfolk Cake maker!


If you’ve enjoyed reading this post and others on this blog, why not comment and join others by signing up for automatic updates via email (see side bar, above right ) or through an RSS feed (see top of page)?

Soil that you can make pots from is a challenge…
‘My garden seems to have a very heavy clay soil. i want to know what to do to make it easier to work with and I’ve heard the terms like structure, texture and tilth – can you explain what these terms mean and advise me on what to do to improve my soil?’

The basic types of soil texture
The components of soil structure

Adding compost or other organic material to the soil by digging in or as a mulch is a must…

Different soil types
Further information:
Feed your soil not your plants
If you’ve enjoyed reading this post and others on this blog, why not comment and join others by signing up for automatic updates via email (see side bar, above right ) or through an RSS feed (see top of page)?

To buy or not to buy? – compost bags at a Garden Centre
I’ve had variable results when I’ve used the shop – bought multi- purpose compost for seed germination, as its larger fragments can be a bit much for some seeds to make contact with and get going. On the other hand, the special seed compost I’ve bought can be a bit too dense and water-retaining , so just the opposite problem. So, now I’m wondering if I should try to make up my own seed and possibly potting mixes. The main argument seems to be that by doing this you can tailor your compost to the job in hand, and more generally, for potting on different plants with their different needs. So, when a new ‘Master Composter’ Factsheet arrived from Garden Organic which contains some interesting information on making your own seed and potting composts, I thought that you might find it helpful too. So I’ll summarise the main points here – maybe by the end of the article I’ll decide what I’ll buy and what I’ll make myself!
- Organic, peat free composts aren’t always available to buy
- Even commercially produced seed and potting composts have a limited life. If you ony need a small amount buying a 50 or 60 litre bag can be wasteful
- It seems easy to do (hmm, I’ll reserve judgment on this one)
- The basic ingredients such as loam, compost and leaf mould can be readily available at no cost (hmm again, I’m not sure about the quality of my garden soil as the loam…)
- You can make the amount you need as you need it
- If you prefer using animal- free products you can be confident about the ingredients
- You can make different mixes appropriate for different plants and purposes.

What to fill seed trays and modules with?
Apparently it isn’t as simple as it first seems….
Commercial producers spend years developing their products and it’s hard to replicate the characteristics of an ideal growing medium – good structure which retains water and air well but also drains well and which provides the correct nutrients for the plant.
Although plain garden soil will grow seedlings and plants very effectively in your garden, it won’t be as effective if it’s used in a tray or pot. For starters the number of micro- organisms in garden soil is mind blowingly large, and they create just the right balance by regulating nutrient levels, suppressing diseases etc. If this balance is disturbed by using just a small volume of soil in a tray, for example, many of the benefits of garden soil are lost and problems can occur with germination and plant development.
So, trying to come up with the right balance of nutrients in a homemade mix is a big challenge, as the levels of essential nutrients will vary in organic compost and their release is unpredictable. An over – rich mixture, for example, can be as much of a problem as one lacking in nutrients. Ideally, you don’t want a mix that breaks down, leaving trays and pots half empty, or a mix which ‘slumps’, becoming compacted and airless, let alone one which contains diseases.
Seed and potting composts consist of two main ingredients:
Specific ingredients are:
Loam – good quality garden soil or home-made loam from old turf stacked upside down and covered for 6 – 12 months and then sieved and pasteurised before used for seed sowing,
Peat substitute such as coir and composted fine grade wood waste. Reclaimed peat from river dredging can also be used (but this can contain weed seeds).
Garden compost is nutrient rich and isn’t needed for seed germination, but is useful in potting mixes and for longer term growing in containers. The release of nutrients can be very variable and it can contain weed seeds.
Leaf mould – 2 year old leaf mould can be used neat for seed sowing or incorporated into mixes to improve structure. It’s rich in micro organisms but low in nutrients and might contain some weed seeds.
Worm compost (from wormeries) is ideal in mixes needing plenty of nutrients and has good water – holding capacity, so is useful in hanging baskets. It can also be spread on the top of these and other containers and watered in where an additional feed is required during the growing season.
Manures – well rotted strawy farmyard manure provides both bulk and nutrients and is best used in rich mixes for long term use, such as tomatoes and peppers growing in pots.
Horticultural grit is needed to ensure good drainage if the loam is too heavy.
Organic fertilisers – bone meal, hoof and horn etc. can be added to a mix to provide the necessary plant nutrients. These ‘slow release’ materials are used in small quantities. Sea weed is another option for those who prefer animal – free fertilisers.

Worm compost- a good top dressing for containers and hanging baskets
Different composts suit different needs (all parts are by volume, not weight):
Seed composts do not need to be very nutritious as seeds come with their own initial power store. Once a pair of true leaves has formed the seedlings need to be potted up into a richer mix. For seed compost use mature leaf mould or a mix of equal parts loam and leaf mould.
Temporary potting mixes need to be rich enough to sustain a plant during its early life, aiming for sturdy plantlets. This is where making a mix suitable for different types of plant and different stages in their growth process comes in. It might be tempting to make up a rich mix but it’s probably better to be a bit mean on the nutrients to encourage plants grow up ‘hard’. Too much nutrient can lead to lots of soft, lush foliage which is prone to weather damage, and attack by pests and diseases. There are different recipes to try out: either equal parts loam, garden compost and leaf mould; or, 2 parts peat substitute, 1 part grit, 3 parts loam and half part garden compost; or, 2 buckets loam,2 buckets coir/ leaf mould, plus 225g seaweed meal,110g bonemeal and 85g hoof and horn; or 3 parts leaf mould, 1 part worm compost
Long term potting mixes– a good balance of slow release nutrients is needed to sustain plants in containers for a long time. Try either 4 parts loam (no need to pasteurise) with 2 parts leaf mould or 3 parts loam; or, 3 parts loam, 1 part manure, 1 part leaf mould – this is especially good for hungry, fast growing plants like tomatoes, aubergines and peppers in pots.

My usual choice of ‘multi-purpose’ compost- other brands are available…
I can see the advantages of mixing different things for different plants and stages in development and as seed compost is quite expensive to buy it is probably well worth me making this up for myself. As to potting mixes, I think I don’t produce enough leaf mould and compost and have a good enough loam to make it a realistic option on any scale. It might be best overall if I use most of my own leaf mould as a soil improver in the autumn and garden compost as a mulch in the spring as now, but perhaps use some of these ingredients (and grit) to amend the multi – purpose (peat free) compost I normally buy to make up different potting mixes according to the plants and their stages of development.
Source: ‘Potting composts: Making your Own’ – Master Composter Factsheet 5 – Garden Organic
If you’ve enjoyed reading this post and others on this blog, why not comment and join others by signing up for automatic updates via email (see side bar, above right ) or through an RSS feed (see top of page)?
 Nettles are one of the most widespread and well-known plants in Britain. You might think of them as weeds or nasty things to avoid with bare legs, but they do have some uses in the garden (as well as for making paper, dyeing cloth and eating)!


Making Nettle Plant Food- image from Tracey the transitioner
Source: Garden Organic Master Composter Factsheet 6
Further information:
Nettles- Royal Horticultural Society
Perennial Nettle- Garden Organic
Top ten uses for Nettles- Daily Telegraph
If you’ve enjoyed reading this post and others on this blog, why not comment and join others by signing up for automatic updates via email (see side bar, above right ) or through an RSS feed (see top of page)?

‘Friend or foe?’
As part of the ‘Master Composter’ project providing advice to families and groups about using green waste to make compost and enrich their soil, I’ve recently been sent a useful factsheet about organic pest and disease control. And pest control – specifically pigeons and blackbirds – is presently keeping me well exercised in the garden! More positively, I don’t seem to have had much of a problem with either slugs and snails, aphids or caterpillars – so far. A harsh winter and dry spell may be part of the answer. Anyway, I thought I’d share the basics of this factsheet with you (plus a few thoughts of my own).
Too much fertiliser and your plants will be soft and sappy – providing a lovely lunch for pests and encouraging you to spray to deal with them. Not good practice. Better to feed your soil with a ‘wholefood’ diet of garden compost and leaf mould rather than those ‘fast food’ fertilisers designed to feed the plant and not the soil.
Choose varieties of plant that can withstand the attack of pests and disease; e.g. blight resistant potatoes such as ‘Remarka’ and Sarpo’ and root aphid resistant lettuces like ‘Milan’.

Leaf mould – a great way to improve your soil
Focusing on the veggy garden, crop rotation is an essential technique to build soil fertility and controlling the build up of pests and diseases. Divide your veg into at least four groups (those in the same or similar families and having similar feeding habits) that stay together each year, but move onto another part of the garden every spring.
Keeping pests out of your crops and off your choice plants is probably the most effective way of reducing if not preventing damage. There is a range of different barriers and scarers suited to different types of crop or plant:

A beer trap will entice slugs
Beers traps for slugs do work. Codling and Plum moth traps hung from apple trees and other ‘sticky’ traps can also be effective, using a pheromone stuck to a sticky base which attracts male insects and gets them stuck in the glue. Greasebands painted around the trunks of apple trees in autumn will prevent the wingless female winter moth from climbing up the tree to mate. Sticky glue is also useful for glasshouse staging if you have a problem with ants. Sticky yellow bits of card hung up in greenhouses can help reduce the white fly population.
These are your best friends when it comes to controlling pests in your garden. Planting simple annuals among the veg (e.g. Marigolds, Californian poppies), will attract a wealth of beneficial insects like ladybirds and hoverflies which will gobble up your aphids. I’ve put some marigolds alongside my tomatoes in the greenhouse for this reason and also planted Nasturtiums which can attract cabbage white butterflies as a diversion away from my Brassicas.You can also plant a few native shrubs and herbaceous perennials (e.g. hazel and hardy geraniums), create a pond, leave a small pile of logs in the corner of the garden or create a ‘bug hotel’ and feed the birds throughout the winter. There are other ‘biological controls’ that you can buy to deal w ith specific problems- little packets of some of the bugs for use in the greenhouse as well as nematodes that can attack some of the more troublesome pests. Any or all of these will keep enough wildlife in your garden to eat literally thousands of pests and their eggs!

‘Bishybarnabee’ – or a ladybird- will eat loads of aphids at one sitting
Think ‘clean cut’. If you’re removing a dead or diseased branch from a tree (e.g one with coral spot), make sure you cut into healthy wood and always wash your tools in boiling water or wipe them with surgical spirit afterwards. Scrub out pots and give your greenhouse a good scrub every winter to get rid of over wintering pests. Maximise air circulation by correct pruning of plants and leaving just a little more space between plants will help control fungal diseases, though his needs to be balanced of course against closer planting to keep weeds under control! Controlling powdery mildew in Roses is something that benefits from greater air circulation, for instance. Finally, and most importantly, be vigilant and check your plants regularly so that any pests and diseases don’t get a foothold. For example, start checking the centre of any Gooseberry bushes in April for Sawfly eggs and larvae. Also be wary of accepting gifts of onion and cabbage plants, as they may well carry onion white rot or clubroot respectively!
Source: Master Composter Manual Factsheet 4, Jojo Norris, Garden Organic 2013
If you’ve enjoyed reading this post and others on this blog, why not comment and join others by signing up for automatic updates via email (see side bar, above right ) or through an RSS feed (see top of page)?
 My previous articles on green manure have covered the why, what, where and when – this final article deals with how to use them to best effect.
Processing your green manure so that the ground can be used again begins around 3 – 4 weeks before you want to make use of the plot for another crop or plant, or alternatively when the green manure approaches maturity – whichever comes first.
There are various ways in which to process the green manure:


You may garden using the ‘no dig’ method. If so, you migth feel that grazing rye, even though it is an excellent soil improver, should be avoided. However, you can cut down the rye, spread it with well-rotted manure if required and then plant a crop of ‘no dig’ potatoes on the surface. these can then be covered with a mulch of hay or straw (around 10cm deep) adding more of this as they grow, and topping off with layer of grass mowings before the potato foliage meets across the rows.
If you forget to deal with your green manure in time and it becomes tough and woody, don’t worry. Just cut off the tops and put them on the compost heap, then dig in the roots or cover with a thick mulch.
If you dig in young annual green manures during the summer they will decompose rapidly, leaving you able to plant up the area within a few days of digging in. Tougher plants, like grazing rye, need to be dug in a few weeks in advance of when you need the ground again, especially in spring when decomposition is slower. If you’re aiming to create a fine seed bed after your green manure remember to leave the ground for a longer period than if you are simply planting into the ground. And avoid using green manures where you plan to sow small seeds such as carrots, parsnips and spinach as some green manures have a chemical which inhibits germination.

Phacelia in flower
Source: ‘Green Manures’- Garden Organic Guide. September 2010
Other articles in this series:
Green Gold: 12 plants for soil improvement
Green Gold- 7 reasons to use green manures
Green Gold: Where and when to use Green Manures
If you’ve enjoyed reading this post and others on this blog, why not comment and join others by signing up for automatic updates via email (see side bar, above right ) or through an RSS feed (see top of page)?

Lupins are useful green manures in light acid soils
Buckwheat has flowers that are attractive to beneficial insects
Sow green manures from spring to autumn depending on the variety, and sow broadcast if they are small, or in rows if larger. Rake the ground to a fine level tilth – prepare a good seed bed as you would for other crops. Leave the green manure to grow until three or four weeks before you want the ground for something else, or until the green manure approaches maturity, whichever comes sooner. Green manures vary in their time to reach maturity; e.g. Mustard goes over rapidly as it flowers, so it’s best dug in once the first flower buds show. Other annuals can be dug in at or just before flowering. Clovers and other perennials can be cut down after six months or so to encourage re – growth.
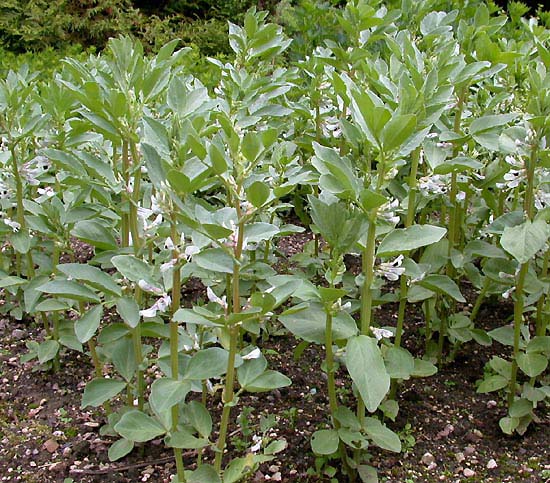
Field Beans prefer heavy soils and can be over wintered
Alfalfa – Sow April – July. Grows 1 year plus. Avoid acid and wet soils. Nitrogen fixer*. Deep rooting and can be grown for several years, using cut foliage as a mulch.
Buckwheat – Sow April – August. Grows 1-3 months. Thrives on poor soils. Not a nitrogen fixer. Attractive pink flowers attractive to beneficial insects.
Crimson Clover – Sow March- August. Grows for 2-3 months, may over winter. Prefers lighter soils. Nitrogen fixer. Dramatic crimson flowers, attractive to bees.
Essex Red Clover – Sow April – August. Grows 3 – 18 months. Sow in good loam. Nitrogen fixer.
Fenugreek – Sow March – August. Grows 2-3 months. Well drained soil. Unlikely to fix Nitrogen in the Uk due to lack of suitable bacteria.
Field Beans – Sow September – November. Grows over winter. Prefers heavy soil. Nitrogen fixer. Sow alternate rows with grazing rye to improve weed control.
Hungarian Grazing Rye – Sow August – November. Grows over winter. Likes most soils. Not a Nitrogen fixer. The best for soil improvement, especially on clay soils – but will inhibit small seed germination after digging in.
Lupin – Sow March – June. Grows 2-4 months. Light, acid soils. nitrogen fixer.
Mustard – Sow March – mid September. Grows 1-2 months. Prefers fertile soil. Not a Nitrogen fixer.
Phacelia – Sow March – mid September. Grows 1-3 months, may over winter. Most soil types. Not a Nitrogen fixer. Scented lavender flowers attract bees and beneficial insects.
Winter Tares – Sow either March – May or July – September. Grows 2-3 months, over winter. Avoid acid and dry soils. Nitrogen fixer, and this is quickly available to new plants after digging in.
Trefoil – Sow March – August. Grows 3 months+ . Will stand light dry soils, preferably not acid. Nitrogen fixer. Good for under sowing, e.g. with Sweet Corn.
*Some plants have the ability to gather Nitrogen from the air and ‘fix’ this in nodules on their roots- this supply of Nitrogen is very beneficial to the plants following on.

Mustard is a Brassica and grows very fast, but doesn’t do well in very dry weather
Source: ‘Green Manures’- Garden Organic Guide. September 2010
Other articles in this series:
Green Gold- 7 reasons to use green manures
Green Gold: Where and when to use Green Manures
If you’ve enjoyed reading this post and others on this blog, why not comment and join others by signing up for automatic updates via email (see side bar, above right ) or through an RSS feed (see top of page)?

‘Iron Man’ Gorilla outside the County Council tent- one of many hand painted gorillas that have just been put on display around Norwich in aid of a local children’s charity.


Before this afternoon stint I was able to stroll around, camera in hand, and soak up the atmosphere on this first of the two day show. Over both days the organisers are expecting around 90,000 people to attend, and they are aiming to ‘break even’ financially. It’s interesting that the show has managed to survive the tough financial times as some other county shows have folded completely due to dwindling attendances, not moving with the times or a lack of facilities to cope with poor weather. No signs of that at Easton, where there was a busy, joyful atmosphere, especially as the weather (until the very end of the afternoon) was warm and sunny.
 Definetely a day of hats…
  More hats/helmets…
  Summer hats…
  And more hats…
  Red and black… plus tea and cakes
  and other hats…
As expected the crowds were a curious mix of ‘old and new’, or perhaps more accurately, different social groups – the well dressed ‘County Setters’ in their blazers, shirts and ties, flowery hats and summer dresses (most involved in farming in some way), alongside groups of school children and more casually dressed families, teenagers and older couples. A microcosm of the local community in what remains predominantly a rural, agricultural County. Of course an agricultural show wouldn’t be the same without the ranks of huge and intricate machinery, some old, some brand spanking new as well as age-old crafts like horse shoeing and sheep shearing – including an impressive display by the Gressenhall Fam Manager, Richard Dalton, using a set of 100 hundred year old hand cranked clippers!
 Steam traction engine from yesteryear
  A trio of Fordsons not quite so old
  Morris Minor Van – on podium
  Big boy
  Horse shoeing display
  Dina and Hannah (in the red) attednignt o the Gressenhall sheep before they were shorn…
  Milking practice…
  Richard Dalton sheep shearing
It’s always impressive to see some of the ‘beasts’ entered for the various cattle, horse, pigs and other animal competitions and the efforts put into their grooming and presentation for the judges. On the horticultural front there was an impressive floral display in one marquee, including some delightful orchids, chrysanthemums and looser mixed arrangements of garden plants nicely in flower and leaf. There were also some amazing floristry displays and the usual competitions for different types of home grown fruit and veg- some impressive Gooseberries caught my eye in particular. I managed to come away from the Norwich and Norfolk Horticultrual Society ‘plant tombola’ with a hand full of very nice seed packets, so I now have a supply of purple Pansies, Amaranthus, Morning Glory and Carrots to add to my seed bank!
 Champion bull
  Champion cow
  Pigs being ‘persuaded’ to walk round the ring
  Guinea pigs looking rather ‘sheepish’- part of the Norfolk Industries for Disabled people stand – this social enterprise makes animal bedding.
  Turkeys
  One of the Cromer Crabs gathered from the sea that morning and destined for a restaurant in a couple of days time…
  A beautiful wild flower display
  Orchids
  Exotics – Cannas
  Elephants…
  You can cover almost anything with artificial grass…
  Floral design winner
  Hostas heaven
  Chrysanthemum combos looked super
And the varieties of food on offer reinforced the summery feel too – tumblers full of freshly cut fruit, strawberries and cream and of course ice cream a plenty. And not wasting food was one of the key messages of the Norfolk Waste Reduction Team’s display, which also hosted the Master Composter/Gardener stalls, along with some fascinating crabs illustrating the work of the Fisheries Conservation Agency. This was a great draw for the children who continually asked ‘which one is the most dangerous?’- in truth none of them really, as despite their fierce looking claws, the staff were able to pick them up to show the to the crowds without any apparent fear – or nipping!
 Prize winning Gooseberries
  Prize winning onions
  Strawberries and cream
  Fruit cocktails
My afternoon was spent talking to show goers about growing their own food and composting. I had some very interesting chats including a teacher from a local High School who teaches horticulture there and sounds to have a splendid school garden, several couples about starting or improving their compost, helping children to make paper pots and sow seeds to take home (along with all the other ‘trophies’ they collected from the stalls at the show), and other show goers clearly just enjoying growing their own food and with whom I shared tales of the late spring, compared potato growth rates and discussed rhubarb diseases. The next door County Council tent with which we were associated also put on a splendid carousel of displays and activities (including live music) illustrating the array of ways in which the Council serves Norfolk – in fact it (and we) were so good that the whole stand won the Show’s top prize for ‘trade’ stands, so congratulations all round!


If you’ve enjoyed reading this post and others on this blog, why not comment and join others by signing up for automatic updates via email (see side bar, above right ) or through an RSS feed (see top of page)?
Nigel Boldero aka 'Old School Gardener'
| Nigel Boldero on Fighting to Reduce Climate Cha… | |
| Anonymous on Fighting to Reduce Climate Cha… | |
| Anonymous on PicPost: Carrot, my foot! | |
| 18 Surprising Hydran… on Plantax 16: Hydrangea the wate… | |
| Nigel Boldero on Poppyland: A Victorian romance… | |
| Anonymous on Poppyland: A Victorian romance… | |
| Anonymous on Plants to die for… | |
| Isabella Childress on PicPost: Forest, but not as we… | |
| Happiness Factor on Is child-friendly planning a l… | |
| zidane on Top Tip: On a Pedestal- make m… |


Nature Connectedness Research Blog by Prof. Miles Richardson
Connecting People with Nature
A daily selection of the best content published on WordPress, collected for you by humans who love to read.
Celebrating gardens, photography and a creative life
Writing, photography and more by Daniel Greenwood
Lydia Rae Bush Poetry
Australian Pub Project, Established 2013
The Journey from Finnish Rintamamiestalo to Arboretum & Gardens
Because even in chaos, there’s always gin and a good story …
RANDOM BITS & MORE TIDBITS
.....and nurturing my soul
Cultural Heritage and the Digital Economy
Sense of place, purpose, rejuvenation and joy
Notes from the Gardeners...
Connecting People to Nature, Empowering People to Live Sustainably
A girl and her garden :)

