Rosa rugosa ‘Frau Dagmar Hastrup’- a shrub rose growing at Old School Garden
What an appropriate question for St. Valentine’s Day, from Minah Petaly of Lincoln:
‘I’ve heard that old roses and shrub roses only flower once a year and that shrub roses would be too big for a small garden like mine. And what would you suggest I grow to get large, decorative hips (no sniggering please)?’
Ha, ha, Minah! It’s true that all the old garden roses will flower once a year but there are some notable exceptions: most Bourbons, the hybrid perpetuals and China roses. This is also true of the wild (species) roses, however, a high proportion of modern shrub roses raised during the last 100 years are recurrent flowerers.
As to size, it’s by no means true that all shrub roses are too large for small gardens. Some of the modern ones developed in the past century will reach only 1.2m (4′) high or less. And the varieties ‘Yesterday’, ‘Frank Naylor’, and ‘Saga’ could also be added to these.
R.’Yesterday’
Of the older roses, most of the Gallicas and China roses grow within this limit too, as do a few examples from other groups. Particularly suitable for smaller gardens are the alba roses like ‘Felicite Parmentier’ and ‘Konigin von Danemarck’ while the species or wild rose ‘Canary Bird’ (pause for a chant of ‘Come on you Yellows’- the canaries is the nickname of Norwich City F.C.), can be kept to a moderate height if grown as a standard.
R. ‘Felicité Parmentier’
R. ‘Königin von Dänemark’
Looking at hips (!), for their sheer size and redness, pick members of the rugosa family that have single flowers, such as ‘Frau Dagmar Hartopp’, R. rugosa alba, and ‘Scabrosa’. Another good one, growing here in Old School Garden is ‘Frau Dagmar Hastrup’. As they are recurrent flowerers, the hips from the first flush of flowers appear with later blooms.
A hip on Rosa rugosa
Many of the wild (species) roses have hips in varying colours from red through to orange and yellow, and some even black. R. roxburghii has prickly hips resembling the fruit of the Horse Chestnut (conkers), while those of R.pomifera resemble large red gooseberries. Perhaps the most spectacular hips are those of R. moyesii and its various hybrids; they are bottle-shaped, bright red and each may be up to 50mm long. To continue with the footballing (soccer) theme, this is perhaps one for Manchester United supporters – both on grounds of colour and name!
As spring approaches it’s around now that some shrubs should be pruned. This week’s question, from Celia MacKnyff of Cutaway in Yorkshire, asks:
‘What is a sub shrub and should I treat it differently to an ordinary shrub?’
Celia, a sub shrub is a plant that is woody at the base but has annual stems like those of a herbaceous plant. These stems die back most years to the older woody growth. The ‘Rose of Sharon’ (‘Great St. John’s Wort’ or Hypericum calycinum) is a good example. The stems should be cut back every spring, not to ground level, but to the new shoots on the woodier stems at the bottom. I’ve been out in Old School Garden doing some pruning of these and other shrubs in the last few days and, not surprisingly as we’ve had such a mild winter to date, many of these stems look pretty healthy and are still carrying lots of green leaves. Nevertheless, if you want to benefit from fresh new growth, now’s the time to prune them.
Lavenders are also treated like sub shrubs
Small, low shrubs such as Lavender, Periwinkle and Thyme, and many members of the family Ericaceae, such as Cranberries and small species of Erica, are often classed as sub shrubs. As far as pruning Lavender is concerned there are perhaps two schools of thought on this – either prune back the flowered shoots in autumn or spring. Doing this in the autumn is good in that there’s till time for new growth to be put on before winter, which helps maintain a nice compact shape to the plants over the colder months. However, if the weather is really cold you may suffer from some die back, so some people leave pruning until the spring. Nevertheless, small amounts of frosted growth can be tackled by further light pruning in the spring so that new vibrant growth is stimulated. Take your pick! In both cases pruning should be limited to the sappy top growth and should avoid cutting into the older woody stems.
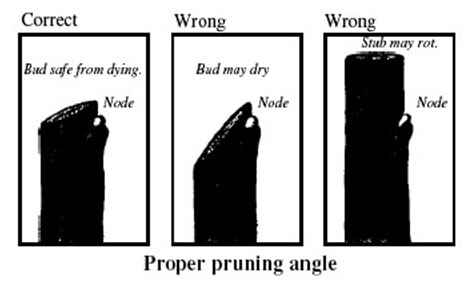
It’s important to get the right pruning cut to avoid damaging shrubs and/or letting in disease
Whilst we’re talking about pruning sub shrubs it’s also worth remembering when to prune different flowering shrubs. There are two basic groups, one which flowers in summer and autumn (‘late flowerers’) on the tips of shoots that grew earlier the same season. This group includes Buddlejas, large flowered and cluster flowered Roses, Caryopteris and some later flowering Clematis hybrids (as well as sub shrubs like Hypericum). These should be pruned back hard to new buds in spring as they appear, so as to encourage development of these into strong new flowering shoots. I’ve tended to prune my Buddlejas a little later than the Hypericum, as late frosts may do damage to the new buds and therefore it’s a good insurance policy to wait until you can see healthy, strong buds to cut back to and the risk of really cold weather has passed. I’ll probaly prune mine later this month or in early March at the same time as I prune back my Dogwoods to encourage new stems that create great winter colour.
Buddlejas are ‘Late flowerers’ and need hard pruning in the spring
The second group (‘Early flowerers’), includes plants that flower in spring on shoots which grew the previous season and includes Philadelphus (‘Mock Orange’), Forsythias, flowering Currants (Ribes), Weigelas and the ‘Beauty Bush’ (Kolkwitzia). Though its is perhaps less important to prune these, it can be done to tidy up the shrub immediately after flowering, by removing the branches that carried the flowers. This also encourages new growth to be put on alongside other shoots that have already grown but not flowered – these shoots must be left unpruned and will carry the flowers next season.
‘Early flowerers’ like Weigela, should be pruned after flowering
With Spring round the corner and thoughts of summer-flowering bulbs, this week’s timely question comes from George White of Walthamstow, London:
‘A friend has some magnificent border plants which he knows only by the name Foxtail Lilies. What are they, and are they easy to grow?’
George, these plants are a glorious addition to summer borders and belong to the genus Eremurus. They are also known as ‘Desert Candles’ and are hardy herbaceous perennials in which tall spikes of star-shaped flowers arise from a ring of narrow, pointed foliage. The best and tallest are the series known as ‘Shelford Hybrids’, whose flowers vary in colour but are often a pleasing soft, pinky beige. They can reach 2.75 metres tall and bear hundreds of primrose-sized flowers.
Eremurus stenophyllus bungei is the yellow-flowered parent of these hybrids and reaches 1 metre in height. The other parent E. olgae, is late flowering, bears pink blooms, and reaches a height of 1.5 metres.
E. stenophyllus AGM- picture from RHS
E. robustus
E. himalaicus
Other fine examples are the very tall E. elwesii with soft pink flowers (and it’s white-flowered variety ‘Albus’), and the even taller (up to 3 metres) E. robustus with pinky yellow flowers on spikes up to 1.2 metres long. Eremurus are quite easy to grow as long as they have a free draining soil around their roots and have lots of warm sunshine. Here’s a video on how to plant Eremurus bulbs. It will probably be at least one season before you see any flowers.
If you can’t wait until next year then now’s the time to think about some other unusual summer flowering bulbs for your borders.
Camassia (Quamash) are easy to grow and are attractive late spring performers that look good with late tulips (I have some whose lavender-purple flower spikes contrast well with the orange tulip ‘Ballerina’). C. cusickii is 200mm tall with lots of pale blue flowers, while C. quamash (syn. esculenta) has spikes of white to deep-blue flowers and grows to 250mm tall. C. leichtlinii, 900mm tall, has white or blue star-like flowers and C. semiplena has semi double creamy flowers on sturdy stems.
Other summer bulbs of interest are Fritillaria persica ‘Adiyaman’ which stands between 800mm – 1.2 metres tall and in May produces unusual, deep -hanging bells of rich plum-purple. Leucojum aestivum ‘Gravetye Giant’ is probably the best of the summer flowering ‘snowflakes’ standing 300-500mm tall and has wide- hanging white bells in April and May.
Camassia leichtlinii
Fritillaria persica ‘Adiyaman’
Leucojum aestivum ‘Gravetye Giant’
If you are in a frost free area or able to lift your bulbs to protect them from winter frost, then Watsonia is a colourful spike- flowered border plant. And why not go for a touch of the exotic with a Canna or two? (better make that 3 at least). Summer flowering bulbs are already available to buy online through various well-known nursery companies and should soon start appearing in your local Garden Centre or nursery. Plant them in the spring as the soil begins to warm up.
Conifers can be pretty! Flowers like these help to relieve otherwise rather monotonous foliage. Picture by Anne Burgess
An interesting question about propagating from hardwood cuttings, this week, from Gary Oakeshott of Dorset:
‘Some conifer cuttings I took during the summer have [produced a hard knobbly base but not roots. what has caused this and will affect rooting?’
Hmm.. Gary, this knobbly surface is called callus and usually develops around a wound when favourable conditions for rooting are provided. It seems to be essential in the process of forming roots. The acidity of the soil can affect the production of callus: too much lime and the callus may be hard and prevent roots from breaking through.
I suspect the cause of your problem might be that you’re checking your conifer cuttings for root growth too often? A case of ‘digging up the plant to see if it’s growing’!! Each time you lift the cutting, another tiny wound may have been made and this will have had to callus over before rooting can occur. I suggest that you remove the hard callus with a clean, sharp knife and replant your cuttings- but this time be patient and leave them alone fora good 2-3 months! Here’s a simple video of the conifer propagation process- useful if you want to extend a hedge with your own cuttings, for example.
The process of wounding cuttings to encourage rooting is an interesting one. You might think it opens up the risk of letting in disease, and whilst this is a possibility, the wounding of the base of woody cuttings seems to be beneficial, especially with those species that are difficult to root, such as Rhododendrons. the wound appears to stimulate root formation, and the cut area allows the roots to emerge from the stem more readily. For the greatest benefit, the cuttings should be treated with a hormone rooting compound after wounding prior to sinking them into compost.
As we roll on towards Christmas, you might be lucky to receive a present of some bare rooted shrubs like George Wellbeloved from the Scottish highlands:
‘I’ve been given a birthday present of some shrubs but the ground is frozen in the garden and I’m not sure what to do with them. Can you advise me?’
A belated Happy Birthday George, what a great idea for a present! Most shrubs and climbers, and especially deciduous ones sent out by mail order, are despatched with bare roots, not in containers. If they dry out they will die, so when they arrive, and there is not soil at all on the roots, stand them in a bucket fo water for a day or two in a cool, frost-free place until the soil is in a fit sate to plant them. Alternatively, store them for longer periods with their roots in damp compost – this can be ‘spent’ (old) rather than new if you have some (from emptying out summer flowering hanging baskets or other containers, for example).
If the plants arrive with some soil, on the roots, probably wrapped in netting, these are best watered carefully with a can fitted with a fine rose and then stored in moist compost. As soon as possible after arrival, dig a trench in a vacant bed of soil, lay in their roots, and replace the earth. ‘Healed in’ like this the shrubs will stay in good condition for many weeks until the planting site is frost-free, fully prepared and in good condition.
When planting shrubs there are two schools of thought. The traditional method is to mix a good supply of well-rotted manure with loosened soil from the bottom of the planting hole, but if you can’t get hold of this, try using your own compost, or spent growing bags (you might be able to get hold of these from commercial tomato growers). Spent mushroom compost is also a possibility, as it usually contains some manure, but as it also contains chalk it should not be used for lime hating plants. Lastly, you can use shop-bought composts or bulky organic materials, though the latter can be pricey. Add a few handfuls of bone meal to the material you use to encourage root development.
The alternative method is to raise the fertility level of the soil around the planting site so that the plant’s roots are encouraged to spread out and so lead to more vigourous growth as the roots are encouraged to seek out nutrients more than if all the goodness is concentrated in the planting hole. Of course for ‘belt and braces’ job you can do both, or use your judgement about whether and how much fertility needs to be added to the site of the planting. Increasing fertility in the space surrounding the planting hole may be impractical where there are already plants in this area or where you’re planting into a lawn. Here’s a useful guide to planting bare rooted trees.
You can also consider adding Mycorrhizal fungi in the planting hole. These are now widely available in Garden Centres and online. As the RHS says:
‘Mycorrhizas are beneficial fungi growing in association with plant roots, and exist by taking sugars from plants ‘in exchange’ for moisture and nutrients gathered from the soil by the fungal strands. The mycorrhizas greatly increase the absorptive area of a plant, acting as extensions to the root system.
Phosphorus is often in very short supply in natural soils. When phosphorus is present in insoluble forms it would require a vast root system for a plant to meet its phosphorus requirements unaided. It is therefore thought that mycorrhizas are crucial in gathering this element in uncultivated soils. Phosphorus-rich fertilisers are widely used in cultivated ground and not only reduce the need for this activity but are thought to actually suppress the mycorrhizas. For this reason it is best not to use phosphorous rich fertilisers in conjunction with mycorrhizal fungi.
Neither fungi nor plants could survive in many uncultivated situations without this mutually beneficial arrangement. Mycorrhizas also seem to confer protection against root diseases.’
Root tips showing mycorrhizal fungi (the white coating)
So it’s coming up to Christmas and those traditional displays of greenery in the house like Mistletoe, Ivy and of course Holly are being assembled as I write. But someone in Cumbria has a problem. George Alloway in Cockermouth asks:
‘My holly bush never seems to have any berries, but my neighbour’s has loads. What’s wrong?’
George, it sounds like a classic case of ‘not the right holly’, or rather that you probably have a male bush and your neighbours a female- only the female will produce fruit (berries) and this plant is probably being pollinated by yours!
Formally clipped Hollies at Kew Gardens
Hollies (Ilex) mainly come in male and female varieties and so you need both to ensure that you have berries. Hollies, apart from their decorative value around the house at Christmas, are a wonderful small tree or shrub to have in your garden, especially in a border that runs into woodland (as is the case in Old School Garden) – they are a classic ‘understorey’ or edge of woodland plant.
So, if you want berries, make sure you have a mix of male and female plants or go for a self fertile variety like ‘J.C. van Tol’ which is a regular fruiter, has oval-elliptical leaves and grows into a conical shape up to 6m. It also can be grown as a standard tree (i.e. having a bare stem of at least 1 metre length).
Ilex ‘J.C. van Tol’
Ilex x altaclarensis ‘Golden King’
Ilex aquifolium ‘Silver Queen’
You could also buy a female variety to sit alongside your other, probably male, bush. A good variety is ‘Golden King’- despite the name, this is a female! Just to confuse matters further there’s a lovely male variety called ‘Silver Queen’ – variegated with broad and irregular white-yellowish margins and dark olive-green centres, this one grows to 4-6 metres high. It has the added feature of new leaves being tinged light pink.
I guess in these days of tolerance on sexual orientation, we shouldn’t get too het up about these naming confusions!
Depending on the shade amd soil conditions many plants can be grown under trees
This week’s question is one that affects many gardens- the impact of trees on other planting. Jenny Bough from Gateshead asks;
‘Part of my garden is in shade for most of the day because of trees in a neighbour’s garden. Since I cannot remove the trees, what can I do to improve the conditions for my plants? And what plants will grow well?’
If the trees grow close to your garden the shade will probably be dense, and the soil may well be permanently moist from overhead drip. If so, you can improve the drainage by adding coarse grit to the soil under the tree and plant moisture- and shade- loving plants such as hardy Ferns, Primula species, Violets and Periwinkles. If you have lighter or more dappled shade then there are plants which like these conditions: Lilies, hostas, Azaleas, Rhododendrons and Blue Poppy (Mecanopsis) for example.
Epimedium- a good choice for dry shade
If the tree is close to your boundary, or indeed within your garden, and its roots make the immediate area very dry and shady, then plants such as dwarf Cyclamen (C. hederifolium), small-leaved Ivies and Epimedium should do well. You could also try to dig out a few pockets where bulbs can be planted. If you can mix plenty of compost or other organic matter into the soil then many more options are open to you as the soil will be relatively nutritious and will retain moisture better. The London Orchard Project have added a helpful piece of advice:
‘Wait until the tree has established before any underplanting is carried out. Then be sure to plant perennials, as (these), including trees, prefer a fungally dominated soil, whereas annuals prefer bacterial domination. Also, disturbing the shallow feeder roots of the tree can be minimised by not having to replant/remove annuals.’
Some trees produce roots close to or above the soil surface, which then send up new shoots or ‘suckers’; e.g Poplars. If you want to grow grass over these root runs, once again the best approach is to ensure a good depth of topsoil above the roots and so give the grass a good layer of soil to grow on and reduce the chances of suckers appearing. Another approach- and one I’ve used in Old School Garden under a large Black Poplar tree- is to cover the immediate surrounds of the tree with landscaping fabric and then use a decorative aggregate or other material as a covering (I’ve used purple slate). This has reduced, but not entirely removed the problem of suckers appearing. Alternatively, there’s nothing else for it but to keep pruning/mowing off the shoots as they come up. This is best done in early summer after the tree has put on its initial growth spurt- doing it in the dormant season will only encourage more suckers to appear in the new season.
Some trees (in this case a Maple) will send out shallow or surface level roots from which new shoots or ‘suckers’ will grow
With winter around the corner, this week’s question comes from Penny Rose in Hampshire:
‘I’ve moved house earlier this year and planted some fuchsias in the garden. I bought these from a local nursery and they are described as ‘hardy’. Can I leave them in the ground over winter and if so do I need to protect them in some way?’
Well, Penny, In the coldest parts of the UK you’ll have no option but to dig up your plants and put them in a conservatory or greenhouse. It’s also a good insurance policy to take cuttings (preferably in early autumn) to bring on new plants in case of a particularly severe frost or disease problems. In warmer areas you can leave plants in the ground but take steps to protect them by not cutting down the stems in Autumn, and by making some holes in the ground around each plant with a a border fork, to help water drain away- particularly important if you have heavy soil that retains water. Once this is done you should put a mulch of leaf mould, wood ashes or soil around the base of the plant to protect it further. Some Fuchsia varieties are hardier than others; the toughest are F. magellanica, F.’Riccartonii’ and F. ‘Mrs. Popple’ which can withstand temperatures down to between -5C and -15C.
So in somewhere like Hampshire, you’ll probably be OK to leave your Fuchsias outside (but take the action suggested above). For me here in Norfolk, it’s a little more difficult to be sure, so I’ll leave some outside (in a pot in a warmish courtyard) and either bring others in or mulch my sandy loam soil (forming drainage holes isn’t as important).
Rosa rubiginosa- a wild or species rose that needs minimal pruning
This week’s gardener’s question comes from a Miss Flora Dunmore of Argyll, and focuses on roses:
‘I’ve just inherited a big garden with lots of different roses, icncuding bush, climbers and ramblers. Can you tell me why, when and how to prune these, please?’
Flora, what a lovely inheritance! First why do you prune:
to remove weak, spindly and diseased shoots
to encourage strong new shoots to grow from the base of the plant each year (these bear the best flowers)
to open out the centre of the bush to increase air circulation (this helps to check disease)
to create a pleasing (usually symmetrical) outline to the plant.
When to prune depends on the types of roses you have:
For large-flowered bush roses the traditional months are March in the south and April in the north of England (and possibly even later in Scotland), when growth is just beginning- but pruning can be done safely any time from November onwards in the south, provided you are prepared, if necessary to remove some frost damaged growth in spring. Most importantly never prune during a frosty spell.
For ramblers the best time to prune is after flowering, probably late August (you can dead head throughout the flowering season to achieve much the same result)
For climbers, the best time is October, when the recurrently flowering types have finished their show, but it can be done later if the weather is mild.
The techniques for pruning vary according to the type of rose:
For large flowered, bush roses cut away completely any diseased,weak and spindly shoots as well as removing all dead stumps from earlier pruning (use a fine toothed saw if they are particularly woody and thick). If there are many canes criss-crossing in the centre then remove a few to open out the bush. If two shoots are growing so that they rub each other, remove one. Finally, cut the remaining shoots back to about 200-250mm long. Harder pruning than this will produce larger, but probably fewer flowers – but it won’t harm the rose.
For smaller, cluster-flowered roses do the same as for larger flowered varieties but leave the main shoots 300-350mm long. If the main shoots have side shoots, the latter don’t need to be removed, provided they are fairly thick (say about a pencil thickness), but they should be cut back by about two-thirds of their length.
Climbers should be pruned to establish a permanent framework of significant branches from which flowering stems are produced. To achieve this cut back side shoots to one or two buds from the point where they branch out from the main shoots. If the plant has become bare at the base, cut one of it’s main shoots hard back to encourage new growth from ground level.
Ramblers need to be pruned to encourage flowering on young shoots that grow from the base of the plant each year. To achieve this cut out completely the side shoots that have finished flowering and tie in the new shoots in their place. If in some years there are only a few of these, some of the old shoots (which can still produce flowers) may be left in place, but their side shoots should be shortened by about two-thirds.
Rambling roses need a framework of stems establishing, with selective removal of the oldest to encourage new growth from the base and flowering shoots pruned after flowering
Miniature Roses which produce a thick tangle of tiny, wiry shoots, require these to be thinned out. Remove dead or diseased shoots and trim back the rest by about two-thirds. It may be difficult to find a bud to cut back to, so just clip them over so that they look neat.
Shrub roses vary enormously in size and type, so it’s difficult to give a general guide to pruning. Wild (species) roses should not be pruned at all, other than for removal of dead or diseased branches. Most of the old garden roses such as Gallicas, Damasks, Albas, Centifolias and Bourbons will give more flowers if they have their side shoots shortened by about two-thirds in winter. Modern shrub roses that are in fact like giant versions of the smaller cluster types should be pruned in a similar way to those – but reduce their height by only about two-thirds. The Rugosa family needs little if any pruning, although for the less dense kinds, a few older canes cut back every two-three years will encourage bushiness.
If you have newly planted roses then you should prune them even harder than established plants so that a strong framework of new shoots will be built up for the beginning. Leave their shoots only about 50-75mm long. Prune autumn planted roses when you do your established ones and spring planted ones at planting time. But, don’t prune climbers at all in their first year, as they take longer to establish.
Pruning cuts are easiest with secateurs. Ensure that a clean cut is made with clean blades (these should be sterilised with surgical spirit/alcohol to avoid passing on diseases from plant to plant). Cuts should be made about 6mm above a bud on a shoot; the cut should slope down towards the side away from the bud. Cutting to an outward- facing bud encourages the bush to spread outwards, but don’t worry if you can’t find one exactly where you want to cut- often a bud lower down will grow away more vigourously in the direction you want, and you can always trim it back later.
Clean secateurs with surgical spirit or alcohol before pruning each rose plant
Winter Tares- good at protecting the soil, smothering weeds and maintaining nitrogen in the soil, once dug in. Picture from Garden Organic
At one of my recent ‘Grow Your Own’ classes, one of the participants raised an interesting question about Green Manures (GM’s).
He wondered if it was actually worth growing green manures as additional sources of nutrients. He reasoned that as they use up nutrients from the ground there isn’t any real gain in the nutrients avialable to follow on crops.Like me, he had also heard that legumes, (peas and beans) do fix nitrogen from the air and therefore their roots are a source of additional supplies of this if dug into the soil. And he also mentioned that deeper rooting plants like Comfrey tap into nutrients that wouldn’t otherwise be available to plants with shallower roots, so making these available via their leaves once composted, and also from a ‘tea’ made from these and applied as a liquid feed. So is this all correct?
I decided to contact my colleagues at Garden Organic and ask for their advice on all this and got a very interesting reply from Francis, their Horticultural Research Manager:
“Green manures and nitrogen
Legumes, when the temperature is warm enough and they have the right bacteria, will fix the nitrogen they need from the atmosphere. It is very true, and seldom appreciated, that if a legume crop (eg beans) is harvested then most of this nitrogen is taken away and not left in the soil. However, if the legume is grown as a green manure and dug in whole (usually in an immature state) rather than being harvested then there will certainly be a net benefit; nitrogen fixation (directly or indirectly via animal manures) is the main source of nitrogen for agriculture and horticulture in the absence of artificial fertilisers.
Non leguminous plants can only take up nitrogen from the soil as inorganic ions (ammonium but mainly nitrate). The latter is very soluble in water and so easily washed out by the rain and so lost from the soil, contaminating drinking water and rivers etc. A lot of work was done (some by Garden Organic) to demonstrate that one of the best ways of preventing this was by growing winter green manures such as rye. When this is dug in the nitrogen they have taken up is mineralised to be made use of by following vegetable crops.
Green manures and other nutrients
Other nutrients (especially the metals such as K, Mg etc) are more tightly held on the surface of the soil particles and so are not easily leached so it is true that green manures are less important for keeping them in the soil. However, some do have specific effects (eg buckwheat can help mobilise phosphorus and chicory is deep rooting and so is a source of trace elements from the subsoil that may have been depleted nearer the surface). All green manures will add organic matter to the soil which helps with structure and also stimulates microbial activity, important for general nutrient cycling.”
So, the net result is that there are several good reasons for using GM’s over the winter, including maintainingnitrogen where this would leach away from unprotected soil, weed reduction, protecting soil structure, and the addition of organic matter to help moisture retention and soil structure. However, the legume contribution to soil fertility (assuming you grow these to produce food), is of questionable value if left in the soil and dug in. Better to add animal manure or your own compost to boost nitrogen levels.
Comfrey- reaches the nutrients other plants cannot reach…and you can out them into your soil via a (smelly) tea made from their leaves
Further information:
Garden Organic and Cotswold Seeds have produced a useful advice booklet on soil improvement. It’s available as a pdf to download for free at ‘Sort out your Soil’


 R. ‘Felicité Parmentier’
  R. ‘Königin von Dänemark’


 As we roll on towards Christmas, you might be lucky to receive a present of some bare rooted shrubs like George Wellbeloved from the Scottish highlands:
 So it’s coming up to Christmas and those traditional displays of greenery in the house like Mistletoe, Ivy and of course Holly are being assembled as I write. But someone in Cumbria has a problem. George Alloway in Cockermouth asks:


